Hello there! In today’s tutorial, I’m going to teach you how to create your own dropshipping website using WordPress and Aliexpress.
Topics Covered In This Tutorial
Getting ready with domain and hosting Installing the WordPress platform Installing the Flatsome Theme Importing products and Marketing your dropshipping website The best part of this tutorial is you don’t have to be an expert in building websites. It is completely user-friendly with ‘Drag and Drop’ features, so it’s like a child’s play to build and market your website. You can add as many features as you want and customize it easily and give it a professional look. WordPress is a CMS based platform which demands a very low level of technical expertise for building websites. In a sense you need not be a master of web development, just a little knowledge and practice will suffice for developing great e-commerce websites.
After you have finished learning this tutorial, you can build your dropshipping website within 2 hours. What’s more? Follow the steps carefully and build one for yourself.
You can watch the video version of this tutorial here
What is the difference between WordPress and Shopify?
WordPress is much more customizable and very cheaper than Shopify. Using Shopify, you pay 299$ per month whereas WooCommerce is free of cost. WordPress takes one-time fees for your website, and it is much more flexible than Shopify. Getting ready with domain and hosting You can get 70% off siteground here
Purchasing the Hosting – The first step in setting up a website is to purchase a domain and hosting. You can avail a 60% discount by following the link on dropshipping.com Installing WordPress – The next step is to install the most popular WordPress platform on our domain. Installing Flatsome Theme – You shall learn to install best rated, and best-selling e-commerce website themes called the Flatsome Theme. Importing Products– In this step, learn to import products from Aliexpress onto your WordPress websites using the Alidropship plug-in. Marketing – Final stage of this tutorial is to attract traffic to your dropshipping website, gradually improve sales and score highest search engine rankings without much hassle. Setting up the domain and hosting and create your own dropshipping website using WordPress and Aliexpress. Click on the subscription link to go to Siteground.com. I’ve been using Siteground.com for five years now. It is the fastest and the most reliable hosting service provider. It also has 24/ customer support with a 30-day money back guarantee.
If you scroll down, you can see the ‘choose a plan’ tab. There goes a list of many plans to choose from. Choose the one that suits your e-commerce website requirement.
The ‘GrowBig’ option is the most recommended one because it allows the hosting of unlimited dropshipping websites. If your website is a blog or a small business, Growbig is the best option. For high-end e-commerce websites, ‘GoGeek’ option is recommended. Press the ‘order’ icon underneath the list like this,
Our next step is to set up a unique domain. So after you place the order, you will have a page like this to input your domain name for your dropshipping website.
Specify the name of your website in the input box and click on the ‘proceed’ button. Don’t forget to checkmark the ‘Domain Registration’ option in the bottom left before clicking on the ‘proceed’ button.
Finally, you have to provide the account information for fund transfer.
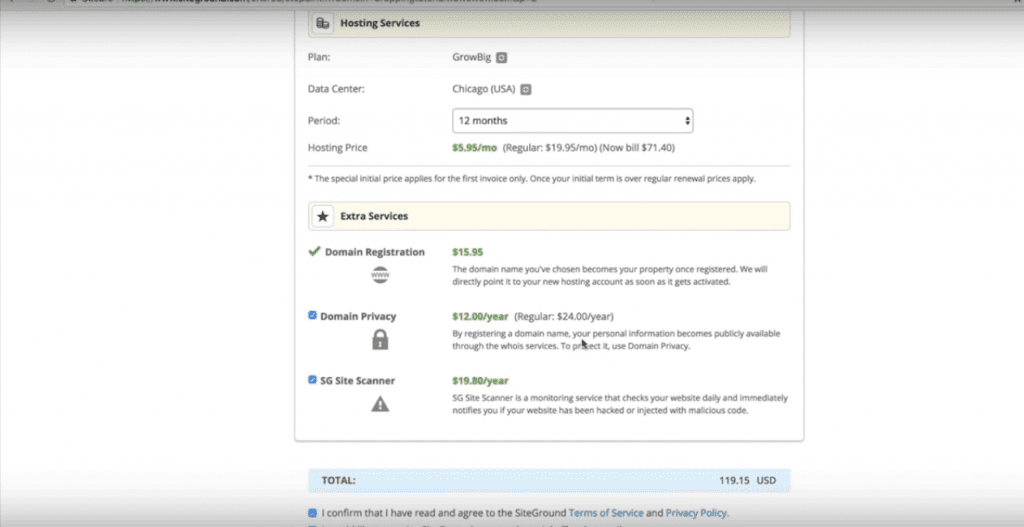
If you scroll down this page, you will have the option to choose ‘period’ for your domain name. Then, you can choose to protect ‘domain privacy’ and an ‘SG site scanner’ to safeguard your website from hackers and malicious elements on the internet.
It is highly recommended that you check both these options to keep all kinds of threats to your e-commerce website at bay. Click on the ‘Pay Now’ button to confirm the payment. Congratulations! You have successfully purchased your domain for your dropshipping website.
Understanding the dashboard Once you have purchased the domain, you have a personalized dashboard that you need to be familiar.
After you log in, you will see a page with many tabs like Home, My Account, Support, Billing, Referral Deals, Add Services and Resources. Browse each of these tabs to understand the purpose and the benefits provided by the plan you have opted with SiteGround. The dashboard includes all info related to your hosting plan, all the domains you own would be listed here, and it is important to familiarize yourself with how to resolve issues using this dashboard.
Installing the WordPress platform In the process to create your own dropshipping website using WordPress and Aliexpress you must have understood the know-how of your SiteGround dashboard.
Our next step towards dropshipping your website would be installing WordPress to your hosting account. In My Accounts, select the domain for which you want to install WordPress and click Manage account. It takes you directly to the cPanel, which looks like this:
Select WordPress from the Autoinstallers section. Install the CMS platform by selecting ‘Install Now’ button. Choose the appropriate domain name from the list. Enter the website name and description. Next, provide login credentials for WordPress and the other fields are self-explanatory so just fill the ones you are sure of. If you have doubts, leave it as such and click on Install.
WordPress Workspace After installing WordPress, you will be provided with an administrative URL that directs you to the WordPress dashboard.
This is the setup where you will build your website. As you know, WordPress is a completely user-friendly platform. The dashboard is also very simple to use and easily understandable.
The left of the dashboard contains a number of tabs which you can use to manage and maintain your website. The ‘settings’ tab is for controlling and managing all the information relating to your website. Just browse through each of them to get an overview of their functionalities.
Creating web pages using WordPress It is very less time to consume to create attractive and creative web pages on WordPress. Web pages are crucial parts of a well-built website. They need to be precise and engaging the readers with their content.
Navigate to the ‘Pages’ tab on the left side of the dashboard. Select option to ‘Add new page’ and input the title of the pages one by one. After this, you can switch between pages and view them individually in the ‘All Pages’ tab on the left. Now you are ready to edit these pages and add attractive themes called Flatsome theme to make the website look more professional and elegant.
Installing the Flatsome Theme Although there are numerous themes available, the Flatsome theme is the highest rated WordPress theme owing to its customizable and flexible conversion features. It enables you to promote your products with much ease and helps in categorizing products so that your website looks organized and decluttered. The most attractive features of this Flatsome theme include,
Drag and Drop page builder SEO optimized code Catalogue mode Built-in wish list Quick view features You can purchase the flatsome theme here
After you have installed the Flatsome theme using the installation wizard, you can see an amazing list of themes from Flatsome in Appearance>Themes tab, on your WordPress dashboard.
Choose the most suitable theme for your e-commerce website and click on ‘install’ button at the top.
Now click on ‘Activate’ to open the Flatsome setup wizard.
Follow the steps in the wizard to complete the setup. It is self-explanatory, so I will not detail this much in this tutorial. You are now ready to add more features to your website that will talk to the visitors and multiply your revenues out of it.
Installing plugins Plugins are basically like the apps for your website. These will enhance the way you customize your website, and you can choose to add additional features using these plugins. WordPress offers thousands of free plugins to choose from, that is why it is the favorite of all website builders out there.
After you have activated your plugin, it gets listed in the widget section on the left pane of your dashboard. You can make changes and add functionality to your plugin as and when you want. You can choose to place the plugin where you want for example here we have a facebook like a box, and I have chosen to place it in the footer.
Using the Contact Form For every e-commerce website, a contact form is a must-have.
The primary communication via emails is done using this form.
Firstly, you need to install Contact Form 7 plugin. After you have activated the plugin, go to Contact>Contact Forms.
You can save the changes you make in preset contact forms by clicking the ‘save’ button. Make sure to specify the destination mail id under the Mail tab. All the contact requests will be reverted to this email id.
Our next step is to add the Contact form to your website.
Go to Edit page>UX builder>Select the form you want to add.
Again there are options to choose the most suitable layout for the contact form.
Designing your web pages To edit a webpage, on your dashboard click on ‘Edit page’ tab on top. You can choose manually to add elements to your website, or you can choose the Flatsome studio tab on the left pane. It gives a range of pre-built templates to make a dropshipping website in no time. Choose your favorite design, import it onto your website and it’s done.
So after this, you have a fully functional website, you just have to edit a little bit, and it shall be up and running! Let’s take a look at how to edit the pages. The pre-built flatsome theme has many elements like categories, sliders, banners, menus etc.
All you need to do is edit the text suitable for your e-commerce website, or change respective images, add videos or flash elements and drag and drop elements wherever you want. It is as simple as it sounds.
You can also choose to mix and match elements from various templates and merge them into one. Explaining every single step in designing the e-commerce website would be out of the scope of this tutorial.
For reference, you can check out my other tutorial on ‘step by step build and create an e-commerce website from scratch. Let’s head to the next part that is theme customization using ‘Theme Customizer’.
Every WordPress theme has an inbuilt ‘theme customizer’. This enables you to decide on the landing page of your website, or you can add and edit headers and footer using the Footer widget, make changes in page layout, share icons, adding menus, etc.
Creating Header There are preset headers under the theme customizer; you can select any of these to save your time. You can make modifications as you like in these preset headers and make it suitable to your needs.
Purchasing a logo The logo is one important element that speaks about your business. So it is indeed essential to put in a little time and effort to select the most appropriate logo and fit it into your website. I highly recommend Fiverr.com for purchasing a logo at reasonable prices. You can specify your price range and get your logo done. Once you have purchased it, you can now upload the logo onto your website.
Under the theme customizer, you have a ‘logo and site identity’ tab. Choose the logo file location and select the logo. Whoa! Your logo is now visible on your website.
Adding Images Adding images to your website is like adding a cherry to the pie. If you are looking for free images and icons of various categories, you can check out freepik.com, unsplash.com, pixabay.com etc. These offer an amazing range of free images to download for free. So you just need to upload the image to your site and enhance the look by multiple folds.
Go to Edit pages> UX Builder on the WordPress dashboard and upload the images wherever you want on your website.
Creating menus For creating menus, navigate to your WordPress dashboard>Appearance>Menus.
Select the pages where you want the menu, appropriate input text and click on ‘save menu’.
Creating Footer Footer is placed at the bottom section of every page. It contains widgets like ‘Facebook like box’, a sitemap widget or any copyright notices, list some featured products, and you can list out all the pages of your website in the footer.
You can design and edit the footer under the customize tab on your dashboard. We can also add featured products in the footer section after you have listed or imported the products on your website.
Under the widget section, select WooCommerce products and start listing the number of products you want to feature in the footer section.
By now, you should have learnt to do the following things at once,
Design your homepage Adding header, logo and the footer Activating widgets and plugins Inserting images Customizing contact form Customizing and merging elements in a web page Using predefined templates from flatsome theme studio Activating WooCommerce WooCommerce is one of the fast-growing trends in the online business sector. Using WooCommerce, you can import products, sell them and make a lot of money without any hassle. It is going to fetch great value for your internet business.
Go to WooCommerce>setting tab and run the setup wizard to complete installation of WooCommerce. The wizard is self-explanatory, and you have to keep filling in the details in order to enable payments through WooCommerce.
This wizard basically creates an account with jetpack and WordPress to make the payment criteria much easier and timesaving. Once the wizard is completed, we move on to creating products page and importing them on your website.
You can add details about your product here one after another.
Details like name, description, sale values, discount period, inventory, shipping details and dimensions, linked products that you recommend to your customers etc. can be filled to complete designing the product sales page.
Don’t forget to add an image of your product from the image gallery and select or add an appropriate category on the right pane and then you can publish it online. Here is a sample product page.
The benefit of activating WooCommerce on your website is that it automatically adds the pages like customer account, shop, cart, check out etc. Once you see the list of pages added in your website, you have to create separate menus for each of them. You can go back to creating a menu section for quick recall.
For your products, you can add widgets like Filter products by rating, Filter products by price, Upsell products, Cross-sells products etc., to make it easy for the customers when they view your product.
Enabling Payments on your website This is the most crucial stage if you create your own dropshipping website using WordPress and Aliexpress. The intent of building an e-commerce website is to make maximum revenue out of online reselling, and we are going to see step by step how to do it right away.
Create a PayPal business account Link your PayPal account to the WooCommerce payment methods Add Stripe to your WordPress website by installing the Stripe plugin. Select the WooCommerce Stripe Payment Gateway and activate it Set up stripe as another payment method by providing details of your credit card and linking your stripe account to WooCommerce payment methods Testing the Stripe payment method If you browse through the stripe account, you will be given two publishable test keys which you will use to test whether this method is really working on your website.
Copy and paste these two secret keys in the ‘Test publishable key’ box under the stripe payment method in the WooCommerce settings>payment section.
Enable the ‘test mode’ to make sure the test run is successful.
Before you test run the stripe payment method, you need to set up the shipping details and the charges for shipping your products. Select the shipping zone and set rates for shipping your products to your customers. You can either choose automated taxable live rates (USPS), or you can set your flat cost of shipping your product.
Once you have provided the shipping details, you can test run the product page. Place an order on your website and provide details of shipping address, billing phone, your credit card details etc. Once this is processed, you will get an email notifying that your order has been processed along with your order number and the shipping details.
To confirm if you have received the payment, you can open your stripe account and check the balance. The amount is immediately reflected in the Net volume from sales, and thus your test run is successful!
Congratulations on having set up a safe and secure payment method for your WordPress website. You can now remove it from test mode and run it in real time. Uncheck the ‘Viewing test data’ on the left of your stripe account and use the publishable keys under the Developers>API keys to make your payment method go live.
The same way, on the WordPress dashboard, WooCommerce payment tab>uncheck the test mode and copy-paste these keys in the Live Publishable key input box. Save the changes and publish it on the website. Whenever someone buys a product from your website, you will have a real-time payment.
Linking web pages on your website A secret to attracting huge traffic to your e-commerce website is to have as many links in your website as possible. Linking pages within site build up incoming traffic and make it rank high on search engines.
Select the buttons you want to link to pages using the UXBuilder and mention the hyperlink to that particular page.
When some visitor clicks on the button, it will redirect to that page of the website.
Voila! You are now a professional WordPress website developer. Let us move on to importing products from Aliexpress.com onto your website.
Importing products and Marketing your dropshipping website Importing from Aliexpress.com You have reached the final stage of dropshipping your website, and once you master this, your e-commerce business will bloom in no time making an unbelievable profit out there. Click on the link below to avail a 10% discount, and 30-day money back guarantee on purchasing the plugin for your website. Download the plugin sent to you via email and then upload it to the WordPress platform. After you activate the Alidropship plugin, you can search and import products easily.
Specify the category of your product, enter the keywords, the price range and the purchase volume. Click on ‘apply filter’. Select the product you want to import and click on ‘Add to import List’. You can make changes in the display or description of the products imported from Aliexpress using the UXBuilder. You can add more categories by using the Product categories widget, Product Search widget to enhance the search options for your customers.
Installing a Chrome extension The Chrome extension is recommended because it helps overcome glitches and odds that pop up during transactions. You can continue by adding this extension to your browser.
To get started with importing the products directly from Aliexpress.com, you first need to enter the License key provided to you in the ‘License’ tab in the ‘Alidropship’ widget on the dashboard.
When you browse Aliexpress.com for products you wish to import on your website, make sure to select e-packet enabled products. These have a faster delivery period than those without e-packet and is highly recommended. After all, you would not want your customers to keep waiting for a product they have purchased from your website.
After selecting the products and categorizing, click on ‘import products’ to begin the process of importing it onto your website.
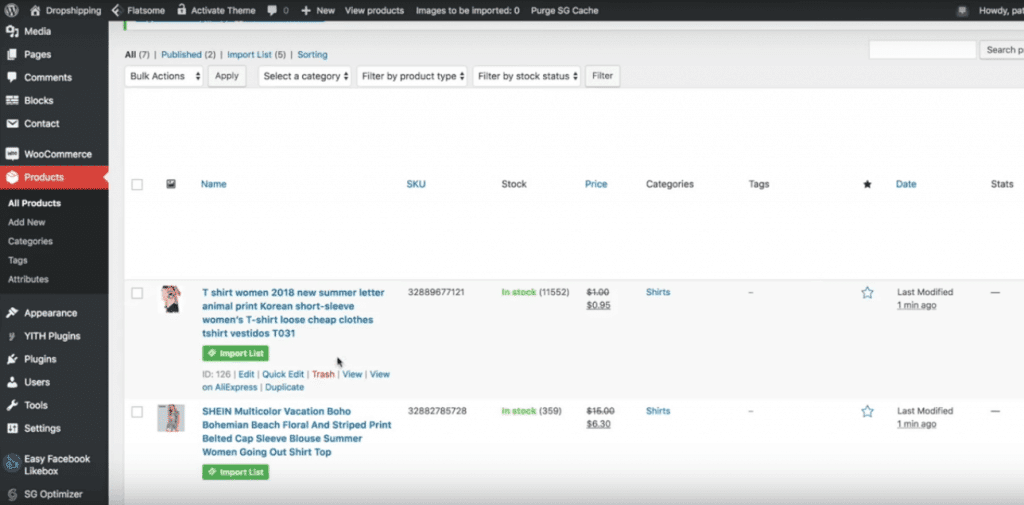
You can check on your dashboard in the Products widget to confirm whether the import process was successful.
You can customize the description of the product, the variables, delete unwanted images and content so that the customers are allured to buy the product from your website. This way you can import as many products as you like directly from Aliexpress.com and display it for sale on your website.
Pricing your products The most incredible thing about dropshipping your website is the pricing mechanism. You can sell the imported list of products at a value higher than its cost price and earn a handsome profit. You will have preset formulas of pricing for the products, and whenever a customer places an order, you get a share of profit without any hard work. No shipping worries, it goes to the customer directly from Aliexpress.com.
To set these pricing formulae, navigate to settings>pricing>pricing markup formula. You can edit the values and ranges as you like and set the share of profit you would like to make out of a product.
Once you start updating the prices, the WooCommerce automatically updates the pricing of all the products on your website, and it’s just that easy.
As soon as you receive an order from a customer the first thing to do is to buy the product from Aliexpress.com.
Specify the customer’s shipping address in the shipping details.
The shipping details can be obtained from the order that you just received from your customer.
Navigate to WooCommerce >order>edit order.
You can specify these details to aliexpress.com, and they will ship the product to the customer.
During purchasing the product from Aliexpress.com, you should notify Aliexpress.com that you are dropshipping so that they don’t send invoices to your customer. Drop a polite message requesting them not to include promo materials and invoices along with the product to the shipping address and confirm your payment.
Helpful tips on how to create your own Dropshipping Website using WordPress and Aliexpress If you want to make your e-commerce even more profitable, by earning 12% cash back on every product you purchase from Aliexpress.com, sign up with certain commission programs like EPN Aliexpress or Admitad Aliexpress. Go to Settings tab on your dashboard and enter the cash back URL given to you. You can use a credit card that gives you cash back to make a few dollars extra during a purchase from Aliexpress.com. During dropshipping your website, you might come across a lot of glitches and technical issues. A useful tip at this point in time is to clear your cache every now and then. This will reduce the loading issues and improve the turnaround time to a great extent. Deactivate your chrome extension when you are not importing products or have finished importing them on your website. Clear browsing history to improve browsing speed. The verdict In this tutorial, you have learnt how to create your own Dropshipping Website using WordPress and Aliexpress. You can now create a fully functional dropshipping website with all features and functionalities to get your business going on the internet. Comprehensive and extended research on CMS and the WooCommerce platform will fetch deeper insights on website dropshipping using WordPress. You must now be able to differentiate between WordPress and shopify and how dropshipping a WordPress website is far more profitable than shopify.
Three cheers for my readers who are now experts in building your own webstore using WordPress!


jackie911
Your Tutorials are great and informative. I am having a problem with AliDropShip. It seems to no longer shows the download in progress (example 25 import 44 items and it takes forever and I mean day or longer and it may not complete, are you or anyone you know having the same problem?
Jackie Tedford
I had posted about Alidropship not working properly. The problem was my Kaspersky Total Security was interfering with the Chrome Extension. It is not compatible with Alidropship Chrome Extension. Sorry.
Albert
Very nice, the Flatsome theme is good. I see that Alidropship website and their youtube channel say that when the their alidropship plugin woocommerce version is used (as in Flatsome) it works best with under 500 listings (goes slow over 500) which is quite limited as opposed to the plain alidropship with WP which can handle up to 10 000 listings with little drop in performance. How limited is the plain alidropship in terms of graphic plugins etc. I see the standard version is limited to some nasty paygates like paypal and stripe horrors 2checkout any comments?