In this tutorial, I am going to teach you how to make an eCommerce website using WordPress and Elementor 2020 from scratch.
WordPress is the most used CMS platform for building all types of websites, including eCommerce websites. Also you will learn to use Elementor page builder to create amazing webpages, which is right now the no.1 and most popular page builder for WordPress. WordPress controls more than 1/3rd of the internet. Majority of big Ecommerce companies like Sony, Bata, EBay and many more, are using if for development and maintenance of their website And the best part about using a WordPress is that you don’t need to learn any type of coding language or any other technical jargon to make your website. It’s a simple drag and drop platform which gives a lot of inbuilt templates and layouts which helps in creating an attractive, user-friendly website. Also, I’ll be providing premade templates that you can easily import and make your E-commerce website up and running in a matter of minutes.
Just going through this entire tutorial will make you ready to make your own website up and running without any external help. This tutorial has helped many people create their website and got their businesses to get an edge over their competition in this brutal e-commerce industry. So go through this easy and self-explanatory tutorial and acquire a skill that will help in your entire life-time.
The entire process which explains you how to make an eCommerce website using WordPress and Elementor 2020 via a step-by-step approach will be thought here. All the info-graphics and pictorial representations are given to make it as easy to understand as possible.
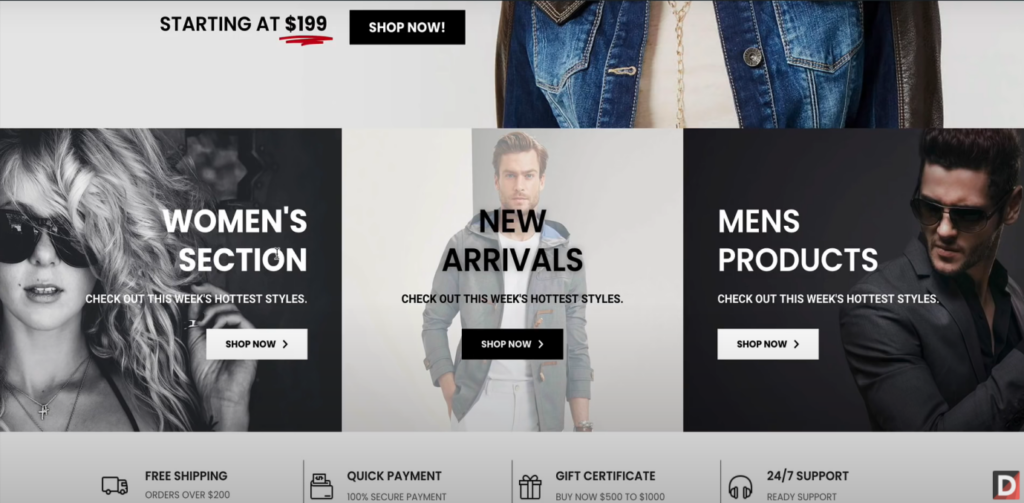
Intro to an Ecommerce Website Above image is an example of a Homepage or Landing page of a typical eCommerce website. Landing pages are very crucial for conversions and making sales on the eCommerce website. So landing page should be attractive containing banners and notifications of sales and reduced prices or new arrivals, especially for ecommerce websites. To get a conversion, you need to emphasis on your most saleable products on the landing page and provide easy linkage to those products. You can display your product categories on the landing page and provide a link to them.
In the top, we have a header which contains our location, phone number, our contact numbers in the left and the right, we have our social media pages icons of Facebook, twitter, YouTube, etc. Below that, we have a shop button which links to the products shopping page of our website. Also we have an Account button, clicking on which users can go their own personal dashboard to access and manage their information and purchases. We also have the logo of our business on the header itself. In the middle, we have our link to our pages viz. Home, About Us, Shop, My Account and Contact Us.
eCommerce Page After that you have all your products and banners, which will learn how to create in this tutorial, shown attractively. After that, we have also had a Newsletter section, where users can subscribe to your website and not notifications and emails about products, offers, coupons, etc. Below that we have our footer, providing information about us and an Email subscription button.
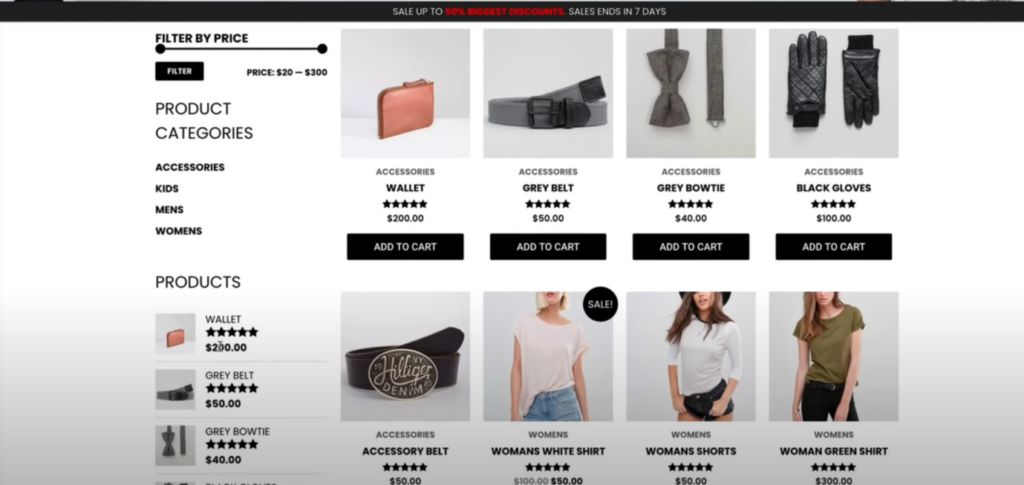
Elementor Product Page
As you can see in the image, the shop page lists all the products available on our website, where users can check any product by clicking on them. On the sidebar, we have a Price filter, list of categories, reviews and video ads of our products. Below every product, there is also review form and related products. Next, we have About Us page displaying your business description and information about your team. And then we have a Contact page where users can contact us using a contact form. Next we have a My Account dashboard which will have a personal dashboard for each customer which contains their personal, purchase and payment info.
You can see the cart page after you purchase something as you can see in the image, where you can change your purchase details, check total amount and proceed to pay. Then visitors can check out by filling the shipping details and paying for the purchase. We will learn to create all these pages step by step in this tutorial so that your website is completely ready to start a business.
Get Hosting and Install WordPress and Elementor The first thing we’ll need to do to make a website is to get a domain name and hosting for your website. You need to select good hosting as your entire website will be based and supported on your hosting site, so you need to check and compare various hosting based on criteria like reliability, technical support, space, securities, design, SEO opportunities etc.
There are several hosting providers in the market and most of them have different offerings. I’ve tried many of them and I’ve finally settled on NameHero for all of my websites. I used it personally and compared it to 22 other hosting and found them the best. As you can see in the image, they have 4 different options, and I recommend Plus Cloud option for an ecommerce website. You can use my link to get a discount. www.namehero.com/darrelwilson
After you order your plan, you’ll get to choose your domain name, that is, the name of your website. You can choose whatever name you want. You can select your domain as per your need to like .net, .biz etc. The next and final step is to fill up your information about Account and Payment details. It is highly recommended to get the ID Protection in the add-on check box as it protects you from spammers. Complete the purchase by click on next pages and going to through payment process.
To install WordPress on your hosting, go to your ‘Client Area’ on your hosting page, click on ‘Cloud Web Hosting’. Next you have My Products and Services, where you will see Plus Cloud package with your domain name, click on the Active button next to it as you can see in the image. Next on the left, you will see ‘Go to cpanel’ button and click on it. On the next page as you can see in the image, scroll down to software category and click on ‘WordPress Manager by Softaculous’.
This will open a WordPress installer, click on Install Now button. A Setup page will open up containing version, your domain name and directory as you can see in the image. PLEASE REMOVE ANYTHING WRITTEN UNDER DIRECTORY. ALSO ON THE PROTOCOLCHOOSE ‘https:/’. In the site settings, you can change your site name and description. We can do this later too. Put on your admin details such as Username, Password and Email, which will be your WordPress login details. On the next page, scroll down the templates as we are not using these and click ‘Install’. Click on the admin URL link given on the next page and your new WordPress is made and live on the internet. You are now on your WordPress dashboard as in the image where you can edit your website.
WordPress General Settings Before you design your website, let us learn to change your settings on the WordPress dashboard. On your WordPress dashboard, you’ll see several tabs to the left of the page, as you can see in the image. One of the most important is the ‘Settings’ tab where you’ll find general WordPress settings. You should change your permalink from ‘Day and Name’ to ‘Post name’ to make your website address easier to understand. This is also very important for your SEO. Another tab on your WordPress dashboard is the ‘Users’ where you customize your profile and the appearance of your WordPress dashboard. Click on ‘Save Changes’ to update it.
To login to WordPress again after you have logout, you need to type your URL in the address bar followed by ‘/wp-admin’ which will bring you to WordPress login page where you can put your Username and Password to login.
Creating pages and Menu You have created a functional website now, it is still not a complete one yet. Now you need to add pages to your website. On your WordPress dashboard, click on the ‘Pages’ tab and select ‘Add New’ option. You can also do this by clicking on the ‘Add New’ button at the top of the page. When you do this, the dashboard will open up a page editor, as shown in the image below, where you can create your new page. Here, you can put the name of the page and design the layout of the page. Click on the ‘Publish’ button and your webpage is created. Here in this tutorial, we will create basic pages like Home, About Us and Contact, which are required by every single website. For now, we are not getting into the contents of the pages which we will do later. You can view these pages by clicking on view below the page name in the WordPress dashboard.
After you’ve created separate pages, you need to create a menu to be able to navigate your way around these pages. Creating a menu is very easy using WordPress. Just navigate to your dashboard, find the ‘Appearance’ tab and click on ‘Menus’. This will open up a menu editor, where you can create and name your menus as you can see in the image below. Once you create a menu, you can assign different pages of your website to the menu. You can always reassign the chronology of the menu items, and you can make a drop-down menu by putting one item under the other by drag and drop.
Now what you should do is click on the ‘Customize’ on the top left as shown in the image and go the ‘Homepage settings’ and change your homepage to ‘A Static page’ and choose your Homepage as the static page, which you have to select from the dropdown list. You do this so that every time someone visits your website, there are always directed to your Homepage. Getting directly on some other page like your About Us, Contact page or your latest posts will not make sense to viewers.
Download Elementor Now we need to buy our page builder Elementor pro which we will be using to build the webpages of our ecommerce website. You can buy it using my link.www.darrelwilson.com/elementor .From their page, you can check various packages available. We cannot use the free version as we need the theme builder and Woocommerce builder services. Once you purchase your package, it open to your account as shown in the image from where you have to click ‘Download Plugin’ and zip while will be downloaded.
Next, you need to upload it to your WordPress website. Go to your dashboard on your WordPress, click on ‘Plugins’ on the toolbar on the left, click ‘Add New’ and your add plugin will open as shown in the image. Click on ‘Upload Plugin’ and select your Elementor zip file and install it. Click on ‘Activate plugin’, and a new ‘Elementor’ button will be created on your WordPress toolbar. Go there and click on ‘Connect and Activate’.
Install WordPress themes Now let us install a WordPress theme to our website. WordPress provides tons of pre-designed themes to choose from, for the appearance of your website. In the “Appearance’ tab of WordPress dashboard, you will find the ‘Theme’ button from which you can install a theme. You can select any theme from the available choices. For this tutorial, we are going to use Astra theme which you can find in the popular menu. Click on ‘Activate’ below the theme’s name. ’The best part about using this theme is that it includes all the necessary setup and functionality that is required for a website to run and it is very compatible with Elementor page builder.
Edit pages with Elementor Now let us learn how to edit our pages with Elementor. Go to the homepage of your WordPress website and click on ‘Edit Page’ on the top black row which will open the page editor. First let us change the page settings on the right side as shown in the image. Change the content layout to ‘Full Width Stretch’ and select ‘Disable Title’ as we want that setting for our homepage.
Now click on ‘Edit with Elementor’ to open the Elementor Editor as shown in the image. Let’s have a quick tutorial of Elementor editor here. To add a new section to the page, click on the Plus button and select the column pattern you want. To add the elements, click on the 9 dots on the toolbar on the left side which will give you a list of elements as in the image. You can drag and drop any of these elements you want on the page and edit them.
Once you click on any module on the page, its edit toolbar will show up on the left. Here in the image, we are editing the Heading, so ‘Edit Heading’ has appeared which contains 3 tabs. 1st is Content which gives various options for the content of the element, 2nd is Style where you can design the style such as colour, size, font etc. of the element. And the 3rd is Advanced where you can put animations and other stuff. Similarly, you can add, edit and style a text box in the same way below your heading.
You can add a button and give a link to any other website which will open on clicking it. You can change the setting to ‘Open a New Window’ so that users don’t leave our site. You can also select an icon for your button from the Icon Gallery. All this will be in the ‘Edit button’ toolbar on the left as shown in the image.
Now instead of designing each element separately, we can use the premade templates and block by clicking the folder icon on Elementor. From the library, you can select the entire page or specific sections or blocks. There are all categories of Blocks available as per your need. For the landing page, choose any block of the Hero category. I have selected the Sound of the future in the example.
Building the Homepage Now let’s create a page similar to the Homepage, we saw in the intro section, using this block. First let’s change the background to the whole section. To edit the entire section, click on the six dots on top of the section as shown in the image. Now you will see ‘Edit Section’ toolbar from where you can use Style to tab to change the background. Here is a LINK TO THE FREE DEMO IMAGES that you can use in your Ecommerce website. Upload these images in Elementor next and select the image for the background. You can change the background overlay if it looks too dark.
Now you can edit the elements of the block as we did earlier. Change the text, colour, font, topography etc. You can use duplicate by clicking on the blue button on the top right of an element. You can add a divider between text boxes and style it the way you like using the ‘Edit Divider. Now edit the button as per our design like adding or reducing Padding to the change the space around it. We will link this button to our Shop page later, you can add an icon to it too. You can change the style and animation for when you hover over it all under the ‘Edit Button’toolbar as shown in the image.
Next put the animated headline from the Pro Elements Sections by scrolling down the element toolbar. You can change the Headline style, shape, colour, topography etc. using ‘Edit Animated Headline’toolbar as shown in the image. You can check all the elements and styles and design things the way you want. There is a lot of trial and error involved in finding your perfect design. Click on the ‘Update’ button to apply these changes to your website.
Next on the landing page, we have to create sections that link to various categories like Women’s section, Men’s section and New Arrivals. Add a new 3 column section, add heading, text and button in them. You can create one and duplicate twice to save time and efforts. Again you’ll have to edit this section’s text, styles, background etc. as we did of the above section. You can use the images given by me for the background for all the 3 categories. While using text editor, to end line and go to next lines, like here, we are doing with Women’s Section, use <br> as shown in the image.
Here we don’t have any template or blocks in this section, so you will have to create and style every section from scratch, which might look a long task for the 1st time. But you can use all the drag and drop and tricks like duplication such as copy the ‘Shop Now’ button made in the above section and change the style of a button or hover instead of making from scratch. You’ll have to see all the options in the Edit toolbar for every element to find out which one fits the best to your taste. This will be a great exercise for your artistic sense. To change the spacing of the contents inside a column, click on the Edit Column icon on the top left of the column to open ‘Edit Column’ toolbar where you can change the padding in the advanced section as you can see in the image below.
You can duplicate the row columns and then edit the text and background for the other two categories of Men’s section and New Arrivals, so you don’t have to style them again. You should style the background image and text colour of each section differently, so each category is visible distinctly. If the first one has a dark background image with light text colour, the next should be opposite. All these techniques, you will learn when you start designing and see these effects yourself. Use background forlay to emphasis on the text above the image, also adjust the position of the text using drag and drop or Alignment option so that it doesn’t cover up the faces in the background image. You can also change the position of the background image using ‘Edit Column’ as earlier. Click on the blue button on top of the section to open ‘Edit Section, and you can stretch the section width to full 100%.
Next below that, we will add icons. For that again first add a new section and insert an Image Box from Elementor toolbar. Choose the icon image for the images I have provided, as shown in the image. These icon boxes are to encourage purchase to give attractive titles like ‘Free Shipping’ and write the description and condition in the text below. Style the image box as you want by changing the image position, size, colour of title and description and text, etc. from the ‘Edit Image’ toolbar. Duplicate it after designing so that you don’t have to design all the icons again. After that you can edit the text of each box for the purpose you want. From the advanced section, you can add margins using Padding, so the page doesn’t look too congested.
You can add borders to the columns, to make it like catchy. Click on the ‘Edit Column’ button and under the ‘Style’ category, you can add a border and design the borders. You can select the border type, width, placement, radius etc. You can select the border only on one or more specific sides like here we have done right border. Check all the designing tools available in the toolbar and select yourself. The more you do it yourself, the more you will get accustomed to all the tools and functions, and it will get quicker and easier for you.
Next, we will add the ‘New Arrival’ section. But before we add a divider between these rows to them look clear and distinguishable. Again add a new section, add ‘Divider’ from the Elementor toolbar and design it using the ‘Edit Divider’ toolbar as shown in the image. Add a text ‘New Arrival’ in the divider which will be used as heading for the next section, so change the size, font etc. as shown in the image to make it look attractive.
Creating Products We have to create products to sell on our e-commerce website now. Products can be Simple or Variable, Simple Products does not have any selection choices such as size, colour or style. In contrast, Variable products have various choices available such as size or colour in clothes. We are going to learn to create both of them.
Woocommerce For creating products, we will need to add a new plugin. So let’s go to your WordPress dashboard, click on the ‘Plugins’ on the toolbar and then click on ‘Add New’ as we did earlier. From the plugin library, search ‘Woocommerce’. Woocommerce is the best eCommerce plugin in my personal experience. Click ‘Install’ and click on Activate. Now the Woocommerce plugin will open as shown in the image. Fill up the form and click on ‘Continue’. Next select your industry, in this tutorial, we are making a Fashion and Apparel website. Next, we have a type of products where 2 options – Physical and downloads are given, select both and click ‘continue’. Then you will get some questions, answer them and again click ‘Continue’.
Next, you will have to select a theme for your plugin, select the ‘Astra’ theme. Next, it will give you option to activate Jetpack Services which will helpful for us, so select ‘Yes Please’ which will take you Jetpack account page, fill your details and make an account. You will be redirected to your WordPress dashboard, but a new ‘Woocommerce’ would be available on your toolbar as shown in the image. All these tax setups, we will do later.
Now let us start creating products. First, we will create a simple product of Woman Green Shirt as shown in the image.
Click on the ‘Products’ on your toolbar which will open up ‘Add new Product’ page as shown in the image below. Fill the name and description of the product. Below on Product data, select ‘Simple Product’ as first we will create a simple product. Put the Regular Price and the Sale Price, which you can schedule below, as shown in the next image below. On these dates, the sale price will be applied automatically.
Next click on the ‘Inventory’ settings below the General where you can put the Stock Availability. You can also allow or disallow Backorders here, if you put ‘Don’t Allow’, no orders will be taken if the product is out of stock. Put the ‘Low stock threshold’ to get notified when stock is low.
Next in the ‘Shipping’ category, put on the weight and dimensions details of the product for shipping purpose. In the ‘Linked’products, you can ‘Upsells’ which will show related products and Cross-sells which will show related products in the cart after the user buys the original product. Add the related products, and you want to show the buyers when they are shopping for this particular product. In the ‘Advanced’ category, you can give a note to buyers and activate reviews.
Below these settings if you scroll down, you have ‘Product short description’ as in the image. Here write the complete description as per our example product. You can design the font and style of the description here too. On the right side if you see the image, there is an option ‘Product Image’. Click on ‘Set Product Image’ which will open the ‘Product image’ page where you can select and upload the image of your product. Below the ‘Product Image’, is ‘Product Gallery’ where you can put other images of your product from different angles for a better understanding of the viewers as shown in the image.
Above you have ‘Product Categories’ on the right side toolbar as shown in the image. Here you can categorize your products. So let us create a new category by clicking on ‘Add New Category’. Type the name ‘Women’s’ and click on Publish. Now you can view your product by clicking on the ‘View Product’ button. It will show how the product will be displayed to viewers when they click on it. A new product popup will open where you can view the product and even magnify the images to get a better view. You can edit anything you want again.
If you don’t like the style and theme of the display page, you can change it with ‘Astra Settings’ on the right side toolbar as shown in the image . For example, if you want to remove the sidebar, click on ‘Sidebar’ and select ‘No side bar’. Click on ‘Update’ to save changes and you can again click on View Product to see the changes. So this was an example of how to create a simple product. You can add as many products and categories as you wish using this same procedure. If you click on the Category button on the Product page, it will open up a New Page of the category where all the products of this category will be shown. At this point, this will be very bland but later we will design this page too.
Next let us learn how to create a variable product. Again we have to go to ‘Add new Product’ page as earlier. This time let us create a Men’s variable product. Give the title and the description of the product as we did earlier. Remember this is not the main description but the additional small description which is shown below, the main description is to be written in ‘Product short description’. Here we are going to change the ‘Product data’ to ‘Variable Product’. All the other settings such as Inventory, Shipping, Linked Products, etc. are similar to the Simple Product we created earlier, so you can complete these details on your own.
Now click of ‘Attributes’ where we will add new attributes or characteristics to our product. Click on ‘Add’ to do that. Next as shown in the image, we will create new attributes of the product such as size, colour, etc. First, let us put Size in the ‘Name’ box. In the ‘Values’ box, write, Small first, followed by ‘|’ symbol (without the brackets). Press ‘Shift’ key + the key above Enter button to write this symbol as shown in the image, then write Medium and again the same symbol and then Large. You can add as many variables as you want, such as S, M, L, XL etc. by using that symbol. Select the ‘Used for all variations’ check box and click ‘Save Attribute’.
Next we will add another Attribute. Click on ‘Add’ button again, write ‘Colour‘ in the Name box and the Value box, add the names of the colours you want to be separated by the symbol we used in the Size attribute. Here we are writing, ‘White|Blue’ as the two options available. Again check the Used for variations box and click ‘Save Attributes’.
Now, we will apply these attributes to our products. Click on the ‘Variations’ below ‘Attributes’ and select ‘Create Variations from all attributes’ and click ‘Go’. Click ‘Yes’ on the popup to verify this option. Which will open the options as shown in the image. You can see that 6 variations have been added by combining 3 sizes with 2 colours viz. Small White, Small Blue, Medium White, Medium Blue, Large White and Large Blue.
Click on the first one to open its edit settings, as shown in the image. First, we have to upload the image of this variation. Click on ‘Upload Image’ and select the image from the gallery. Next you have to put the regular price of this variation. This is a mandatory field so even if the prices are same, you have to write them here. Again you can add the Sale Price and schedule it as we did in the Simple Product. You can fill up the stock details and shipping details as we did in the Simple Product.
Again you will have to do the same process for other variations too. So click on the Variationname, upload the image and put the price Small Blue and so on. Here we are putting just the image and price of all the variations which are required, but you can put all the other details on your website as per own terms. Above the name of variations, you can see the option to put ‘Default Form Value’ where you can select which variation will be shown as the default in the Product Box when the users view the product.
Other settings such as Product short description will be similar to the Simple Product we did earlier, so fill the details as per your product. Same for Product image, where you should put the image for the default variation as this will be shown to viewers first when they see the product. You should put your most saleable variation as the default product. You don’t need to put a Product gallery for Variable products as views will be able to see different images of the variation. Create a new ‘Men’s’category and select its checkbox as we did for the Simple Product. Click on Publish to apply these changes on the website.
You can now click on View Product to see how the viewers will see it. As you can see in the image, the product will open up. Here as this is a variable product, you will have a list of attributes and their values in their drop down box. You can click on these boxes to view various variations of this product. You will then see the image and prices you set for the variation when you click on them. Again you can change the theme of the Product page too if you don’t like it using the Astra Settings. Let us change the settings and remove the Sidebar and change the Content Layout to Full width as we did with Single Product for consistency. You can make as many variable products with as many variations you want but you will have to fill the details of each variation as we did here. So with more attributes and the more values of them, you will have many more variations. One thing to notice is that the Price of the product is shown as a range because it shows the prices of the lowest priced variation and the costliest variation as a range. So we have learned now how to create both Simple and Variable Products.
Now let us add these products to our Homepage. Go to your homepage and click on ‘Edit with Elementor’. Scroll down to the end where we created the New Arrivals divider. On the Elementor toolbar on the right, click on the ‘Search Widgets’ bar and type product. Select the Product element and drag and drop it in the box on your page below the New Arrivals divider, and you will see the products there.
In the ‘Edit Products’ toolbar as you can see in the image, you have the number of columns and rows of product you want to show here so that not all your products are shown in this page. You can also use the style category to change the column gap and row gap, alignments, border for the image. You can style the Title of the product name here too like its colour, font, spacing, topography, etc. Same thing for the rating stars, both filled and empty. Similarly, for the price too, you can change the font, colour, topography, etc. for both regular and sales price. Next is the button, you can design the button any way you want like the background colour, text colour, border colour and so on. Using Elementor makes all this editing so easy. You just have to use all the editing tools available and play with it, and all the results will be in front of your eyes.
You also have the ‘Sales flash’ option that you can design to show up when you have a sale which will show a flash banner above your product when there is a sale on the product. Use this to attract customers on your products when they visit your homepage. All the designing options are similar to what we have learned till now so you can grow through all of them and select the design that suits you the best.
In the Query option, you can select the products that you want to be displayed in this section. For example, if you want just the Women’s Product to be displayed in this section then in the Source box, select ‘Latest products’, as it is a new arrivals section from the drop down box and click of ‘Include’. Then in the ‘include by’ box, write term and select the Term option which will so the term box. In the term box, write ‘Women’ and select ‘Product Category: Women’s’ as shown in the image. Click on Update to give effect on your website. In this way, you can create product display sections in any part of your website.
Elementor ecommerce Template I have given you the template of the ecommerce website we prepared just now layout prepared by us here for free on my website on this linkhttps://darrelwilson.com/product/elementor-ecommerce-template-package . Download the template zip file from there and now let us learn how to import and export templates in Elementor. First, extract all the .json flies from the zip file. These are the templates for specific pages. Go back to your Elementor editor page and click on the folder icon next to the Add section icon on the page. This will open up the Template library and go to ‘My templates’ as shown in the image and click on Add templates. Here you can drag and drop those template files. Select the Homepage template and click on insert and your template will be loaded. You can edit the template according your taste but using the template, you won’t have to create everything from scratch. Just remove the unwanted elements or sections and add new ones you like such as countdown, form etc. and style them the way you want.
Now let us create the other pages using our template. First, create a Menu for the rest of the pages. Woocommerce automatically adds the Shop, My Account, Cart and Checkout pages. Go the Appearance in WordPress and add these to the menu. Go to the About Us page, click on ‘Edit Page, first disable the title and select Full Width in content layout. Now similar to Homepage template, insert the About Us template and edit the page as you want. You can add other pages too. Complete the website design using this process.
Theme Customizer Theme customizer is where we design the structure and theme of the website and not the actual webpages. For opening the theme customizer, click on the ‘Customize’ button next you website button and it will open the Theme Customizer dashboard. We have used the Astra theme in this tutorial. Let us create a logo for your website, go to Header, then Site Identity and select Logo and upload your Logo. You can get a logo from www.fiverr.com .
In the same way, you can edit your site icon. You can design your Primary Header here too, as shown in the image. You can select the layout, width, colour, etc. of the Header. Also you can design and style your menu from here.
Same way, you can design the footer. You can add upto 4 footer widgets here and customize as you want as shown in the image. Select ‘Widgets’ on your WordPress toolbar and you will get 4 Widgets to add to your footer. When you click on it and then click on ‘Add a widget’, you will get a list of widgets. You will get a widget toolbar where you can edit the contents of widget such as title, description, image and also your social media links. Once you click publish, it will appear on the footer of your webpage.
From the Woocommerce option on the toolbar, we can customize the Checkout page as in the image. You can assign ‘Terms and conditions’ page and ‘Privacy Policy’ page from the toolbar for the customers but first you’ll have to first create these pages and write the details as the legal requirements. Next, select the page from the drop down below their respective box. You can add new fields in the Checkout form and make them ‘Required’ or Optional.
Next in the Woocommerce toolbar, you can customize your Product catalog as shown in the image. You can customize, how products are shown in the catalog, their design and also you can hide some of the components that you don’t want to show like for example Ratings by clicking on the eye icon next to its name. This will control how your products are shown on your Shop page and also on the products section anywhere on the website.
Here we are using the free version of Astra Theme customizer, but you can buy the pro version where you will get tons of different option and templates for your website. You can import entire customized websites from this service.
Plugins Plugins are small apps for your website, which helps to create and upgrading your website. You have to add plugins to your WordPress to help you create your website in way more efficient manner. To add a new plugin to your WordPress, go to your WordPress homepage and then click on plug-in from the Options list on the left side. It will open an ‘Add plugin’ page, as shown in the image where different type of plugins is available to choose from. You can search for the type of plug-in that you need in the search box and you will find so many plugins to use for that specific purpose. It is like an app store on your mobile and just like your app store, and you can check the usage, reviews and success of these plugins before installing. And all these plug-ins are available for free. And if you need any plugin later, you can always come back and install it here. You can add plugins for social media sites, translator and so many things. Just search for the plugin use you want, select the one you want, click on ‘Install’ and ‘Activate’. For every plugin, a new option will be created on the toolbar from where you can add and edit elements.
Elementor Theme Builder The Elementor theme builder allows you to create a custom Shop Page and Product Page using the page builder instead of the themes so that these pages match the design of other pages of your website. Using the Elementor page builder, you can edit any part of any page of your website, unlike the themes which are preset and normally can’t be edited. So now we are going to edit the Shop Page and Product Page that we created using the Woocommerce theme using Elementor theme builder and design it to match our demo website’s design we saw in the beginning.
Go to your WordPress dashboard, click on ‘Templates’ and then select ‘Theme Builder’ from the list which will open the Theme Builder as shown in the image. Elementor allows us to build the theme of different parts of the site. So if want to have a different header, click on the ‘+’ icon on the header. And you can select any header theme from the library and click ‘Insert’. Your Header will be created, and now you can edit anything in using the Edit Toolbar as we did earlier. You can change the style of the Logo or the Menu or anything, just click on the part you want to edit, and the edit toolbar will appear.
Now you can add other elements on this header one by one as we did earlier, or you can insert another one or more blocks which contains similar elements and delete the common ones. For example, here as you can see in the image, we inserted a Header Block which has a bar for contact no, info and social icons. We can delete the rest of the elements of the block as we don’t need them. Again you may not find the exact design of each element in the block templates, so you can now edit and style as you want to instead of creating and editing each element from scratch. This way you can create a different part of your website very quickly.
Remember we have just created a part of the website but it’s not applied on our website yet. So when you click ‘Publish’, it will ask you where you want to display this template on your website. Here we created a header, so we will display it on the entire website by click ‘Entire Site’ on ‘Include’ box as shown in the image. You can put different conditions by adding Include or Exclude conditions as to where you show this template.
Now you can do the same thing for the footer as we did for the header and create a footer for your website using templates. You can edit the footer content to your pages by pasting the URL link of the page to its button using the editor as shown in the image. Here we have selected a footer block template with for columns and added link to various parts of our Shop, About, Contact Us and social media pages. You may design it any way you want.
Now let us design a custom Shop Page using the Theme Builder. Elementor has significantly fewer themes for the shop page so we will design from scratch. So we will have to create each element like for the banner we will have 2 text boxes and animated heading over a background image. Edit the elements and style the section as we learned earlier. Use all the styling features such as font, colours, size, shadows, margins, paddings, etc. to make the banner section look eye catchy like here in the example as shown in the image below.
Now we need to design our product section with a filter column in the side. So add a new section, and use the 2 column structure. On the right, add ‘Products’ from the toolbar and design it as we did on the Homepage or you can save the Homepage Template and insert it here. On the left, insert ‘Sidebar’ from the Elementor elements bar and select ‘Woocommerce sidebar‘. Right now, we haven’t created a sidebar so we will have to exit to WordPress dashboard. But first, click ‘Publish’ and in the condition include ‘Shop page’ to apply it to the website.
Go to ‘Appearance’ on the dashboard where we have all our widgets are shown as shown in the image. On the right, we have our Woocommerce Sidebar where we can place the ‘Filter Products by Price’ by drag and drop. You can add other filters too. Below we will add ‘Product Category’, then ‘Products’ and the ‘Video’ on our sidebar. You can edit the title, contents and other stuff like link the URL of the video here. You can add as many widgets that you want from here.
If you want to edit the style of this sidebar, you can’t use the Elementor editor as these are prepared by WordPress theme customizer. So to customize it, you will need to click on ‘Customize’ button WordPress. Click on ‘Global’, then ‘colours’ where you can change the colours as in the image. Here we are customizing the WordPress theme which is the Astra theme that we are using, and not just the sidebar.
Now we will design the category pages for our product. We are going to copy the template of the page we created earlier and save to use it for all our Product Category pages. First, click on ‘Edit with Elementor’ on the top and select ‘Product Archive’ as shown in Image. Then, on the bottom left click on the button next to Update and select ‘Save as a Template’ as shown in the next image. Give a name to the template like ‘Main Shop Page Template’ and click Save. Next, select the given name and click on ‘Export’ and then ‘Save File’ to save this file to use this template on other pages or even other websites.
Now, go back to the Elementor theme builder and click on Add New. Here you have the Elementor templates, but we will use the template we created, so click on ‘My Templates’ and click on ‘Insert’ next to the name of the new template you created. Now we have to edit it using the tools which we have learned already. So change the Title text to ‘Men’s Product’. Next, as this is Men’s Category, you have to edit it to show only Men’s Product. So click on the Product box and the ‘Query’ button on the toolbar, write ‘term’ in the ‘Include By’ button and put ‘Men’ in the term box as we did earlier. Click on Publish and put the condition to put it only in ‘Men’s’ in ‘Products category’ as you can see in the image below. You can go the website and on the Shop page, click on the Men’s category on the sidebar and view the effect on the page. You will have to do the exact same process for Women’s category page and any other category you want to put on your website too.
Now we will customize our Product page using the same technique. If you click on any product now, it will show the product page in the default theme as we saw when we created the products. Again, go to the Elementortheme builder and add a new Single Product theme by clicking on + icon next to it. You can use the templates provided here, but we will build one from scratch for this tutorial. So first add a 2 part section and click on the elements tab. Here you can see all the elements which are made specifically for Products as shown in the image which we don’t see when building a page.
First, add a breadcrumb which is like the categorization of the product. Now you can edit the style of the breadcrumb like colour, size, padding etc. using the toolbar as you can see in the image. On the right, add the ‘Product Title’ element from the sidebar and design the style of that too using the toolbar as earlier. Next let us add the product image in the same way. Click on the Product image element and edit the style of it using the toolbar. Next add the Short Description similarly. You can add a divider between the title and description. Next we have to put the product category. For that, select ‘Product Meta’ element and drop it under description and style it too. Next add the ‘Price’ element below it and you can change the style of it too again. Next put an ‘Add to cart’ button below the price. As it is a variable product, it will automatically give the variation options. Next you can add social icons and review forms, additional info etc. elements you want. Click on ‘Publish’ after you are done with adding and designing on the elements you want on your product page. In the condition on the display page, include ‘All Products’ to give the effect of this template to all the products you created. You can create different themes for different product categories if you want, you’ll just have to change the condition to include it on just that specific category. All of our product pages will be updated to this template as we applied it to all products.
Custom Checkout and Cart Page Now we will design the customized Checkout and Cart pages. Checkout and Cart pages are not with the theme builder so will we edit them with Elementor. Go to the Cart page and click on Edit with Elementor. Just like any other page, you can edit and style it the way you want with the Elementor elements. You can edit the text, icons, coupon buttons etc. and style the font, colour, topography etc. on your own by now. But to edit the part of the actual theme such as the title Cart here is not possible with Elementor. To edit that you’ll have to edit it in WordPress itself, so click on ‘Edit Page’ and on the bottom right corner, select the ‘Disable Title’ check box under disable section as shown in the image as we did earlier when designing the theme of WordPress.
You can edit and design the checkout page and using in the same manner. In the same way, you can design the ‘My Account’ page of your customers as the default theme of that page isn’t very good looking. You can edit it with Elementor. And I have also given a link earlier in which I have also put the zip file fo the templates of all these pages for you to design then quickly.
Woocommerce Settings You have by now learned how to create pages using Elementor and Theme Builder, and your website building is complete. Now we have to learn about Woocommerce settings to get this website running. Go to the WordPress dashboard, click on Woocommerce and select ‘Settings’ which will open up the Woocommerce’s general setting tab as shown in the image.
Here you can put your address and select the countries you want to sell to, enable taxes, enable coupon codes. Check on all these boxes to enable them. Below that you can change your currency according to your country.
The next tab is the Product tab on the top row of Settings where you will find many settings most of which are very specific to here we are not going to use except for the review section where you can enable reviews and star ratings on the products, also you can show verified user tag to real buyers in reviews as shown in the image. You can also put the shipping details of the products such as weight, dimension, etc.
Next in the tax tab, where you can enable or disable auto tax calculation. Tax calculation can be very complicated depending on your country and business, so auto calculation might not work for you. However, you have the options to set taxes for the different shipping address and based on cart item. I have given a link to www.taxjar.com where you can get free and paid services to help you with tax calculation. You can also select to display prices with or without taxes at various points like in the shop, you should show price without tax, and in the cart and checkout, it should be including tax generally.
The next tab is ‘Shipping’. First click on ‘Add a shipping zone’, add the name of the Zone, specific regions of the zone and set up your shipping rates under various shipping method as shown in the image. Here, we have used a Flat Rate method where we put a $5 flat rate, and the other one is the free shipping method. Click on Edit button below to add a condition of minimum order amount or coupon requirement. Here we have a minimum $50 order requirement selected. You can add multiple zones and multiple shipping methods and rates for each one of them. You also have a default for the locations not covered by any of your zones which we haven’t given any specific rates. So here we have put a $10 default rate for those zones by default.
‘Accounts and Privacy’ tab where you can select the option to create an account of the customers before buying or allow them to buy without account first and later create an account at the time of Checkout. And also various other options in the creation of account like username, passwords, etc. which you can check out on yourself as they are very self-explanatory. Also, you can add a privacy policy as required by the law here. You also have options about the time in which the personal data of the users will be deleted under Personal Data Retention.
Also we have the ‘Email’ tab where the settings about all the automated emails that you will receive and send to the customers from the website for instance on a new order or cancelled order. You can edit the format of the email that you will receive or send to the customer in all such situations here. You can add a plugin for this purpose to receive better quality emails. Go to Plugins and install ‘Kadence Woocommerce Email designers’ and. Using this plugin, you can design the email contents, header, footer, text etc. using their custom styles which are editable here by going to the plugin in Woocommerce sidebar as shown in the image.
Now we will go to the ‘Payments’ tab where we can select the payments methods allowed to our customers. There are many options available to select but we will enable ‘Stripes’ and ‘PayPal’ here by clicking on the enable button as shown in the image below.
PayPal Now let us set up the payment settings for PayPal first, so click on ‘Set Up’ to open up the PayPal settings page where you can put up the title, description for the payment box and your PayPal email account and click on ‘Save changes’ to integrate your website with PayPal. If you don’t have a PayPal, you can create one by going on their website and signing up for free. You just will have to sign up with an email address which you will put in the PayPal email box as shown in the image. It is one of the most popular payment method available.
Next we are going to setup payments with stripes. So click on the ‘Manage’ button next to it. Same way to PayPal settings, put up the title, description for the payment box first. Next you have the test publishable key and test secret key. You can go to www.stripe.com and create a free account there, just need to have a bank account to create an account. You can integrate your Stripe account to your website after creating it, which is a free service. For that, after logging in your stripe account, click on ‘Developers’ and select ‘API keys’ as shown in the image. Copy the publishable key that comes up here on your website in the publishable key box and the secret key in the secret key box. Then click on ‘Save changes’, and now your website is ready to accept credit card payments from anywhere around the world on a very low transaction fee. Here we are doing so we still have the enabled the Viewing testing data button on our stripe account and the Woocommerce settings page we have checked the ‘Enable test mode’ box but when you are ready to go live with your payment system, disable it.
You can now test your website by placing an order and buying something and also you can make the payment to check out that everything is in order. On the My Account Page, customers will have their own personal dashboard where they can check, edit or cancel their orders, edit their shipping and billing address, set up their payment methods and their account details. All their past orders view also be shown in their orders list with their status.
Optimizing for mobile Mobile optimization means making the website look user friendly for mobile devices. Mobile optimization is very important in today’s scenario because a) many people use mobile devices for surfing the internet and b) According to the new Google algorithm, if your website is not mobile optimized, then they will decrease your rank which can be catastrophic for your website traffic and SEO.
Mobile optimization is quiet simple using the Elementor editor. Let us again go back to the Elementor dashboard. At the bottom of the toolbar, you will find the ‘Responsive Mode’ button, clicking on which will open a drop down list showing 3 options viz. Desktop, Tablet and Mobile. Until now, we were designing our website basing it on how it would look for desktop viewers. Now click on ‘Tablet’ to get a preview of how it would look on a tablet browser. Similarly, you can check it for the ‘Mobile’ mode too. You can edit the webpage if anything seems out of order or if it doesn’t feel visually appealing.
Here as you can see in the image, the first title is too big for the tablet mode and the ‘50% OFF’ is too small so you will have to adjust it. Check out all the elements of the pages to see if anything needs to be redesigned. All these changes will be applicable on the to the Tablet mode when you click Update. Same will be applicable for the mobile mode. Adjust the size of the heading texts, the alignment of the buttons, banners and headings.
You can disable some of the sections that you need on the mobile or tablet version if you think it is not essential for them. For that, select the section you want to hide, go to the advanced category on the ‘Edit Section’ toolbar, click of ‘Responsive’ and under Visibility, you can choose to hide the section on desktop, tablet or mobile version as shown in the image.Same thing you can do with other sections or elements. You can design everything different for tablet or mobile mode like background images, font size or anything.
Contact Form Now let us move forward and learn how to create a ‘Contact’ page where visitors can fill out there contact information and it will go directly to your email. The basic design of the page, you can do on your own by using Elementor editor or Theme Customizer. The only important thing is the contact form as shown in the image. So you search form on the Elementor toolbar and drag and drop it on the section and you can edit the text and the design of the form using the ‘Edit Form’ toolbar which by now I think you would be able to do on your own. There are many advanced settings in Edit Form toolbar which are not going through here but the basic form you can create.
Coupons To add coupons to your site, click on ‘+ New’ on the top bar next to customize button and select Coupons. The coupons on the WordPress side toolbar are located under ‘Marketing’ section as shown in the image. Here, you can add a new coupon code, select the discount type as a percentage discount, fixed cart discount or fixed product discount, put the amount or percentage of the discount and expiry date for the coupon. Under the ‘Usage Restrictions’, you can put conditions like minimum spend, individual use or conjunction with other coupons, include or exclude products or product categories from the coupon. Under the Usage limit, you can select the number of times this coupon can be used or limit it for a specific product and limit the usage by a single customer. Click on Publish to apply this coupon on the website and test it out on the Cart page by applying the coupon code while making a purchase.
I really hope that this tutorial was beneficial to the readers, and now you can create a website from scratch on your own. If you need any help, you can visit my website and my Facebook page and leave a comment. I have tons of other resources about website building and using Elementor there which you can check out. Thank you for reading this tutorial and your feedbacks and queries are always welcome.


Amy Brown
Wow! that was awesome. Always learning incredible new things from you Darrel!. Thanks for sharing.
admin
you are welcome!
vervelogic
Its an informative post. Thanks for sharing
ganesh
Great content. I love how your articles make it easy to understand and implement for people with little or no knowledge of elemetor . Keep writing!
Jackson Monichan
WOW!!! Its just awesome Darrel Wilson and Team!!!
You have covered each and every section of building a website – from basic of getting a domain and hosting to setup of WordPress installation to installation of elementor page builder and teaching the necessary things inside the elementor editor and to insert templates .
What I loved is the users have to refer to this one post to create a full ecommerce website with elementor and woocommerce in wordpress platform.
Keep going ahead with such awesome articles.
ninositsolution
I read your blog. The information you give in the blog is very good.
ecphasisinfotech
More informative post and clearly explained thanks for sharing.
admin
thanks!
admin
thanks again bro!
Lori
I love your blog.. very nice colors & theme. Did you design this website
yourself or did you hire someone to do it for you?
Plz reply as I’m looking to create my own blog and would like to know where u got this from.
thank you