Getting frustrated with this error?
By the end of this guide, you will learn what this error is all about and the different methods to fix this security or permission issue.
Here’s a sneak peek of the contents:
The “Sorry, You Are Not Allowed to Access This Page” error is a common issue that users may encounter when accessing certain areas of their WordPress dashboard or site.
This error is essentially a security or permissions issue, indicating that the user’s current role or permissions settings do not allow access to the requested page.
However, it can also appear even when the user should theoretically have access, which makes it a frustrating obstacle to overcome.
The error can be triggered by a variety of factors, including but not limited to:
| Cause | Description | Mechanism |
| User role restrictions | WordPress user roles and permissions define what actions different users can perform. If a user’s role has been changed or does not have the necessary permissions, they might encounter this error. | This could happen due to a plugin conflict, a manual error, or changes made to the user’s role that restrict access to certain areas of the dashboard. |
| Plugin or theme conflicts | Plugins and themes can sometimes conflict with each other or with WordPress core, leading to permission issues. | This can occur after installing a new plugin/theme, updating existing ones, or due to incompatibilities between different components of the site. |
| Incorrect file or database configuration | The wp-config.php file contains essential configuration details, and any discrepancies here can cause WordPress to restrict access to certain pages. | Issues with the wp-config.php file, such as incorrect database prefixes or outdated PHP versions, can lead to permission errors. |
| File permissions | File permissions determine who can read, write, or execute files on the server. Incorrect file permissions might restrict access, triggering the error. | For example, if the permissions are too restrictive, users might not be able to access certain parts of the dashboard even if their user role should allow it. |
Understanding these causes provides a foundation for effectively troubleshooting this error in WordPress.
👉 Related: The Ultimate Guide to WordPress Error Troubleshooting
It’s also important to acknowledge the role of web hosting in your website’s overall performance and security.
Just like the right hosting can enable your site to run smoothly, choosing Hostinger offers a blend of speed, stability, and security.

Discover the Hostinger advantage for your WordPress site:
Choosing Hostinger means you’re not just selecting a hosting provider:
You’re partnering with a service committed to enhancing your WordPress site’s performance and security.
To resolve the “Sorry, You Are Not Allowed to Access This Page” error, you can try several approaches:
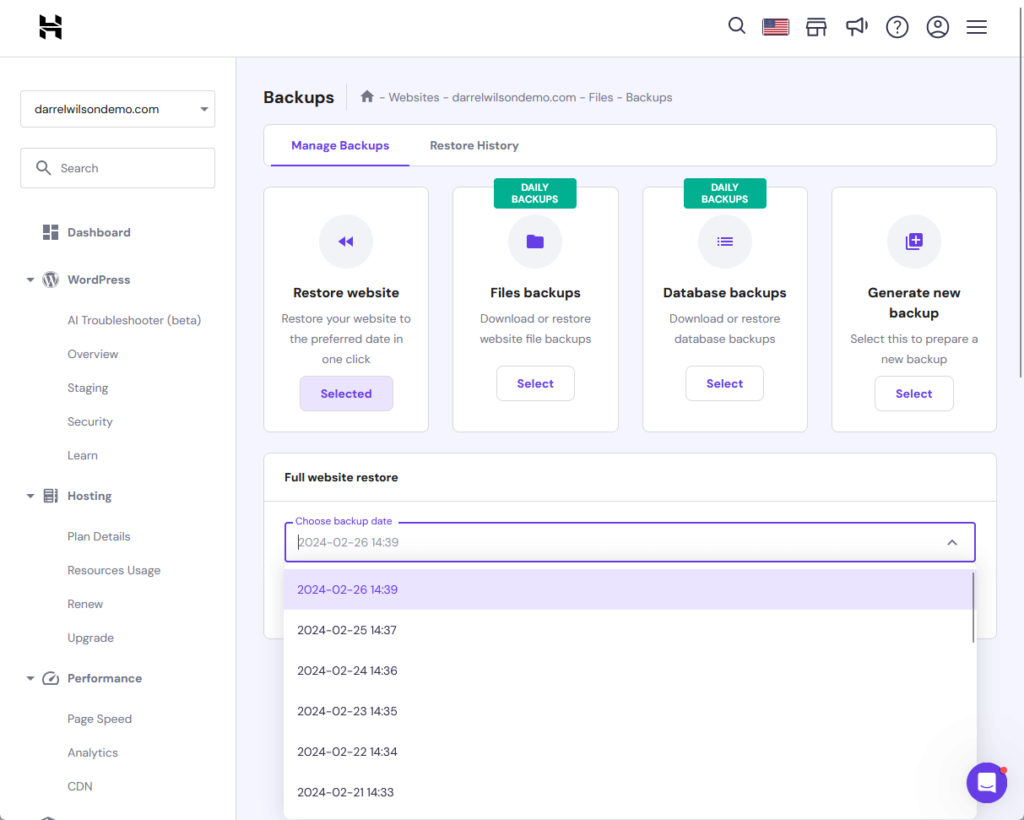
If you suspect recent changes to have caused the error, restoring the site from a backup made before the changes were implemented can be a quick solution.
The quickest method to do this is if your hosting includes a backup solution or feature accessible from the hosting panel.
For example, Hostinger provides a free backup feature (weekly and daily) where you can easily restore from the panel:
👉 Related: Hostinger Review: Budget-Friendly Hosting Powerhouse?
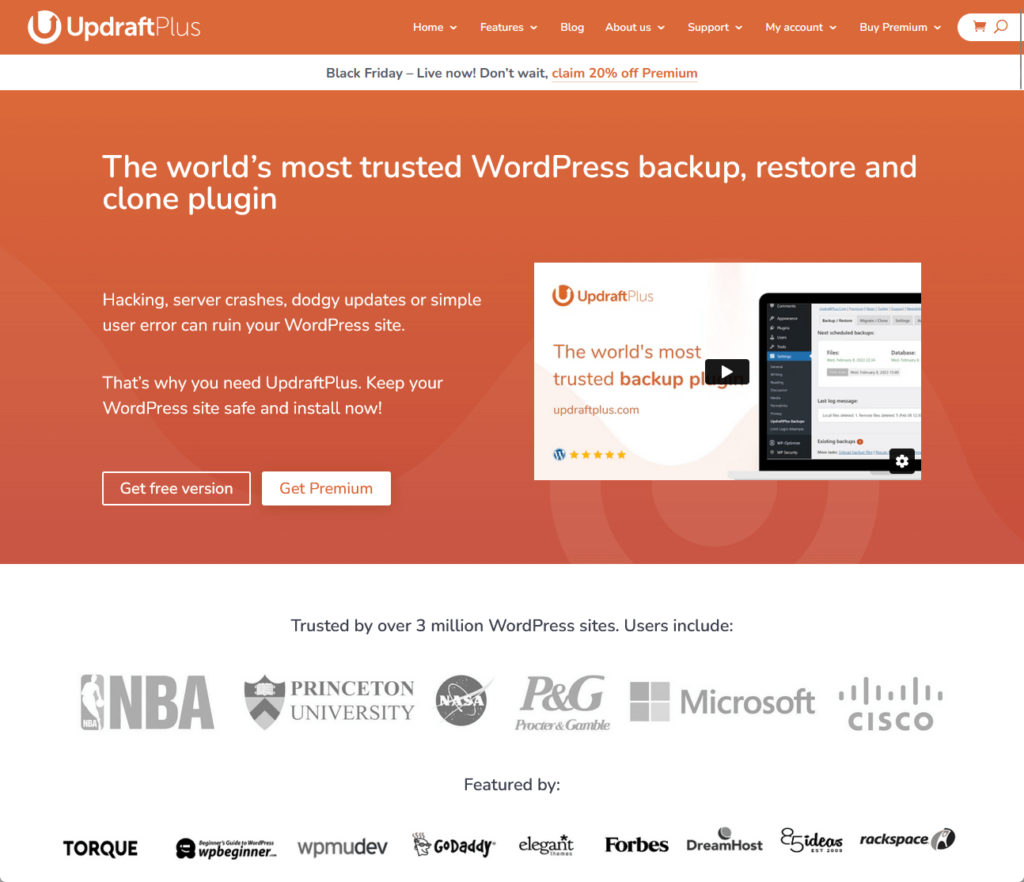
If not, this is why installing a backup plugin is important, you never know when things can get ugly on your website.
In case you haven’t yet, there are a myriad of backup plugins available for WordPress that you can use — many even have a free version.
Some of the best ones include:
👉 Related: Best WordPress Backup Plugins: Overview + Key Features
If you’re used to doing things manually, and you were able to import the site’s database and files, you can use them to restore your website.
Unfortunately, if you don’t have any backups of your site, your only choice here is to proceed with the next methods.
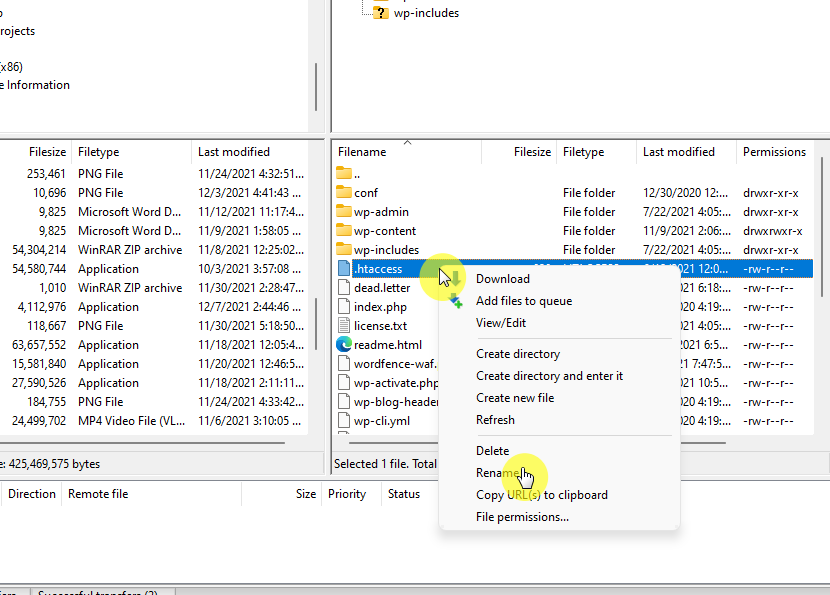
A .htaccess file controls the server’s directory and file permissions and is important for WordPress’s permalink structure.
For this method, you will have to rename the .htaccess file and create a new one (this will require either an FTP client or your host’s file manager app).
If you don’t have access to a cPanel or a file manager app from your web hosting service, you have to use something like FileZilla.
The .htaccess file should be in the root folder > right-click on the file > select rename from the context menu:
⚠️ Note: If you can’t see the file, you will have to force the app to show you the hidden files (for FileZilla, it’s under the server menu).
For the renaming, you can simply change its name to something like .htaccess.bak.
Renaming the file and simply adding a new extension to it will render the file useless — at the same time, you can restore it if this method doesn’t work.
After renaming the old .htaccess file, you need to create a new one.
To do this, open a text editor like Notepad or TextEdit and paste the following default WordPress .htaccess rules:
   # BEGIN WordPress
   RewriteEngine On
   RewriteBase /
   RewriteRule ^index\.php$ - [L]
   RewriteCond %{REQUEST_FILENAME} !-f
   RewriteCond %{REQUEST_FILENAME} !-d
   RewriteRule . /index.php [L]
   # END WordPress
Save the file as .htaccess on your computer and then upload it to the root folder of your website (works whether through FileZilla or file manager).
After uploading the new .htaccess file, visit your website and try to access the dashboard or the page that was previously showing the error.
If the method earlier worked, then that means that the problem was with the .htaccess file, otherwise, try to temporarily disable all plugins.
I’m going to assume here that you can’t access the dashboard of your website at all — so we have to resort again to using an FTP client or file manager.
Go to the /wp-content/ directory of your website and find the plugins folder:
plugins_old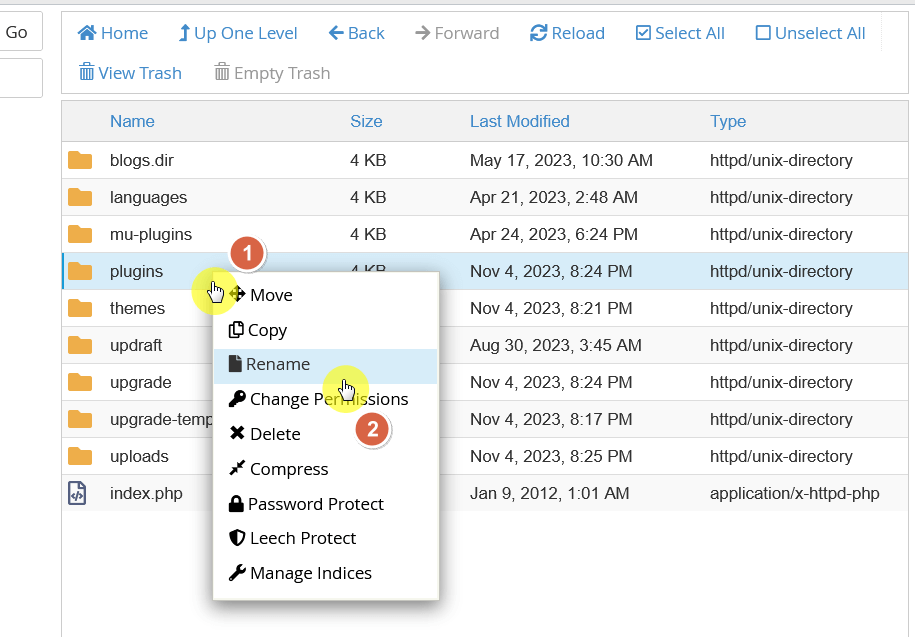
Renaming the entire folder will deactivate all the plugins since WordPress won’t be able to find them anymore.
Check the website again — if it fixed the problem, reactivate your plugins one by one to see which plugin is causing the problem.
Similar to the plugins, if that doesn’t work, let’s try to activate the default theme by renaming the active theme folder.
You still have to use FileZilla here or your host’s client manager app:
/wp-content/themes/ folderhello-elementor-older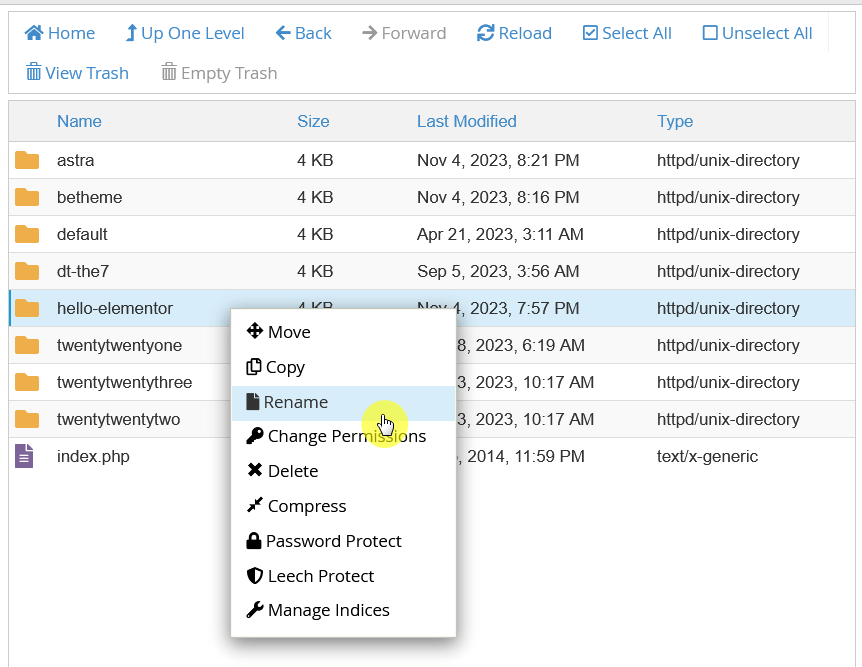
You don’t have to do anything after this since WordPress will automatically revert to one of the default themes.
Visit your website and access the admin area — if the theme was causing the error, this should resolve the issue.
The primary cause of database connection errors, which could also lead to access issues, in WordPress is often incorrect database credentials.
If you don’t know yet, these credentials, stored in the wp-config.php file, actually include the database name, username, password, and server.
Find the wp-config.php file on the root directory of your website and open up the file:
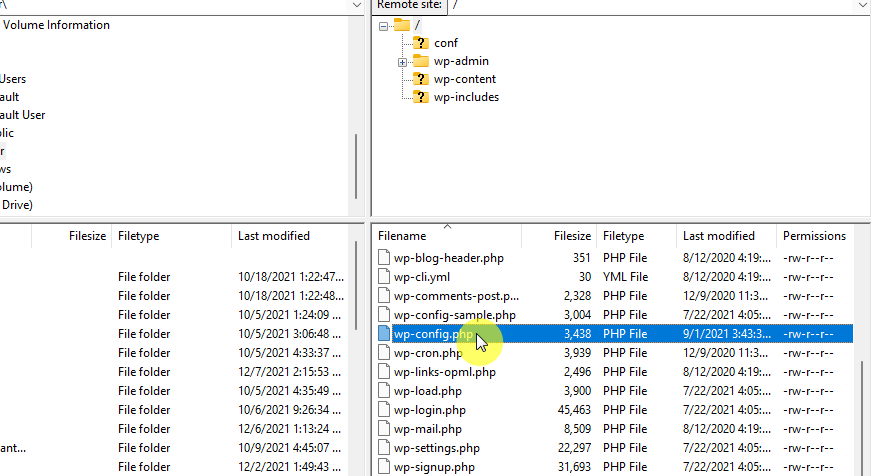
Scan through the file and look for the part that defines or mentions the database name, username, password, and hostname.
It looks like this:
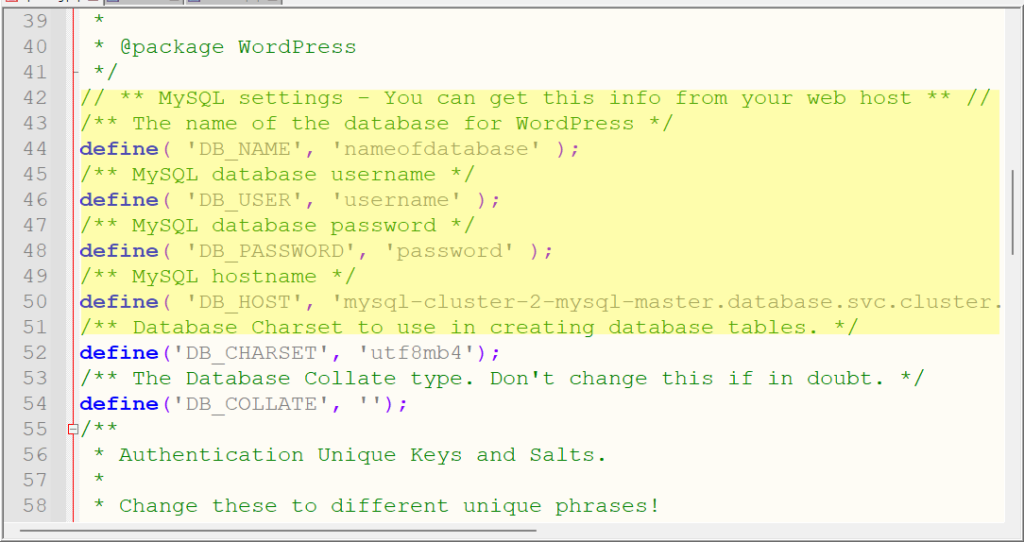
Do you have the correct database name and host information as provided by your web host?
If yes, check the username and password of your database credentials and make sure that they’re correct.
To further diagnose the issue, you can test the database connection by creating a simple .php file (e.g., testconnection.php) containing the following code snippet:
php
<?php
$link = mysqli_connect('YourDatabaseHost', 'YourDatabaseUsername', 'YourDatabasePassword', 'YourDatabaseName');
if (!$link) {
    die('Could not connect: ' . mysqli_error());
}
echo 'Connected successfully';
mysqli_close($link);
?>
Replace YourDatabaseHost, YourDatabaseUsername, YourDatabasePassword, and YourDatabaseName with your actual database host, username, password, and name.
Upload this file to your website using FTP and access it via a web browser:
In some cases, the error might be due to a corrupted database.
For this, you need to enable the feature first by using a file manager app or FTP client and accessing the wp-config.php file.
Add the following code to the file:
define('WP_ALLOW_REPAIR', true);Make sure to save the changes by reuploading the file back to the server or simply saving the progress when using a file manager app.
From there, visit the following page — and make sure to replace the domain name:
http://www.yourwebsitedomain.com/wp-admin/maint/repair.phpThis will open a page where you can repair your database (try if you can access this despite the access error).
If yes, all you have to do is click the repair database button on the page and wait until it finishes the database repair:
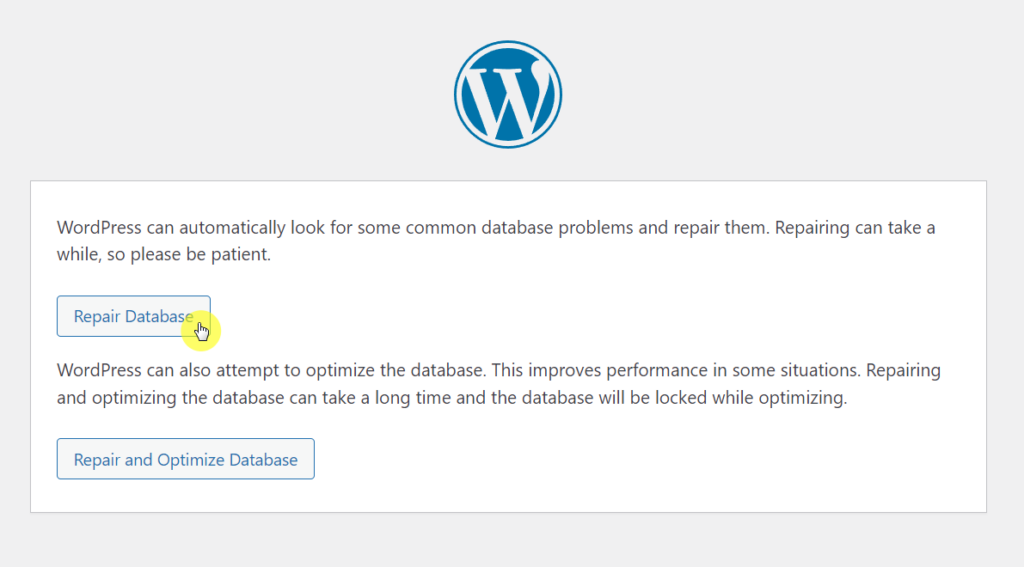
If the error was caused by the database, then you shouldn’t see the error anymore — otherwise, try the next method below.
Incorrect permissions can prevent WordPress from reading or executing files — leading to errors like the “Sorry, You Are Not Allowed to Access This Page” error.
For this step, you need to install an FTP client like FileZilla since these clients offer more features like enabling you to see the file permissions.
Find the /wp-content/themes/ folder > right-click on it > select file permissions:

File permissions are denoted by three digits (e.g., 644 or 755).
WordPress recommends setting file permissions to 644 or 640 for files and 755 or 750 for directories.
In case the file permissions are different, you can manually change them on that window.
Just change the numeric value and then select which part of the directory you want to apply the permissions (like all files and directories, files only, etc.):
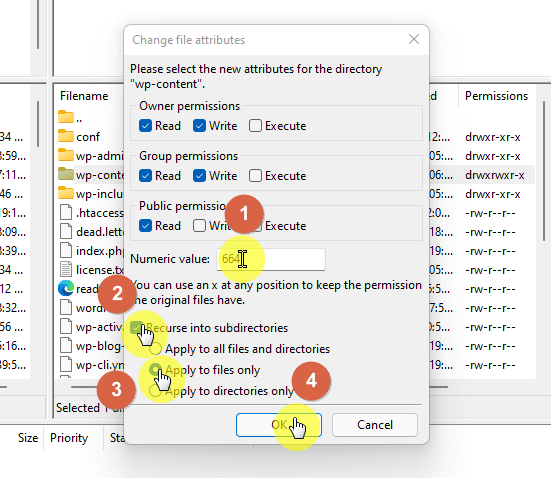
After adjusting the permissions, visit your WordPress site and try to access the previously restricted page:
You may need to recursively apply the permissions to all files and directories within the WordPress installation.
If you can still access the login page, then the problem may be with your account permissions — which is why you can try to create a new one.
Since you might not be able to access the dashboard anyway, you will need to access phpMyAdmin for this.
⚠️ Note: Usually, you can find the database credentials from your hosting panel. But if there’s none, contact your web hosting provider.
Log in to your phpMyAdmin (the link is also in the hosting panel):
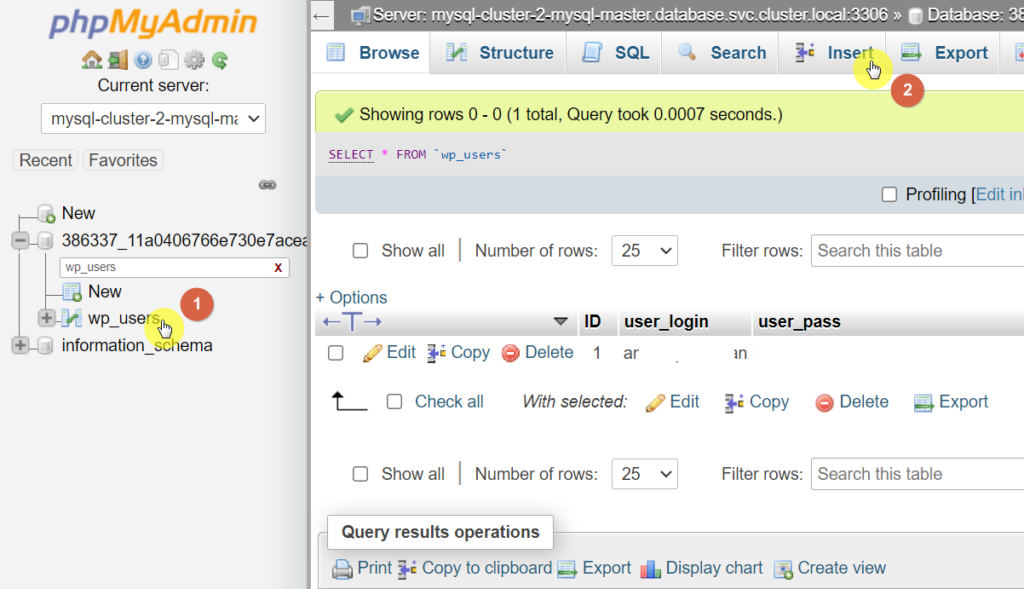
This will enable you to create a new admin account.
Click the go button and you will be able to see the new user information in the table.
Take note of the ID of the new admin account and then go to the wp_usermeta table > click the insert button and fill out the fields with this information:
This will give you new user admin privileges and you can use the new account to log in to your WordPress admin dashboard.
If this worked, delete your old account as it’s possible that someone was able to get hold of your account or that it has been corrupted.
If nothing worked, the error might be related to server-side complications.
Begin by compiling all pertinent information about the error, such as its onset time and any recent modifications to your website.
Then, communicate with the support team of your hosting provider, inform them of the issue, and give them the necessary information.
Wrapping up, it’s a great moment to highlight a solution that could transform your web design experience.
Selecting the right design tools is important for your site’s appearance and functionality.

Secure lifetime access to all premium Elementor template kits:
Don’t let the hassle of frequent updates or the high costs of maintaining your site’s design hold you back.
Take advantage of Darrel Wilson’s offer and elevate your Elementor experience today.


