Want to code a website?
By the end of this guide, you will learn the basics of coding a website, whether that’s by using a website builder or from scratch.
Here’s what we’ll talk about here:
Ready? Let’s get started.
When it comes to creating a website, you have two primary options: using a website builder or coding the site from scratch.
Each approach has its own set of advantages and disadvantages:
Website builders often include drag-and-drop interfaces, pre-made templates, and numerous customization choices.
Users can select a template, customize it with their own content, and publish the website with minimal effort.
👉 Related: Best Page Builders for WordPress: The Ultimate Guide
👍 Benefits
👎 Disadvantages
Coding a website from scratch involves writing the HTML, CSS, JavaScript, and other code necessary to create a fully functional website.
This method offers complete control over the design, functionality, and performance of the site — but the trade-offs are time and a learning curve.
👍 Benefits
👎 Disadvantages
When it comes to building a website, Hostinger offers a perfect balance between ease of use and powerful performance.
Hostinger combines simplicity with powerful features to make building a website easy, fast, and affordable.

Discover the Hostinger advantage for your WordPress site:
Hostinger provides everything you need to build and grow your online presence.
Creating a website with WordPress can be a seamless and efficient process, especially when using the popular go-to website builder Elementor.
Here’s how you can create a stunning WordPress website using Elementor:
Before you start building your website, you need to purchase a domain name and web hosting.
A domain name is your website’s address on the internet while hosting is the service that stores your website’s files.
Many hosting providers, such as Hostinger, offer packages that include a free domain name for the first year.

👉 Related: Hostinger Review: Budget-Friendly Hosting Powerhouse?
Next, install WordPress by using the auto-installer tool in your hosting dashboard to install WordPress on your domain.
In the WordPress dashboard:
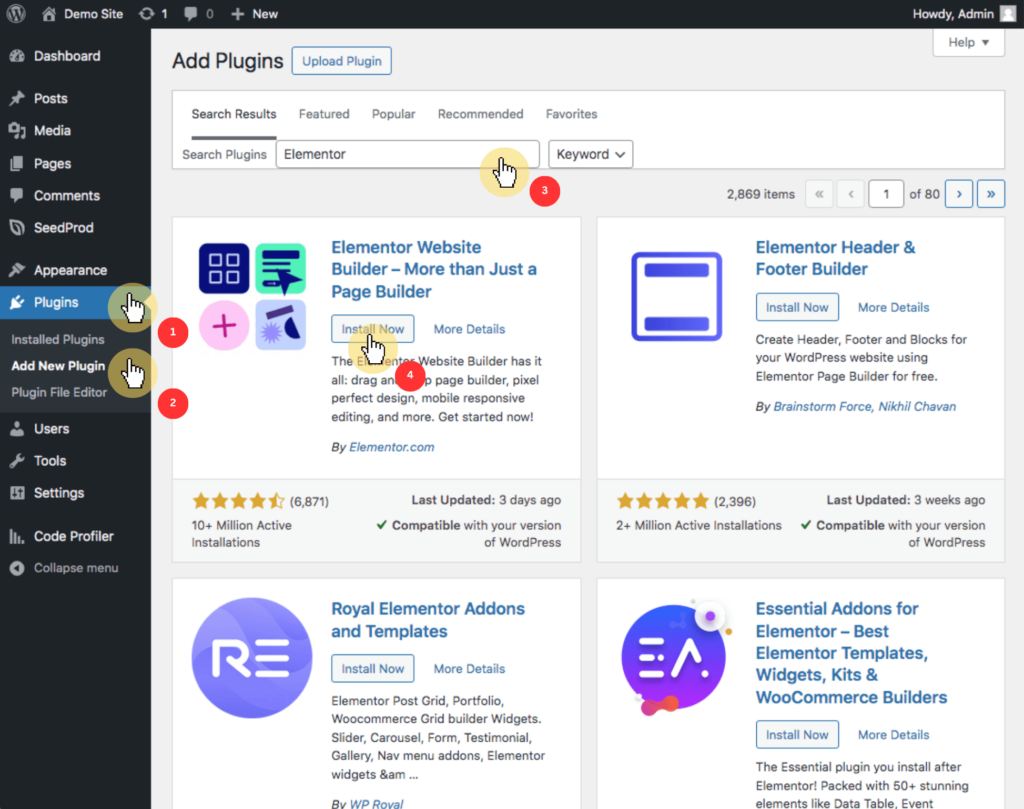
Elementor offers a free version which is sufficient for basic website creation and customization.
However, for full functionality and advanced features, I recommend Elementor Pro (get it from their website) and then manually upload the plugin files.
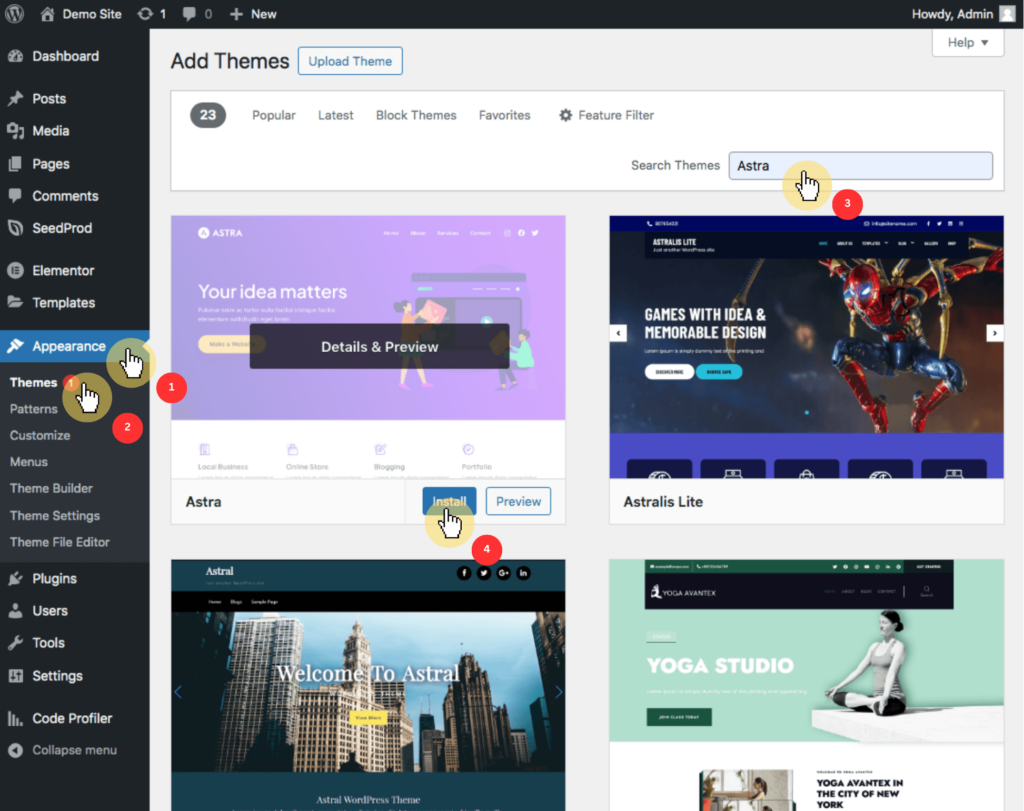
After that, go to appearance > themes > add new theme, and select a theme that is compatible with Elementor.
Install and activate the theme by clicking install and then activate, and use the theme’s options to import pre-designed templates that work with Elementor.
👉 Related: How to Install a WordPress Theme for Beginners
Next, build and customize your own website by going to pages, selecting a page, and clicking edit with Elementor.
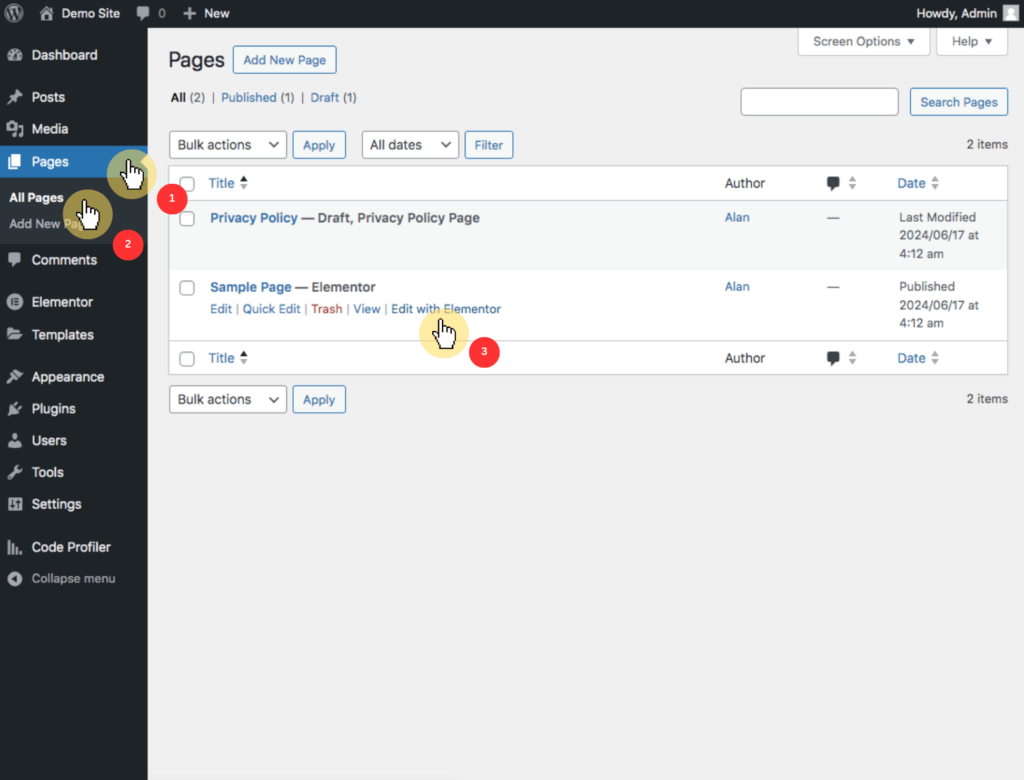
Use Elementor’s drag-and-drop interface to add and customize widgets like text, images, and buttons, and adjust colors, fonts, and layouts to match your brand.
Finally, ensure everything works correctly, then publish your pages to make your website live.
Pretty simple, right? 😉
I won’t stop you if you want to build from scratch.
You must have your own reasons, or maybe you’re doing it to learn — but mind you that customizing your website takes time. 🙂
HTML (HyperText Markup Language) is the foundational language for creating web pages.
It structures the content on the web, allowing browsers to display text, images, links, and other elements properly.
Learning HTML is the first step in building a website from scratch.
HTML is a markup language used to create the structure of web pages.
It consists of a series of elements that tell the browser how to display content.
Each element is defined by a start tag, content, and an end tag.
For example, a paragraph in HTML is written as <p>This is a paragraph.</p>.
An HTML document has a specific structure that includes several essential elements:
<!DOCTYPE html>: This declaration defines the document type and version of HTML.<html>: The root element that encompasses the entire HTML document.<head>: Contains meta-information about the document, such as the title and links to CSS files.<title>: Specifies the title of the web page, displayed in the browser’s title bar or tab.<body>: Contains all the visible content of the web page, such as text, images, and links.To create your first HTML page, start by opening a simple text editor like Notepad (Windows) or TextEdit (Mac), as these are preferable for learning over more complex HTML editors.
Write the basic HTML code as shown below:
xml
<!DOCTYPE html>
<html>
<head>
    <title>My First Web Page</title>
</head>
<body>
    <h1>Welcome to My Website</h1>
    <p>This is my first paragraph.</p>
</body>
</html>
This code creates a basic web page with a title, a heading, and a paragraph.
Save the file with a .html extension, such as index.html, ensuring the encoding is set to UTF-8.
Finally, open the saved HTML file in your favorite web browser (Chrome, Firefox, Safari, etc.) to see how it renders.
xml
<h1>Main Heading</h1>
<h2>Subheading</h2>
<h3>Minor Heading</h3>xml
<p>This is a paragraph.</p>xml
<a href="https://www.example.com">Visit Example</a>xml
<img src="image.jpg" alt="Description of image" width="300" height="200">xml
<ul>
<li>First item</li>
<li>Second item</li>
</ul>After writing your HTML code, save the file and open it in a web browser to see how it looks.
This immediate feedback helps you understand how your code translates to visual elements on the web.
CSS (Cascading Style Sheets) is a powerful tool used to control the presentation of HTML elements on a web page.
It allows you to separate the content of your website (HTML) from its design and layout.
Learning how to style your website with CSS is essential for creating visually appealing and user-friendly web pages.
CSS is a stylesheet language used to describe the look and formatting of a document written in HTML.
It defines how HTML elements should be displayed, including their layout, colors, fonts, and overall design.
CSS enhances the visual presentation of web pages, making them more attractive and engaging for users.
There are three primary methods to apply CSS to your HTML documents: inline CSS, internal CSS, and external CSS.
1. Inline CSS
Inline CSS is used to apply a unique style to a single HTML element.
It is defined within the style attribute of the relevant element.
For example:
xml
<!DOCTYPE html>
<html>
<body>
    <h1 style="color:blue;text-align:center;">This is a heading</h1>
    <p style="color:red;">This is a paragraph.</p>
</body>
</html>
⚠️ Note: Inline CSS should be used sparingly as it mixes content with presentation, making the HTML code harder to maintain.
2. Internal CSS
Internal CSS is used to define styles for a single HTML page.
It is defined within a <style> element inside the <head> section of the HTML document.
For example:
xml
<!DOCTYPE html>
<html>
<head>
    <style>
        body {
            background-color: linen;
        }
        h1 {
            color: maroon;
            margin-left: 40px;
        }
    </style>
</head>
<body>
    <h1>This is a heading</h1>
    <p>This is a paragraph.</p>
</body>
</html>
3. External CSS
External CSS is used to define styles for multiple HTML pages.
It is stored in a separate .css file and linked to the HTML document using the <link> element inside the <head> section.
For example:
xml
<!DOCTYPE html>
<html>
<head>
    <link rel="stylesheet" href="styles.css">
</head>
<body>
    <h1>This is a heading</h1>
    <p>This is a paragraph.</p>
</body>
</html>
The styles.css file might look like this:
css
body {
    background-color: lightblue;
}
h1 {
    color: navy;
    margin-left: 20px;
}CSS rules are composed of selectors and declarations.
A selector targets the HTML element you want to style, and declarations specify the properties and values you want to apply.
For example:
css
h1 {
    color: blue;
    font-family: verdana;
    font-size: 300%;
}
p {
    color: red;
    font-family: courier;
    font-size: 160%;
}1. Color and fonts
color: Defines the text color.font-family: Specifies the font to be used.font-size: Sets the size of the text.2. Borders and padding
border: Defines a border around an element.padding: Adds space between the text and the border.3. Margins
margin: Adds space outside the border of an element.Here’s a complete example that demonstrates the use of various CSS properties to style an HTML page:
xml
<!DOCTYPE html>
<html>
<head>
    <link rel="stylesheet" href="styles.css">
</head>
<body>
    <h1>Welcome to My Website</h1>
    <p>This is my first paragraph.</p>
</body>
</html>
And the styles.css file:
css
body {
    background-color: lightgrey;
}
h1 {
    color: blue;
    font-family: verdana;
    font-size: 300%;
}
p {
    color: red;
    font-family: courier;
    font-size: 160%;
    border: 2px solid powderblue;
    padding: 30px;
    margin: 50px;
}JavaScript is a powerful scripting language that enables you to add interactivity and dynamic behavior to your website.
It works alongside HTML and CSS to create a more engaging user experience.
Learning how to incorporate JavaScript into your web pages is essential for building modern, interactive websites.
JavaScript is a client-side programming language used to create interactive effects within web browsers.
It allows you to manipulate HTML elements, validate forms, create animations, and much more.
JavaScript is one of the core technologies of the web, along with HTML and CSS, and is supported by all modern web browsers.
There are three primary methods to incorporate JavaScript into your HTML documents: inline JavaScript, internal JavaScript, and external JavaScript.
1. Inline JavaScript
Inline JavaScript is written directly within the HTML elements using event attributes like onclick, onmouseover, onkeypress, etc.
For example:
xml
<!DOCTYPE html>
<html>
<body>
    <button onclick="alert('Hello, World!')">Click Me</button>
</body>
</html>
⚠️ Note: Inline JavaScript should be used sparingly as it mixes content with behavior, making the HTML code harder to maintain.
2. Internal JavaScript
Internal JavaScript is written within a <script> tag inside the <head> or <body> section of the HTML document.
For example:
xml
<!DOCTYPE html>
<html>
<head>
    <script>
        function showMessage() {
            alert('Hello, World!');
        }
    </script>
</head>
<body>
    <button onclick="showMessage()">Click Me</button>
</body>
</html>
3. External JavaScript
External JavaScript is stored in a separate .js file and linked to the HTML document using the <script> tag with the src attribute.
For example:
xml
<!DOCTYPE html>
<html>
<head>
    <script src="scripts.js"></script>
</head>
<body>
    <button onclick="showMessage()">Click Me</button>
</body>
</html>

The scripts.js file:
javascript
function showMessage() {
    alert('Hello, World!');
}
⚠️ Note: External JavaScript is the preferred method for larger projects as it keeps the HTML and JavaScript code separate, making both easier to manage.
JavaScript syntax consists of statements, variables, operators, functions, and events.
Here are some basic concepts:
1. Variables: Used to store data values.
javascript
var message = "Hello, World!";
2. Functions: Blocks of code designed to perform a particular task.
javascript
function showMessage() {
    alert(message);
}
3. Events: Actions that occur in the browser, such as clicks, that can trigger JavaScript code.
xml
<button onclick="showMessage()">Click Me</button>Here’s a complete example that demonstrates how to add interactivity to a web page using JavaScript:
xml
<!DOCTYPE html>
<html>
<head>
    <title>Interactive Web Page</title>
    <script>
        function changeContent() {
            document.getElementById("demo").innerHTML = "Content changed!";
        }
    </script>
</head>
<body>
    <h1 id="demo">Original Content</h1>
    <button onclick="changeContent()">Change Content</button>
</body>
</html>
In this example, clicking the button changes the text inside the <h1> element.
javascript
// This function changes the content of the element with id="demo"
function changeContent() {
    document.getElementById("demo").innerHTML = "Content changed!";
}Creating a website can be an enriching experience, whether you choose to use a website builder or code from scratch.
This comprehensive guide has covered essential topics, from understanding HTML, CSS, and JavaScript to leveraging website builders.
Follow the steps I outlined above and you will gain the knowledge and learn the tools to build a functional, visually appealing website.
If you’re looking to save time and speed up the process of building your website, Elementor Template Kits are the perfect solution.
Designed to give you a head start with pre-built layouts, these kits allow you to create professional websites without needing to start from scratch.

Secure lifetime access to all premium Elementor template kits:
With the right kit, you can have your website up and running in no time, making it perfect for beginners and seasoned pros alike.