Want to track your site’s performance?
By the end of this guide, you will learn how to install Google Analytics on your WordPress site in different methods.
Here’s what we’ll talk about:
What Google Analytics is Why you need Google Analytics How to install Google Analytics Ready? Let’s get started.
What is Google Analytics? Google Analytics tracks and reports website traffic , and gives you the means, free of charge, to understand customers and improve marketing ROI.
Think of it as your website’s personal diary, noting who visits, from where, what they like to do on your site, and how long they stay.
This tool gives you insights into your audience’s behavior, helping you understand what’s working on your website and what’s not.
Why do you need Google Analytics? Imagine you’re throwing a party and want to know how many guests arrived, what food they liked, and which music got them dancing.
Google Analytics does something similar for your website.
It tells you how many visitors you get, which pages they love the most, and how they found your site, and with this information, you can make better management decisions.
Specifically, here are some practical uses for Google Analytics:
Understand visitor behavior: Discover how users interact with your site, what content they prefer, and how long they stay on your pages.Track traffic sources: Identify where your visitors are coming from, whether it’s search engines, social media, or direct visits.Measure conversion rates: Track how well your site achieves its goals, like product purchases, sign-ups, or other actions you deem valuable.Improve user experience: Use data to optimize your site’s layout, speed, and content, and enhance overall user satisfaction.Make informed decisions: Base your website improvements and marketing strategies on solid data, not just guesses.
Choosing the right web hosting provider is just as crucial as using the right tools to track your site’s performance.
That’s where Hostinger comes in, offering an affordable yet powerful hosting solution.
Discover the Hostinger advantage for your WordPress site:
Enjoy a 99.9% uptime guarantee Affordable pricing at just $2.49/month (use the code DARREL10 to get a discount) Global performance and reach with Hostinger’s optimized hosting platform By hosting with Hostinger, you’re setting your website up for success with a provider that prioritizes performance, and reliability.
Make the switch to Hostinger today and experience the difference it makes to your site’s growth and performance.
How to Install Google Analytics Before anything else, you will first have to create a Google Analytics account.
If you already have a Google account, log in with your credentials — if you don’t have yet, create one (it’s free!).
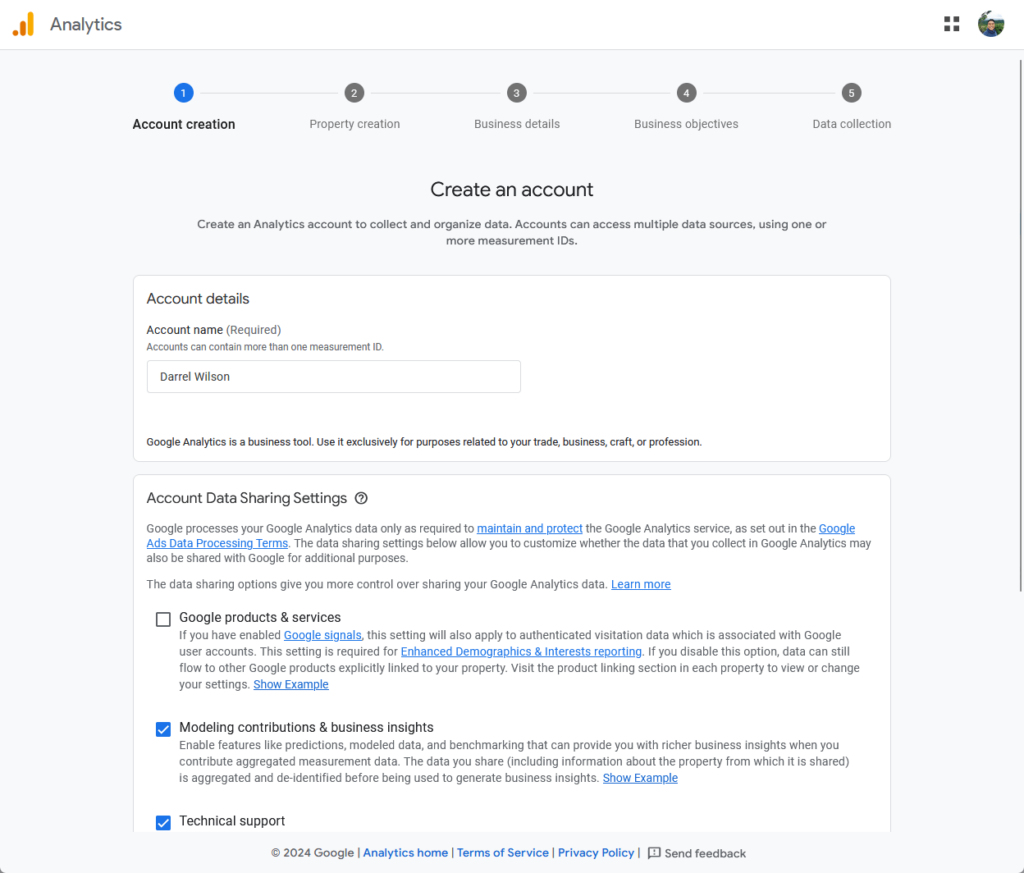
Create a Google Analytics account Once you’ve created your Gmail account, open the Google Analytics homepage and click the get started today button.
This will lead you to the “create an account” page, where you need to enter an account name and select relevant data-sharing settings .
When you’re done with this, scroll down to the bottom of the page and click on the next button.
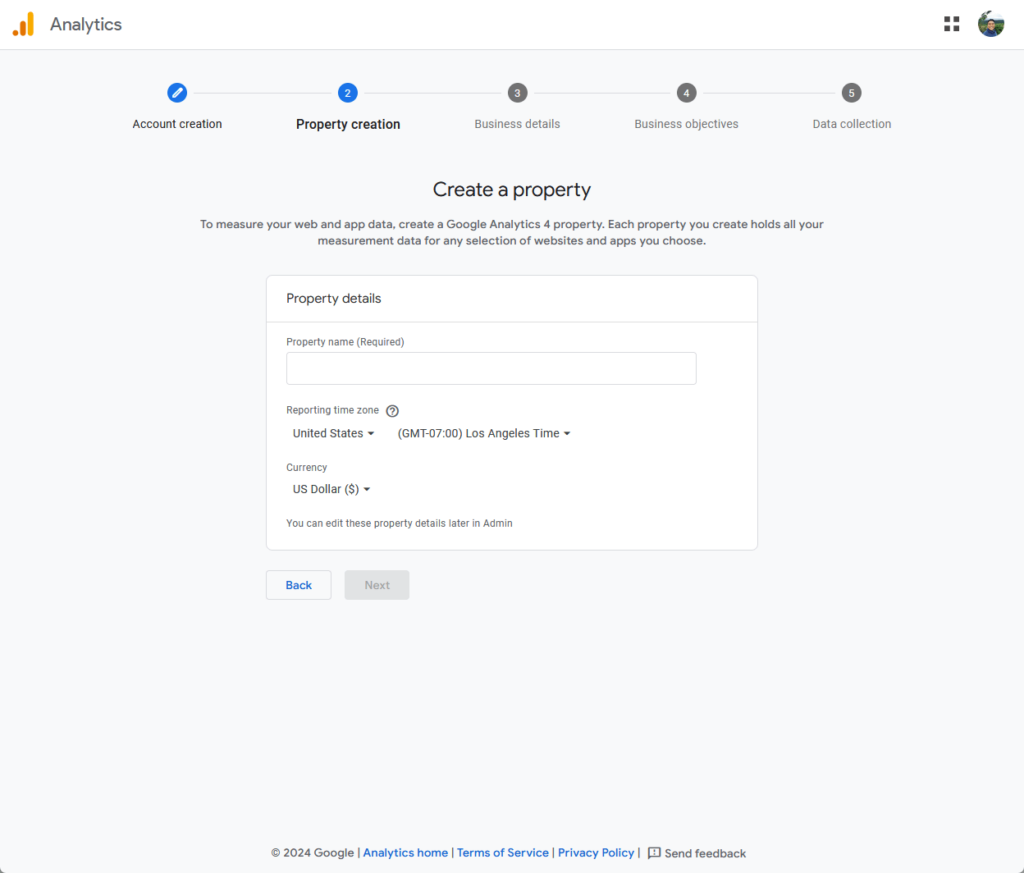
You will then get to the setup screen where you can create a property and select the reporting time zone, currency, and name.
Simply fill in the information and click the next button again.
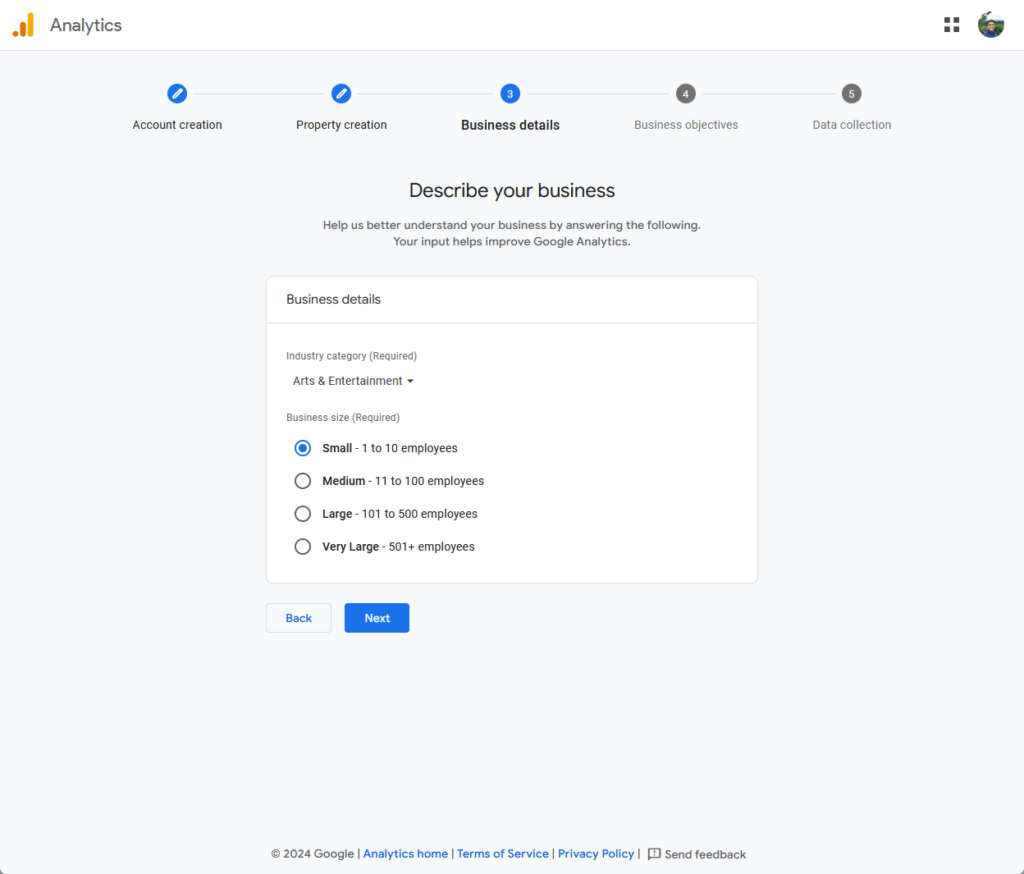
You will then reach the business description setup screen.
This is where you will choose the industry category that best fits your site (or find the closest one) and your business size.
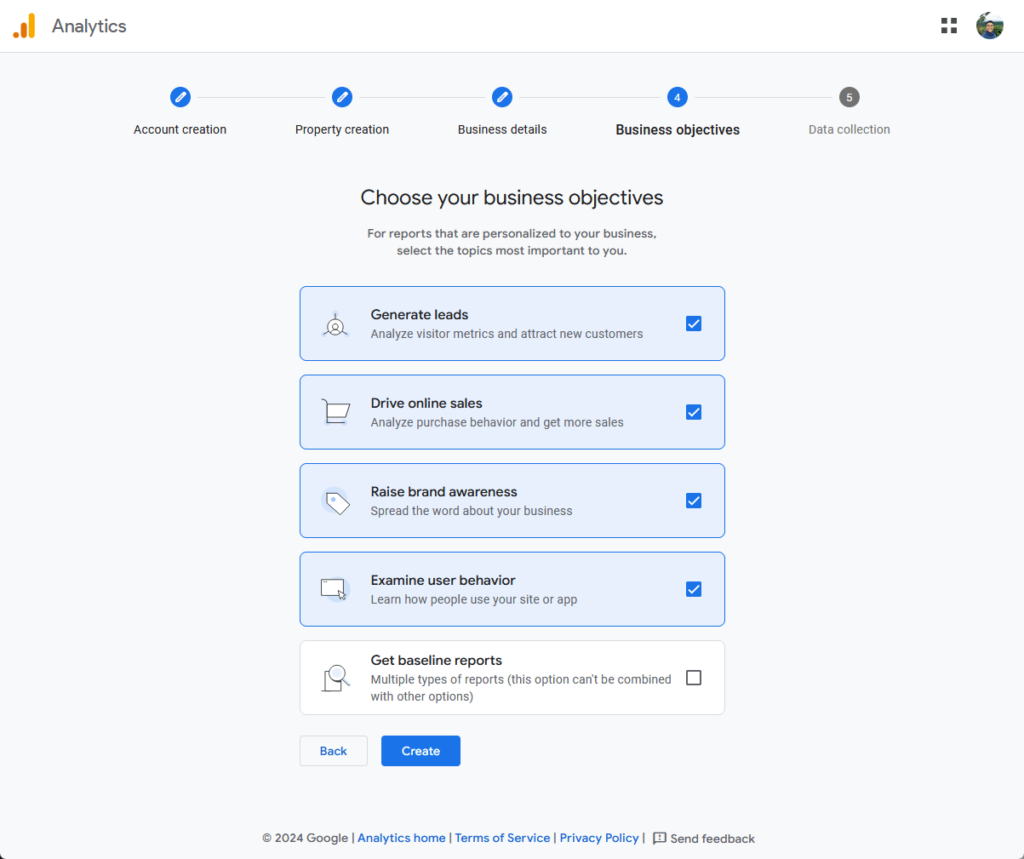
The next stop is choosing your business objectives , which will determine your purposes for using Google Analytics.
Select all that apply here:
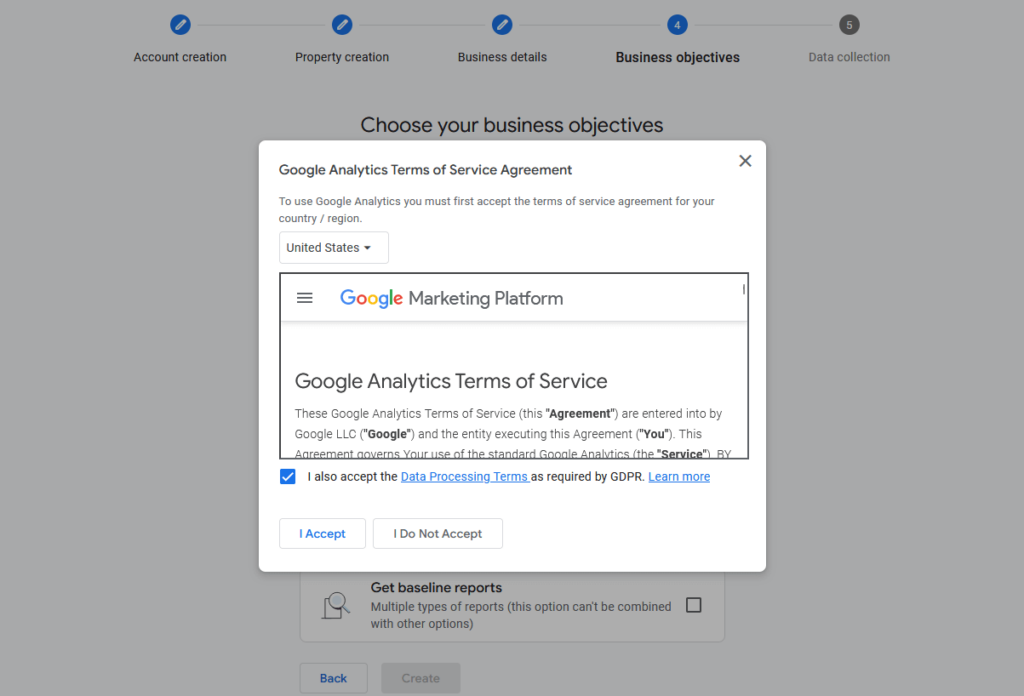
When you click the next button, Google Analytics will display its terms of service agreement.
You may study these carefully, and if you wish to proceed, agree to the data processing terms and click on the accept button .
This is what you will see:
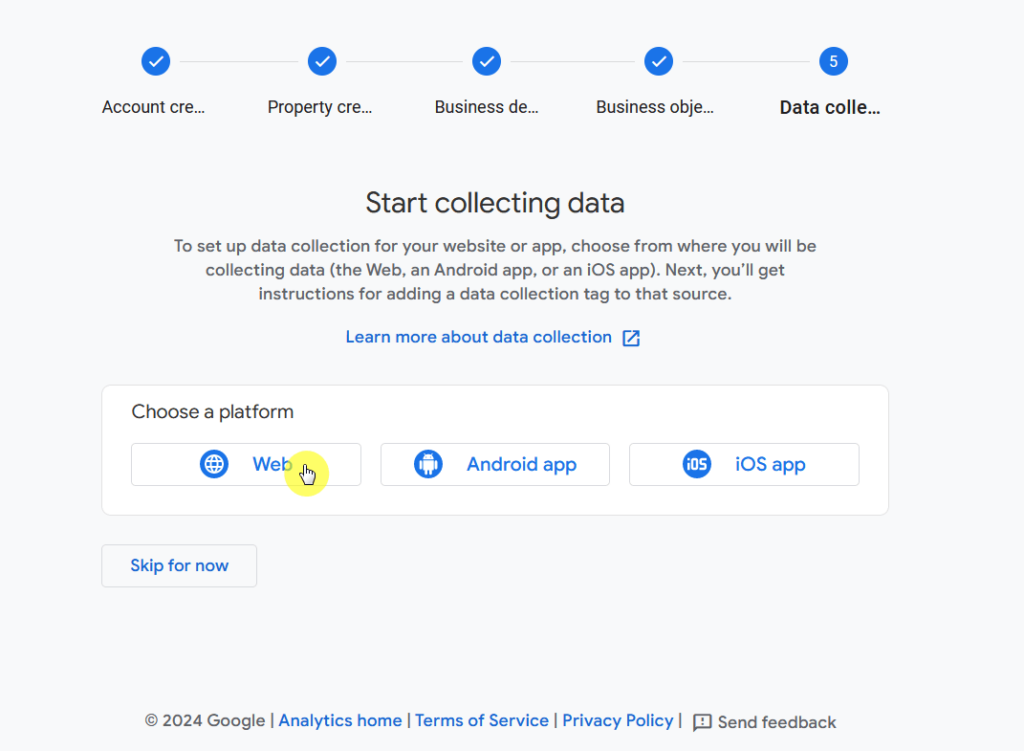
To finalize the creation process, choose your preferred platform to collect the data (you can do this later if you want though).
If the source is a website , then choose the web option:
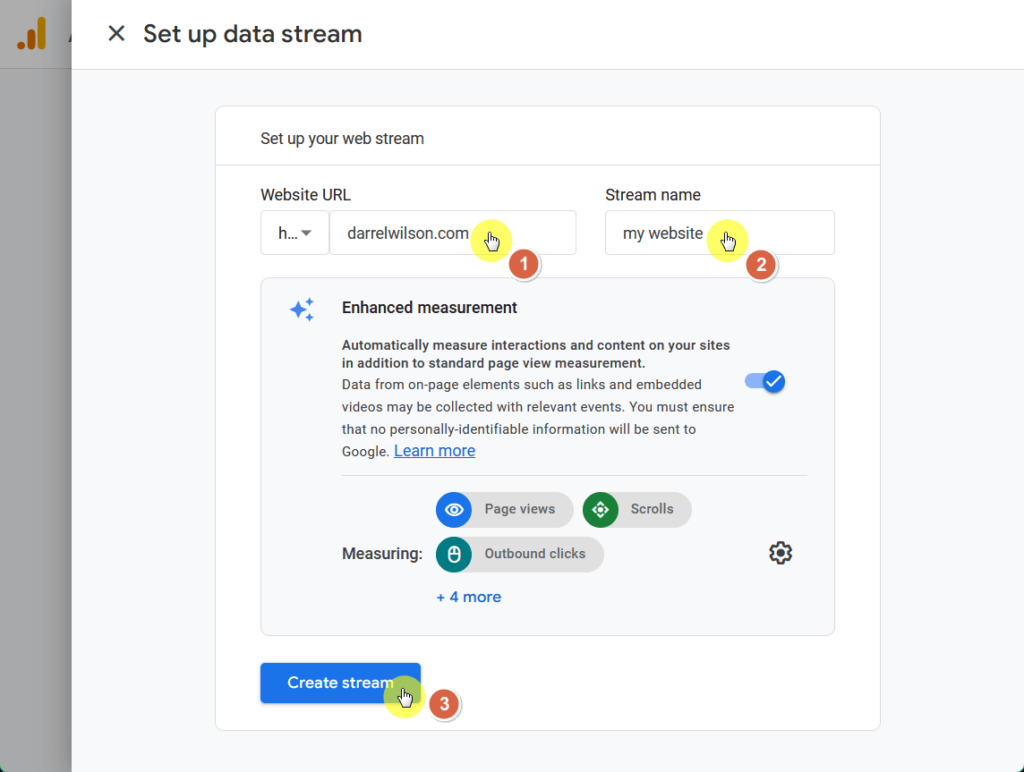
Now to set up your data stream, add your website URL and stream name , then click on the “create stream” button.
It looks like this:
And there you have it!
You will now have the web stream details screen.
But data collection isn’t active yet, since you must install Google Tag on your site, manually or through a website builder.
You can add Google Analytics to WordPress by simply copying and pasting the tracking code to your website code (in the “header.php” file).
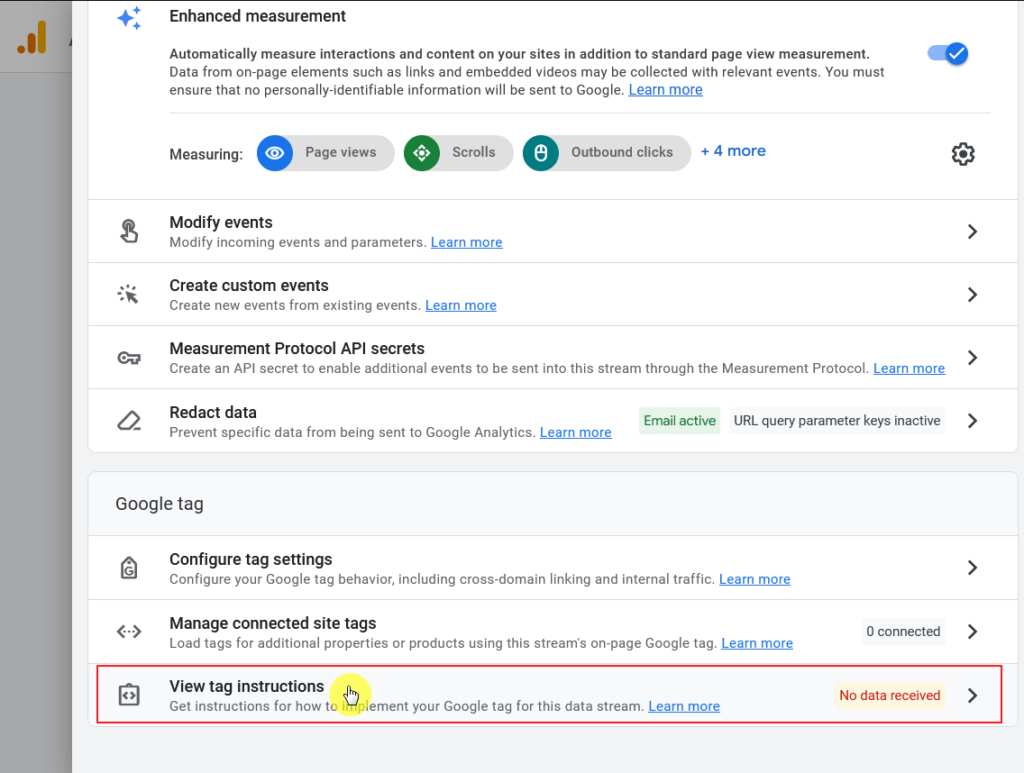
In the web stream details screen, scroll down and click the view tag instructions box as shown in the screenshot below:
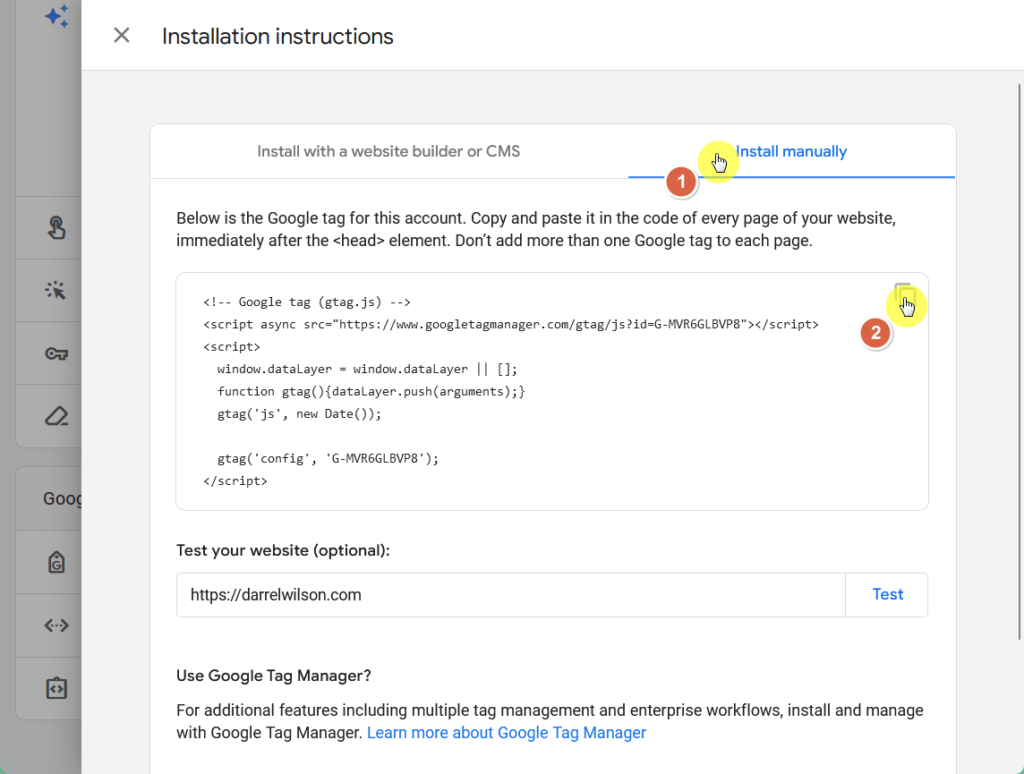
In the next pop-up screen, click on the “install manually ” header.
Here you will see the Google Analytics code for your account — copy this by clicking on the corresponding button in the top right-hand corner of the text box.
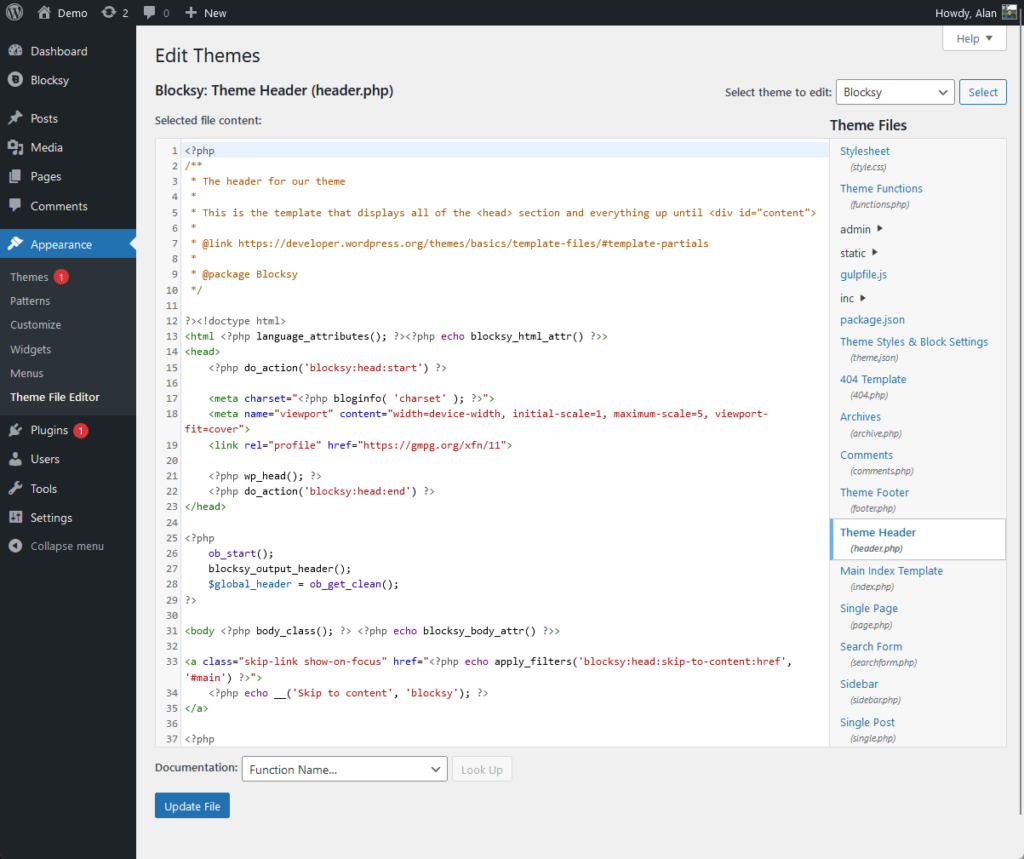
Now head over to your WordPress dashboard and go to appearance > theme file editor > header.php .
It might look a little different depending on your theme, but all themes have a header.php that you can edit here.
Copy the tracking code from Google Analytics and paste it into the header code and make sure that you paste the code right before the </head> tag.
⛔ Warning : Be careful when using the theme file editor to avoid destroying your website. If you’re not comfortable with this, use a different method.
Once it’s done, you will have to wait a few hours, as the installation and data collection can take up to 48 hours to fully activate.
After that, you’re all set! 🙂
Method 2: Install a Google Analytics WordPress plugin There are actually a few plugins out there that you can use to connect your website with Google Analytics.
GA Google Analytics offers a powerful plugin that seamlessly integrates its tracking into your WordPress website.
It offers a user-friendly interface and simplifies the process of adding Google Analytics to your site without the need for manual tracking code insertion.
With this plugin, you can gain valuable insights into your website’s performance for data-driven decision-making straight out of your WordPress editor.
💻 Key features
One-click setup: Easily connect your WordPress site to Google Analytics with just a few clicks.Real-time reporting: Access real-time data on your website traffic to allow you to monitor visitor activity as it happens and respond accordingly.Advanced tracking: Gain deep insights into user behavior, including page views, bounce rates, session durations, and more.Event tracking: Track specific events such as clicks, downloads, video views, and form submissions to measure user engagement.E-commerce tracking: Monitor ecommerce transactions and revenue generated by your online store to analyze sales performance and marketing efforts.
In the add new plugin page, search for “GA Google Analytics” and install and activate the corresponding plugin.
Navigate to the plugin’s settings.
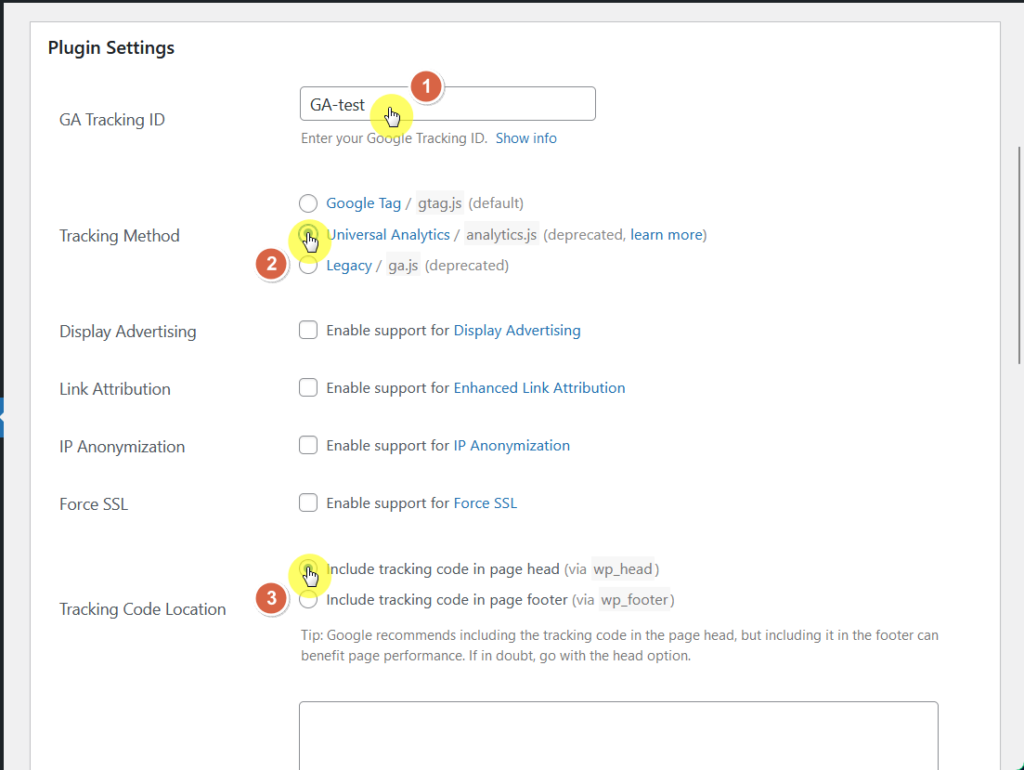
In the “GA Tracking ID” textbox, paste the tracking code you copied from Google Analytics (see Method 1).
You must check the universal analytics and include tracking code in page head boxes that set up Google Analytics on the WordPress website.
Afterward, click the save changes button at the bottom of the page.
That’s it! 👍
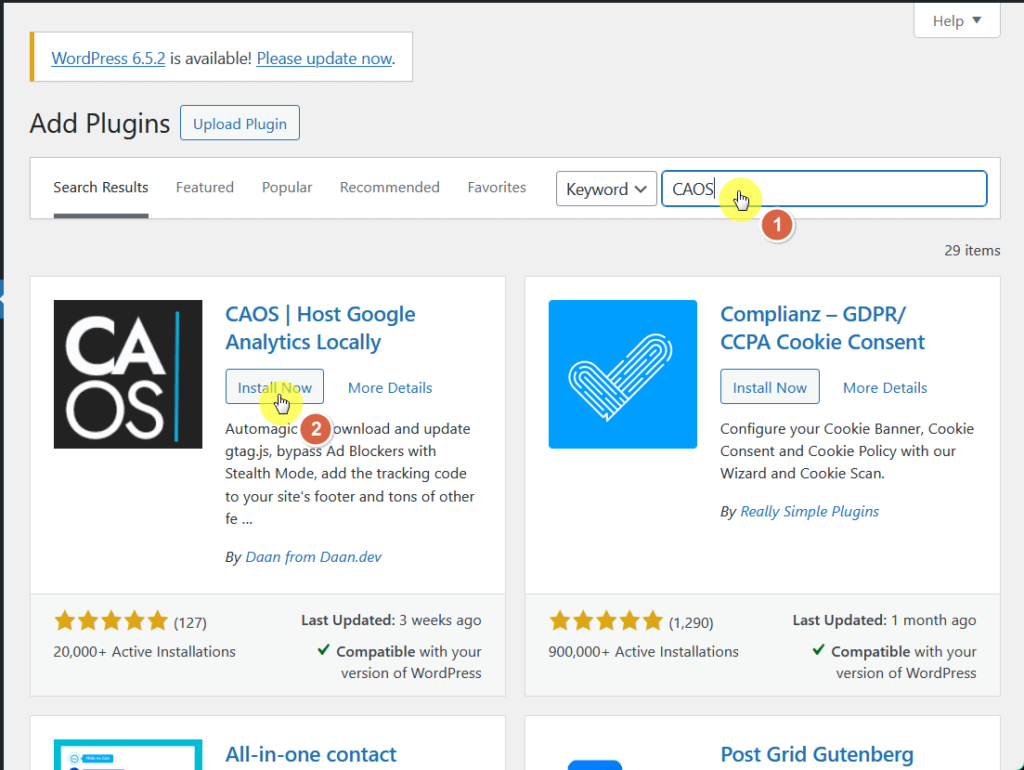
Method 3: Hosting WordPress Google Analytics locally If you don’t prefer methods 1 or 2, there’s another one for you: local hosting.
Google Analytics can be hosted locally on your server for better performance as it improves website loading speed and reduces external HTTP requests.
CAOS (Complete Analytics Optimization Suite) lightweight WordPress plugin designed to host Google Analytics locally.
This plugin also includes features such as asynchronous loading, exclusion of logged-in users, and compatibility with popular caching plugins.
💻 Key features
Privacy compliance: Ensure compliance with privacy regulations such as GDPR and CCPA by processing visitor data locally.Asynchronous loading: Load the Google Analytics tracking code asynchronously to prevent it from delaying the rendering of your web pages.Cache compatibility: Integrate seamlessly with popular caching plugins such as WP Super Cache and W3 Total Cache to ensure optimal performance.Custom tracking code: Customize the Google Analytics tracking code to tailor it to your specific needs and preferences.Logged-in user exclusion: Ensures that administrative actions and testing activities do not skew your website analytics.
In the add new plugin page, search for “CAOS” and install and activate the corresponding plugin:
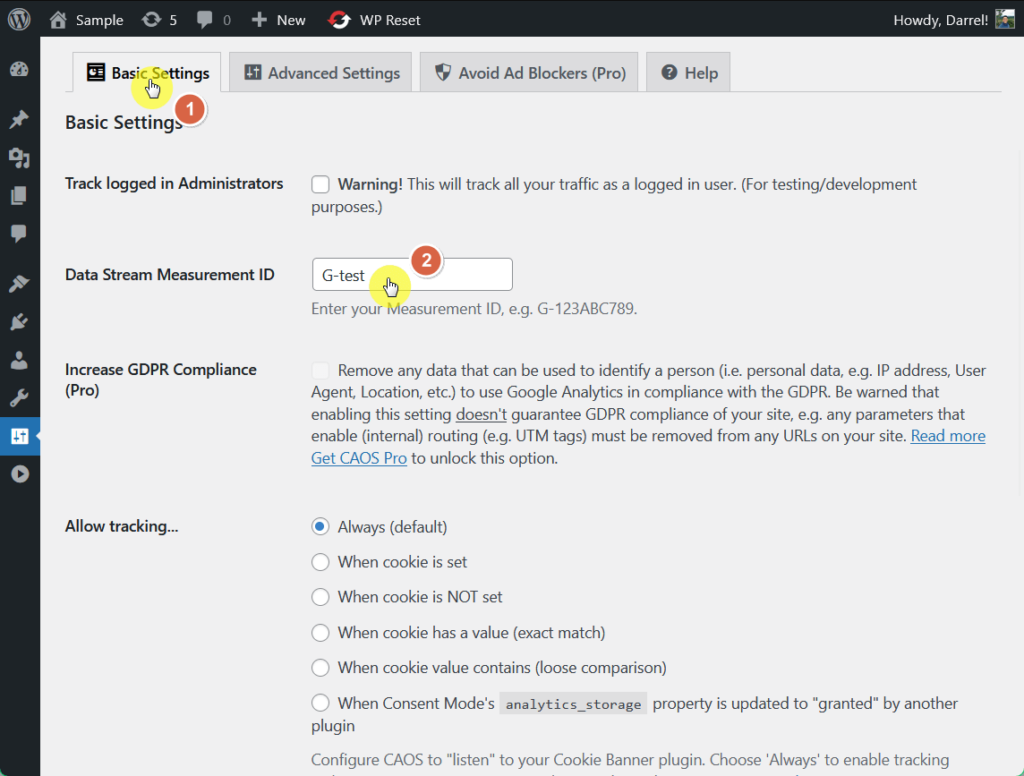
Navigate to the plugin’s settings > go to the basic settings.
In the “Data Stream Measurement ID” text box, simply paste the tracking code you found on the “Google Analytics Tracking Code” page (refer to Method 1).
In addition, select the location to place the tracking script:
Once you’re up, click the save changes & update button at the bottom of the page.
Either manually or through the use of straightforward plugins, setting up Google Analytics on your site need not be too stressful or technical!
Making the Most Out of Google Analytics By integrating Google Analytics, you’re not just collecting data — you’re gaining a treasure trove of insights that can guide you in making strategic decisions.
By allowing access to real-time data, Google Analytics gives you an edge over competitors regarding user satisfaction and conversion.
To truly benefit from the app, always set smart goals, understand your audience, monitor their site behavior, and use custom reports to get the most relevant data.
Wrapping up, you must also consider simplifying your site’s design process with Elementor Template Kits.
Why not take your website to the next level with designs that are not only stunning but also incredibly easy to implement?
Secure lifetime access to all premium Elementor template kits:
Get lifetime access to all premium template kits designed for Elementor Complete with 2 years of dedicated support Only for $99 — that’s already for the lifetime access You enhance your site’s aesthetic appeal and streamline your workflow, saving time and resources.
Make the smart choice for your business and your brand with Elementor.