
Hey folks, it’s time to roll up our sleeves and get down to business. In this tutorial, I’m going to show you how to make a blog with WordPress like a pro.
If you’re not familiar with WordPress, it’s a powerful platform that lets you create professional-looking websites and blogs without having to be a coding genius. With WordPress, you have all the tools you need to create a blog that looks amazing and functions perfectly.
In this step-by-step guide, I’m going to walk you through the entire process of creating your blog with WordPress. We’ll cover everything from selecting a domain name and hosting provider to customizing your blog’s design and adding content.
By the time we’re done, you’ll have a fully functional blog that’s ready to take on the world. So, let’s get started and make some magic happen!
The initial step in establishing your WordPress blog involves choosing a domain name and selecting a hosting provider. A domain name, which serves as your website’s unique internet address, allows people to locate your blog. A hosting service, on the other hand, stores and makes your website files accessible on the internet. Careful consideration of several factors is necessary when selecting a domain name and hosting company.
Firstly, opt for a domain name that is memorable, easy to spell, and relevant to your blog’s content. Additionally, ensure that your chosen domain name is unique and not already claimed by another website.
Secondly, choose a hosting provider that is reliable, fast, and offers exceptional customer support. The hosting company you select should also provide simple WordPress installation, robust security measures, and automatic backups.
Some of the most popular WordPress hosting providers include Bluehost, SiteGround(offers free domain), and HostGator. These hosting companies offer tailored packages specifically designed for WordPress, optimized for speed and performance. Furthermore, they provide easy, one-click WordPress installation and outstanding customer service.
Namehero is one such Hosting platform. It has a rating of 4.78 stars based on 2,575 reviews, showing that the majority of customers are pleased with their purchases. Customers that are pleased with NameHero usually praise customer care, tech support, and reseller accounts. It offers 73% off to their providers.
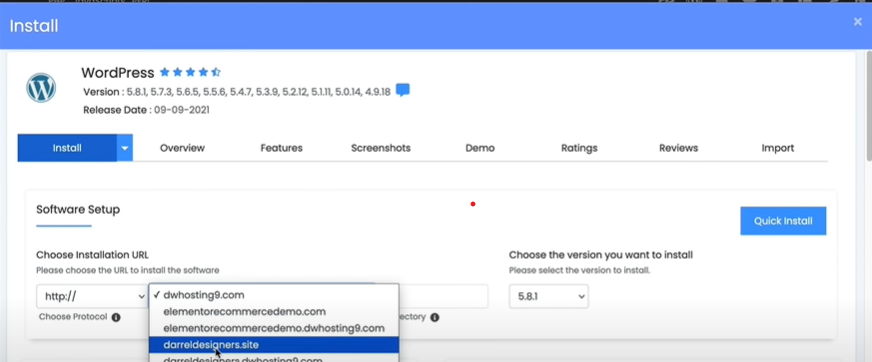
Once you have chosen a domain name and hosting provider, the subsequent step is to configure WordPress. Installing WordPress is incredibly straightforward and requires just a few clicks.
Many hosting companies offer one-click WordPress installation. To install WordPress, assuming your hosting provider allows it, simply log into your account, navigate to the administrative dashboard, and select the WordPress icon. Our comprehensive guide can assist you in installing WordPress on your website.
Now, let’s explore the five-step process of installing WordPress:
Initially, you need to download WordPress as a standalone software. Thankfully, this step is quite straightforward. Visit Hostinger and select a web hosting for you.

Following that, you must pick whether or not to establish a WordPress database and user. Depending on your host, you may not need to do this. Therefore it’s worth studying further. You can find the answer in your host’s documentation or inquire directly.
The wp-config.php file is among the most crucial ones in your WordPress installation. This file, which is found in the root of your WordPress file directory, includes information on the basic settings of your website, including the database connection details.
The wp-config.php file is absent from the first WordPress download. A wp-config.php file will be generated for you by the WordPress setup process using the data you enter during the installation process.
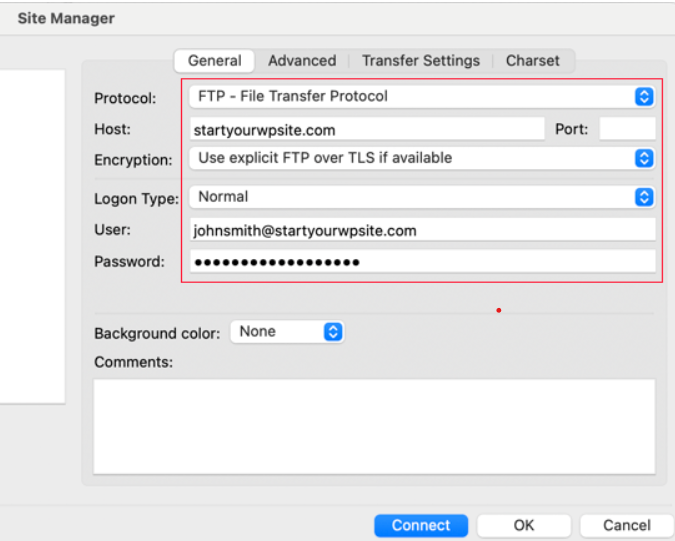
Step 4: Upload your WordPress files through FTP
You are now prepared to install wordpress on your server. Your hosting panel is often where you can find your FTP credentials, which you will need to access. Open FileZilla from here, sign into your server and use the right panel to go to your root directory. Common names for it include www and public_html.
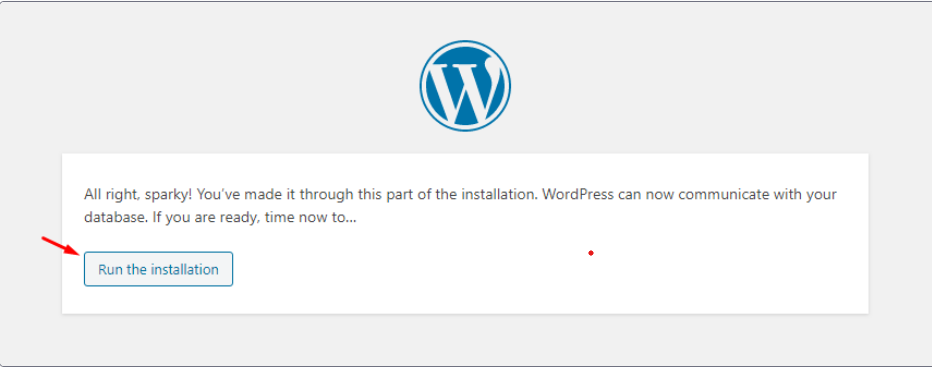
The last thing you have to do is run the WordPress software. Depending on where you installed WordPress, open your favorite browser and do one of the following:
You should see the WordPress logo and a screen full of settings that may be different based on your host:
Most new bloggers stumble over this because they spend a ridiculous amount of time trying to find the ideal theme. So, exhale deeply and calm down. Your primary focus should be creating and sharing content with the public. Until you have a sizable audience to tell you whether or not they like it, don’t worry too much about the design of your website.
The developers of WordPress, offer a brand-new version geared towards bloggers each year. Those who are just starting WordPress to create a blog every year will love this new theme.
However, you’ll probably want to switch to a theme with more functionality if your website grows. Installing a new article is all that is necessary to make a change. Just use your sidebar to navigate to Appearance> Themes > Add New.
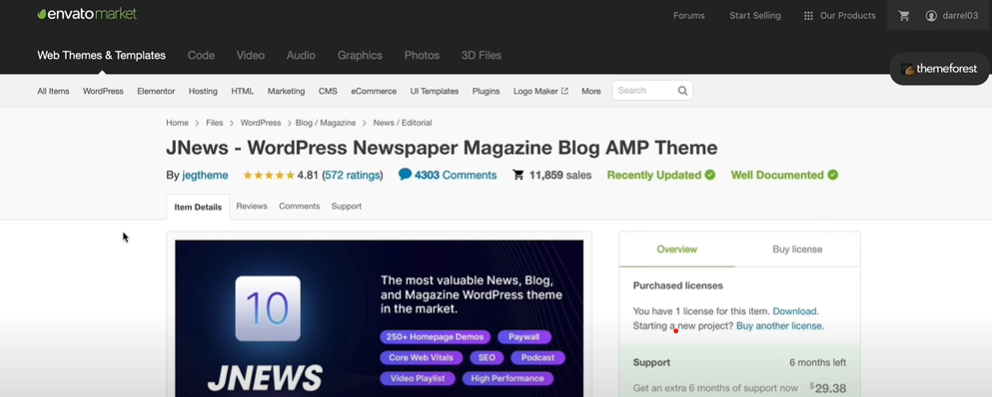
Tap the icon to upload your theme. Next, select the theme zip file you want to upload, install, and activate. Ta-dah! An excellent J-news wordpress premium theme that offers more functionality and customization options than a free theme has just been installed by you.
Despite the abundance of free and premium articles, the quality of the themes made by WPExplorer is unmatched.
Three of the most well-known providers of WordPress themes are ThemeForest, StudioPress, and Elegant Themes. These suppliers provide a vast selection of premium themes that are quick, adaptable on mobile devices, and customizable. Additionally, they provide first-rate customer service and tools to ensure you get the most out of your theme.
Let’s face it, when designing a blog, your theme is like your clothing; you want it to be fashionable, useful, and capture the essence of your company. It’s also not necessarily a one-size-fits-all situation, much as with businesses.
Therefore, you can alter your theme in a few different ways to perfectly fit your website. First, make sure the theme you select complements the tone and message of your business. Choose a simple, clean look if you’re a minimalist. Find a theme that fits your style if you’re all about strong statements and vibrant colors.
It’s time to customize once you’ve discovered a theme you adore. Start with your header; it’s the first thing your readers will notice about you. Include your brand’s name, logo, tagline, and other crucial details.
Let’s now discuss fonts and colors. Remember that when it comes to these design aspects, less is more. Maintain a unified color scheme easy on the eyes, and select legible fonts.
Make sure your blog’s layout makes it simple for readers to navigate. Add a search bar, menu, or featured section to draw attention to your most popular content.
Another fantastic approach to give your site flair is with widgets. Several possibilities include a newsletter sign-up form and social networking icons. Just keep in mind to only use widgets that bring value for your users and are relevant.
Last but not least, don’t overlook your footer. The cherry on top of your blog sundae, if you will. Use it to list your contact information, copyright information, and other crucial things you want people to know.
Like an expert, you know a few straightforward strategies for modifying your WordPress theme. Keep in mind that your music should reflect the personality and message of your business because it’s like your blog’s clothing. You may make a blog that stands out from the competition using imagination and fundamental design ideas.
If themes are the first thing that gets in the way of new writers, then plugins must come in second. It’s too easy to waste hours loading a bunch of plugins before getting anything done in terms of making content. It wastes a lot of time.
You don’t need any apps to start blogging. WordPress comes with everything you need to get started. Here are some steps to follow to install plugin from the dashboard:
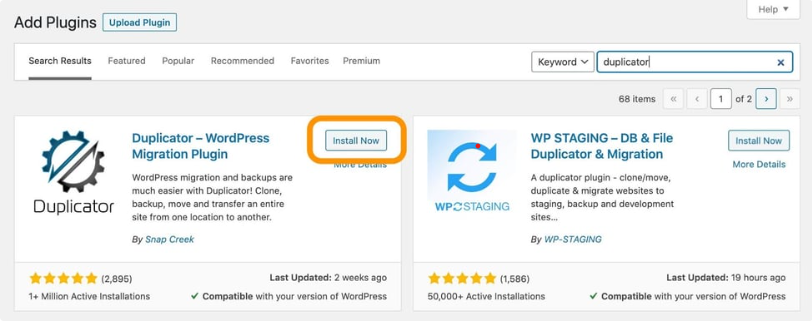

Some well-known plugins are:
1. Akismet: To prevent comment spam from becoming a significant issue, it’s important to use anti-spam measures. Akismet is a highly recommended and popular spam prevention plugin for WordPress. To utilize it, install and activate the plugin, then choose the appropriate “strictness” level. After Akismet scans and filters suspicious comments into the spam folder, make sure to empty the folder regularly.
2. Yoast: Popular WordPress plugin Yoast SEO helps website owners in search engine optimization of their content. It offers features and tools to assist customers in enhancing their on-page SEO, such as adding meta tags, keyword-optimizing content, creating XML sitemaps, and more. With more than 5 million active installs, Yoast SEO has grown to become one of the most widely used SEO plugins for WordPress. Users with little to no technical SEO knowledge should find it easy to use and accessible.
3. MonsterInsights: Using Google Analytics to track visitors to your website is an excellent way to monitor its performance. Follow our guide on setting up Google Analytics for your site. Once you’ve registered and implemented the tracking code, you can start monitoring your site’s performance. While WordPress, as a flexible CMS, provides numerous user-friendly plugins to integrate analytics into your dashboard, you can also access your Google Analytics account daily. We recommend using MonsterInsights, as it works seamlessly with Yoast SEO, allowing you to merge your SEO strategy and monitoring for improved results.
You’re all set to craft engaging content for your WordPress blog! Pages and posts are two vital components of your site’s content, and it’s crucial to create them thoughtfully.
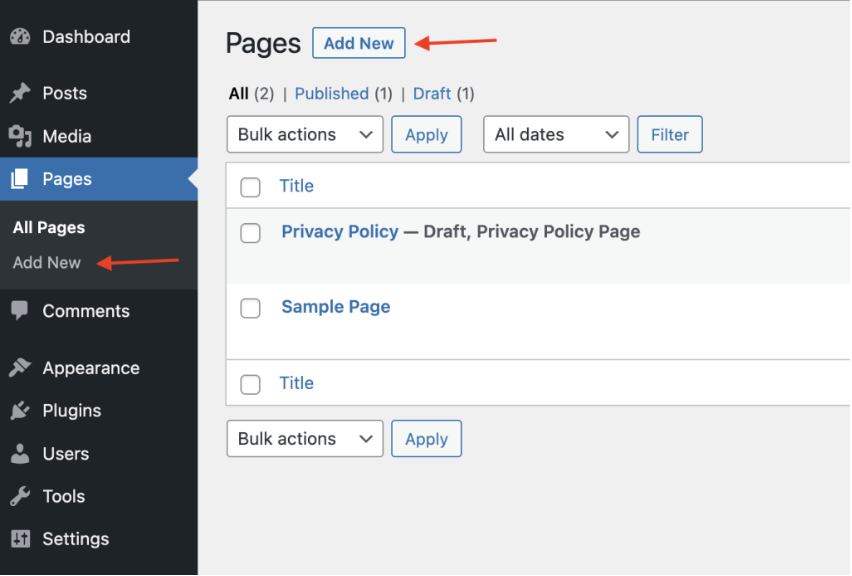
First, let’s examine pages. These static elements provide essential information about your business or website. You should create standard pages like an About page, a Contact page, and a Services page. To make a new page, go to Pages > Add New, which takes you to the editor. Enter a title, add content, and when satisfied, click Publish to make it visible on your site.
Next, let’s discuss posts. These are timely, chronological articles that engage readers and encourage them to return. To create a post, navigate to Posts > Add New, opening the post editor.
Compose your title, add content, and include tags and categories for organization. Consider your target audience while crafting posts—what interests them, and what do they want to learn? By producing informative, captivating content, you’ll retain your readers’ interest.
Using a content calendar is an excellent way to stay organized and ensure the regular publication of fresh content. You can also schedule posts to be published at specific times, eliminating the need to manually press “publish.”
With these tips, you’re on your way to creating outstanding pages and posts for your WordPress blog. Focus on generating content your readers will enjoy, and you’ll be rewarded with an engaged audience.
Ah, SEO – that elusive concept that seems to constantly be changing. But one thing remains constant: if you want your blog to be seen by the masses, you need to optimize it for search engines. Don’t worry; it’s not as scary as it sounds.
Here are some tips to get you started:
There you go, people. Here are some pointers to assist you in making your WordPress blog SEO-friendly. Don’t worry about it too much; just concentrate on producing excellent material that your readers will enjoy, and everything else will take care of itself.
WordPress’s powerful categories and tags feature can help you organize your blog and make it simpler for visitors to locate what they’re looking for. While tags are more precise terms that reflect the substance of your posts, categories are broad groups that group your posts by topic.
Go to the Posts area of the WordPress dashboard and click on Categories or Tags to use categories and tags. You can then add new categories and tags to your posts from that point on.
Here are some pointers for making efficient use of categories and tags:
You can make it simpler for readers to access relevant content on your blog and raise the visibility of your website in search engines by using categories and tags correctly. Spend time developing a logical and structured framework for your categories and tags, then periodically evaluate and adjust it as necessary.
Congratulations! You’ve mastered the WordPress blog creation process. Now that your blog is set up, it’s time to start producing content and disseminating it online.
A fantastic way to express yourself, share your expertise, meet like-minded individuals, and even earn some money is through blogging. Keep in mind that blogging is an ongoing activity that demands commitment and hard work. It is not a one-time task.
But don’t worry, WordPress is a strong tool that can make the procedure much simpler and more pleasurable. To determine which functions best for you and your site, keep trying with various themes, plugins, and functionalities.
We sincerely hope that this advice has been useful in launching your blogging career. So go ahead and publish your first blog entry to share your thoughts with the world!


