Scared the update might do something?
By the end of this guide, you will learn how to update your WordPress theme safely through different methods.
Here’s what we will talk about here:
Why update your theme Backup your website Use a staging environment Ready? Let’s get started!
Why update your WordPress theme?
Updating your WordPress theme is important primarily for security reasons, as it helps patch vulnerabilities that could be exploited by hackers.
Additionally, theme updates often include:
Bug fixes Performance improvements New features that enhance the functionality and user experience Ensuring your theme is up-to-date also maintains compatibility with the latest WordPress core updates and plugins to prevent potential issues and breakdowns.
Methods to Update Your WordPress Theme (Safely)
The bright side here is that there are things you can do to make sure the update process is safe for your website.
Let’s talk about the first method:
Method 1: Backup Your Website
This method involves creating a complete copy of your site, including all files and the database, so you can easily restore it if anything goes wrong during the update process.
Here are the steps to back up your website:
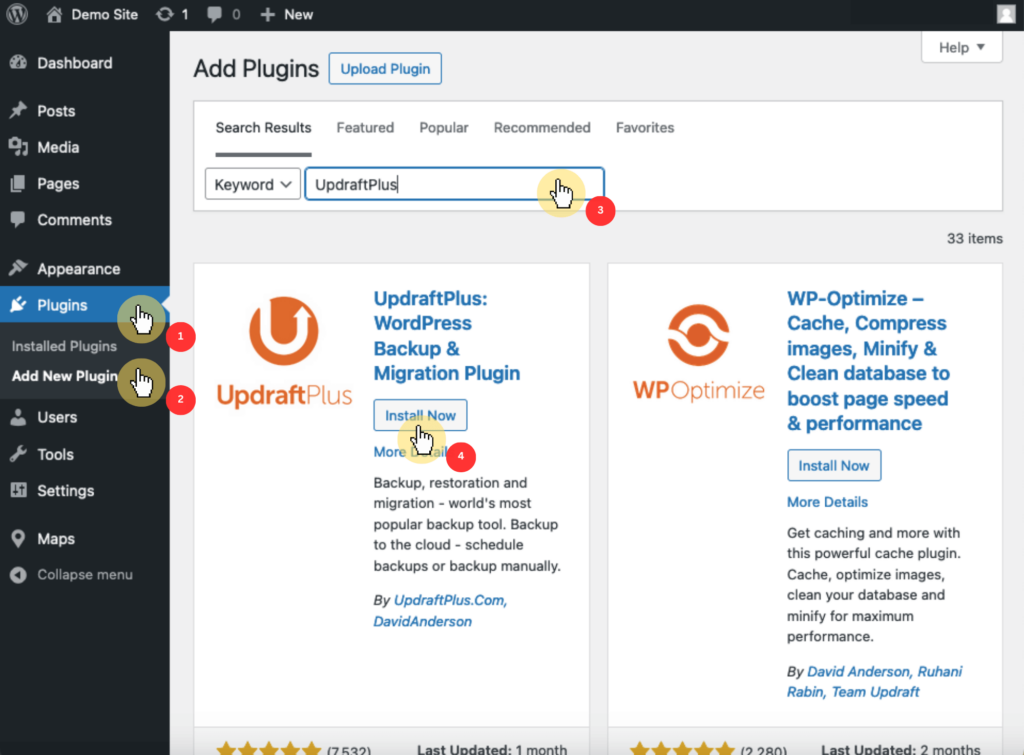
Step 1: Install a backup plugin
You first need to select a reliable backup plugin such as UpdraftPlus (we will use this as an example), BlogVault, or Duplicator.
Then, go to your WordPress dashboard:
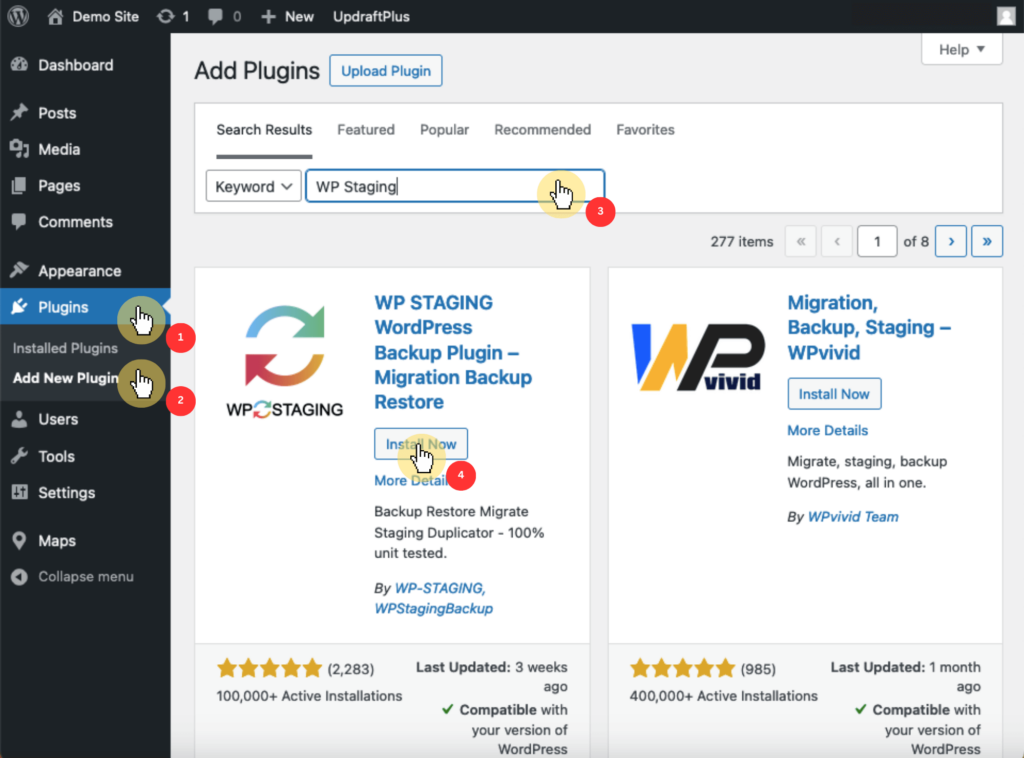
Navigate to plugins > add news Search for the plugin’s name Click the install now button 👉 Related : Best WordPress Backup Plugins: Overview + Key Features
Backing up your WordPress site is important, but so is the foundation that keeps your site running smoothly—your web hosting service.
This is where Hostinger comes into play, offering an unmatched hosting solution that you simply can’t overlook.
Discover the Hostinger advantage for your WordPress site:
Enjoy a 99.9% uptime guarantee Affordable pricing at just $2.49/month (use the code darrel10 to get a discount) Global performance and reach with Hostinger’s optimized hosting platform Invest in Hostinger and ensure your WordPress site is backed by a reliable, high-performance hosting solution.
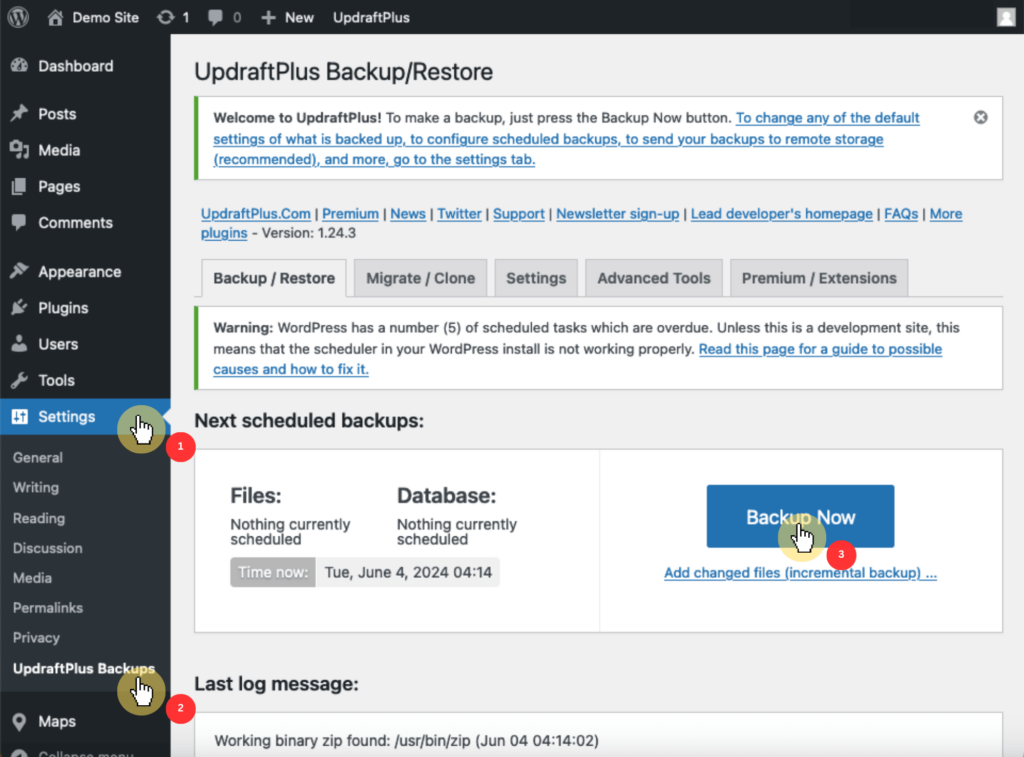
Step 2: Create a manual backup
Go to the plugin settings.
To initiate a backup, click the backup now button and ensure that both the database and files options are selected.
Wait for the backup process to complete, and you should see a confirmation message and the backup listed under the existing backups list.
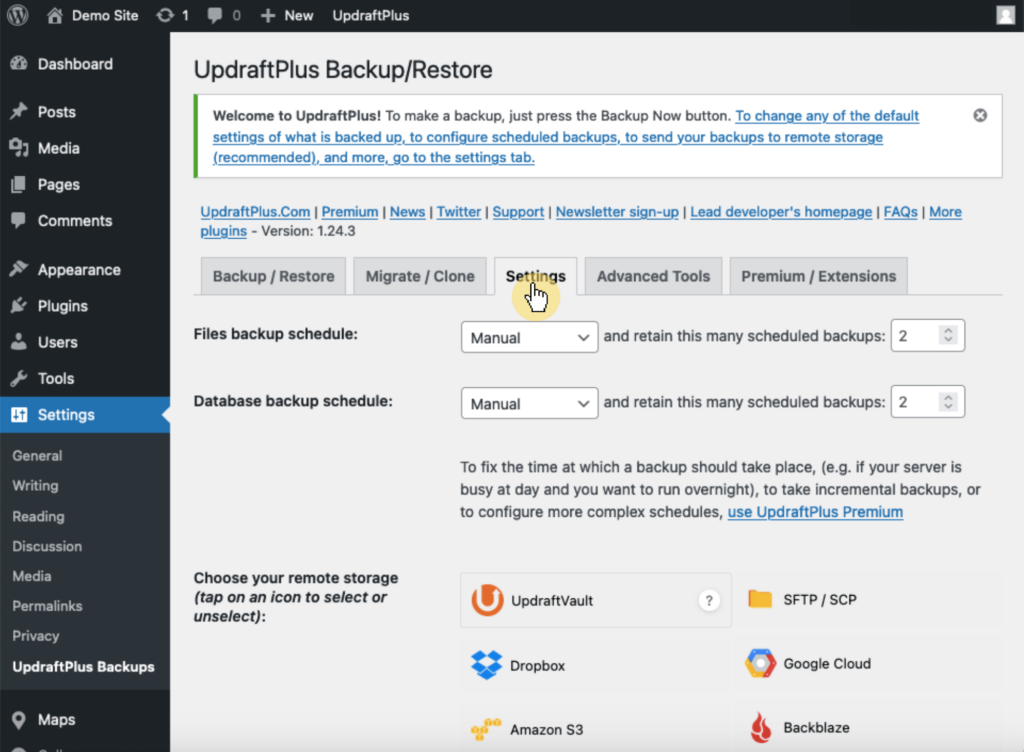
Step 3: Schedule automatic backups
In the plugin, configure the schedule for automatic backups depending on how frequently your WordPress site changes.
Then, select a remote storage option such as Google Drive, Dropbox, or Amazon S3 to store your backups off-site.
What’s great with off-site storage is that you can retrieve them in case there’s a problem with your hosting provider.
Step 4: Update the theme
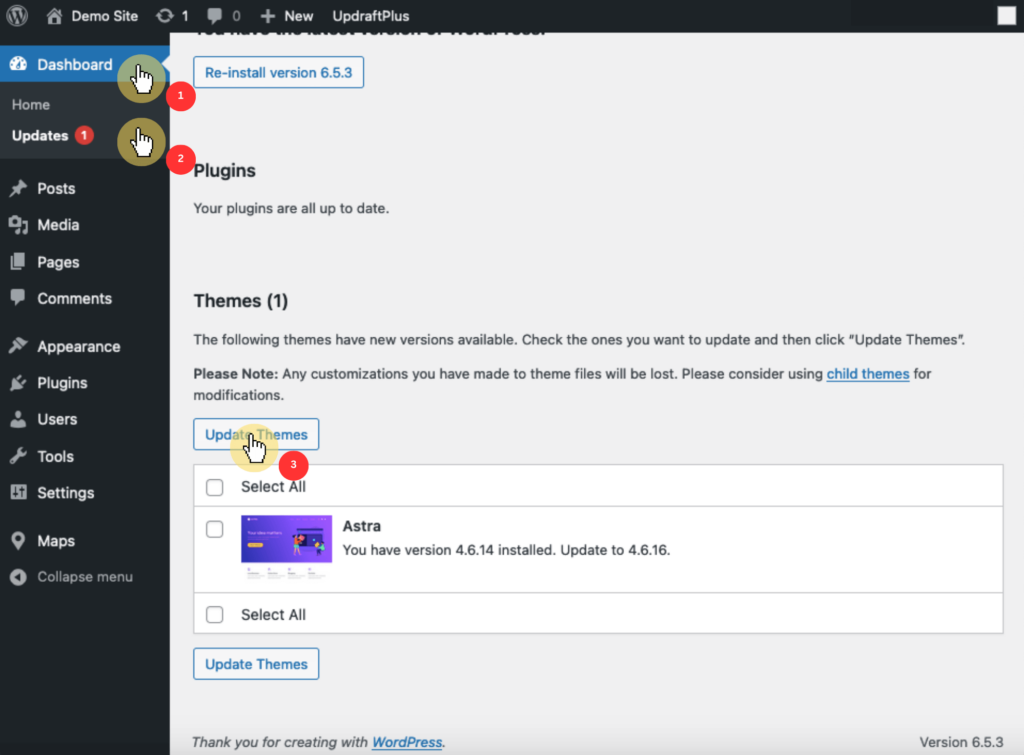
To update the theme, first check for theme updates by going to dashboard > updates or appearance > themes to see if there are any available updates for your theme.
Click the update now button to update your theme.
⚠️ Note : For WordPress themes from the repository, this process is straightforward. For those from other sources, you may need to upload the updated theme files.
After updating, thoroughly check your WordPress website to ensure that everything is functioning correctly.
To ensure that you are viewing the latest version of your site, clear your website cache and browser cache.
To restore from a backup if needed, access your backup plugin settings, select the most recent backup, and click the restore button.
Method 2: Use a Staging Environment
Using a staging environment is one of the safest ways to update a WordPress theme.
A staging site is an exact copy of your live website where you can test changes without affecting the live site.
To create a staging site, you first need to choose a method — either through your hosting provider, using a plugin, or manually.
👉 Related : Best Staging Plugins for WordPress: Free and Paid
For demo purposes, I will be using WP Staging
Step 1: Install and activate the WP Staging plugin
Search for the plugin and install it:
Don’t forget to activate it afterward.
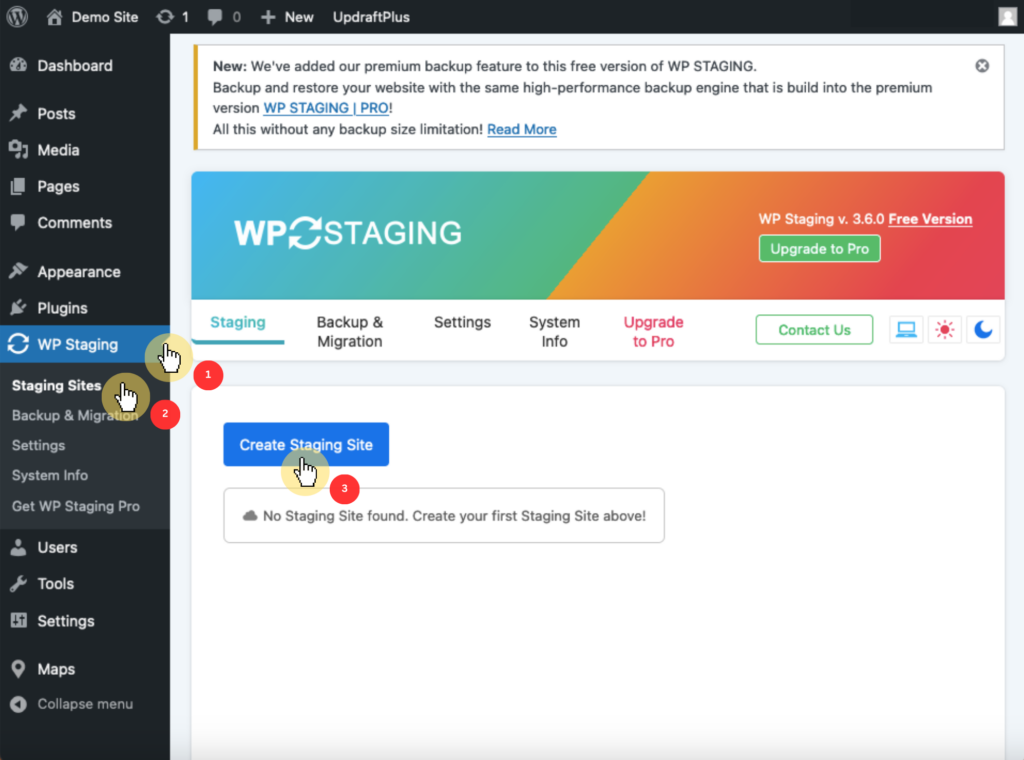
Step 2: Create a staging site
Go to the plugin settings > staging sites > click the create new staging site > enter a name for your staging site:
Select the parts of the database and files you want to clone, though it’s recommended to select everything to get a complete copy of your site.
Click on start cloning to begin the process, and once it is complete, click on the open button to access your staging site.
Step 3: Update the theme on the staging site
To update the theme on the staging site, log in to your staging site using the same credentials as your live site.
Navigate to dashboard > updates , check for any available theme updates, and if an update is available, click on the update button.
Just like updating any regular site.
Step 4: Test the staging site
To test the staging site, thoroughly examine it to ensure that the theme update has not caused any issues.
Check the functionality of menus, forms, and other navigational elements; view your posts, pages, and custom post types to ensure there are no visual problems.
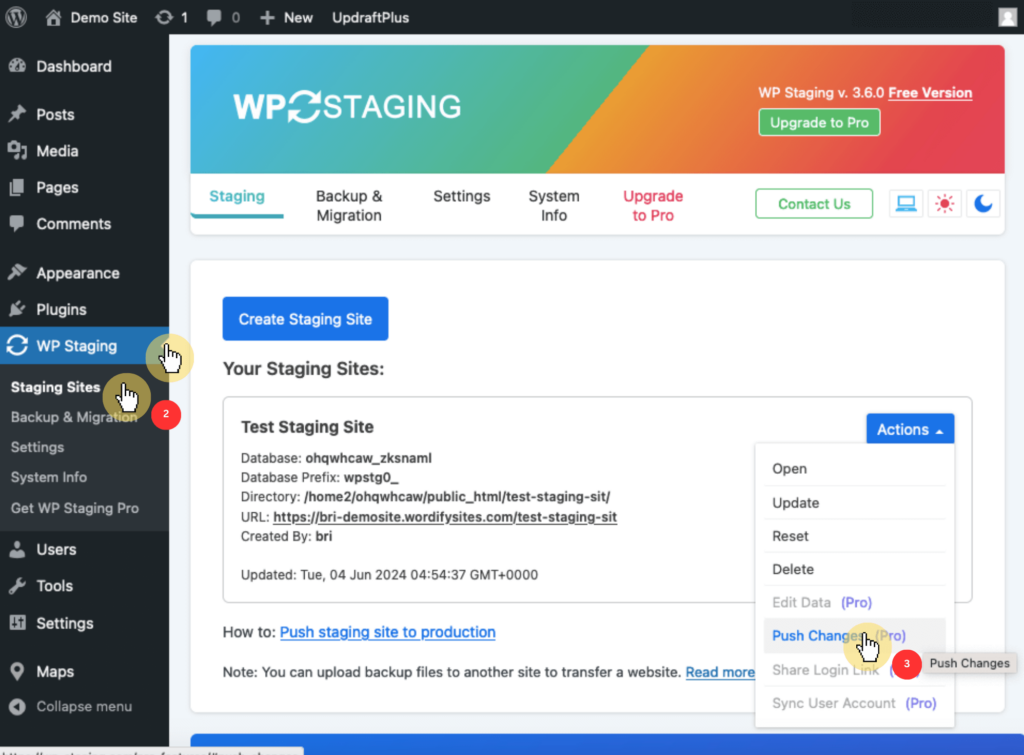
Once you’re satisfied that the theme update works correctly on the staging site, go back to your live site’s WordPress dashboard.
Go to plugin settings > staging sites > find your staging site> click on the push changes button:
After the process is complete, check your live site to ensure that everything is functioning correctly.
Nice and easy! 👏
Method 3: Use a child theme for customizations
Using a child theme allows you to modify your theme without losing changes when the parent theme is updated.
That means you can update the parent theme when needed and you can do all the customizations on the child theme.
Step 1: Create a child theme
Create a new folder in your WordPress installation by navigating to wp-content/themes and creating a new folder for your child theme.
Name it after the parent theme with -child appended to the end (e.g., twentytwentytwo-child).
Inside the child theme folder, create a file named style.css. Add the following code to it, updating the information where relevant:
/*
Theme Name: Twenty Twenty-Two Child
Theme URI: https://example.com/twenty-twenty-two-child/
Description: Twenty Twenty-Two Child Theme
Author: John Doe
Author URI: https://example.com
Template: twentytwentytwo
Version: 1.0.0
*/After that, create a functions.php file in the child theme folder.
Add the following code to enqueue the parent theme’s styles:
<?php
add_action( 'wp_enqueue_scripts', 'enqueue_parent_styles' );
function enqueue_parent_styles() {
    wp_enqueue_style( 'parent-style', get_template_directory_uri() . '/style.css' );
}
?>⚠️ Note : There are online generators that would enable you to create child themes quite easily like this one
Step 2: Update the parent theme
Activate the child theme first like activating any theme in your dashboard — go to the appearance > themes page.
The next part is to update the parent theme:
Create a complete backup of your site, including both files and the database, before updating the parent theme.
Then check for updates by going to dashboard > updates or appearance > themes to see if there are any available updates for your parent theme.
Proceed with the update to the parent theme — this will apply the latest updates without affecting your customizations in the child theme.
After that, inspect your site after updating the parent theme to ensure that everything is functioning correctly.
If any issues arise, compare the updated parent theme files with your child theme files to identify and resolve conflicts.
Updating Your Theme Safely
Keeping your WordPress theme updated is essential for maintaining security, performance, and compatibility with the latest WordPress version.
By following best practices such as backing up your site, using a staging environment, and using update services, you can ensure a smooth and safe update process.
Regular updates not only protect your site from vulnerabilities but also provide access to new features and improvements, enhancing the overall user experience.
Wrapping, let’s talk about keeping your site stylish and up-to-date without the hassle.
Darrel Wilson offers an incredible solution to simplify your web design process.
Secure lifetime access to all premium Elementor template kits:
Get lifetime access to all premium template kits designed for Elementor Complete with 2 years of dedicated support Only for $99 — that’s already for the lifetime access Improve your design toolkit today and maintain a fresh, engaging site without recurring costs or time investment.