Are you struggling with the frustrating 503 error on your WordPress site?
By the end of this guide, you will know how to diagnose and fix the WordPress 503 error so your website runs smoothly.
What you will learn:
Let’s get started!
The 503 error, commonly referred to as the “503 Service Unavailable Error,” is an HTTP error response status code indicating temporary server unavailability.
This error is not specific to WordPress — it can occur on any website, regardless of the platform or hosting environment.
However, in WordPress, this error often surfaces due to issues related to the website’s server, plugins, themes, or excessive resource usage.
This error is particularly frustrating because it not only affects the website’s functionality but also impacts user experience and site performance.
Unlike other errors that might provide more specific clues about the problem, the 503 error is often vague and leaves users guessing about the root cause.
⚠️ Note: It’s important to note that the 503 error is different from a 500 Internal Server Error, which indicates a more permanent server-side issue.
Identifying the causes of a WordPress 503 error is important in troubleshooting and resolving the issue effectively.
This error can stem from various sources, often related to the resources and configuration of your WordPress site.
Here are the possible causes of the 503 error in WordPress:
| Cause | Description | Mechanism |
| Plugin conflicts | Plugins can enhance the functionality of a WordPress site, but they can also cause conflicts, leading to a 503 error. This is especially true with outdated, poorly coded, or incompatible plugins. | When a plugin conflicts with other plugins, themes, or the WordPress core, it can overload the server or cause it to malfunction. |
| Theme issues | Similar to plugins, themes can also be a source of the 503 error, particularly if they are poorly coded or incompatible with the current WordPress version. | A theme can cause excessive server load or conflict with other site components, leading to server unavailability. |
| Server resource overload | Limited server resources (like memory and CPU) can lead to a 503 error, especially on shared hosting plans where resources are distributed among multiple users. | When your website exceeds the allocated server resources, it can overload the server, causing a temporary downtime or a 503 error. |
| Maintenance and downtime | Scheduled maintenance downtime or unexpected downtime from the hosting provider can result in a 503 error. | If the server is intentionally taken down for maintenance or experiences an outage, it will respond with a 503 error to incoming requests. |
| Excessive traffic | Sudden spikes in website traffic, often due to viral content or a marketing campaign, can overwhelm the server. | If the server cannot handle the increased load from the traffic spike, it may result in a 503 error. |
| Poor server configuration | Incorrect or suboptimal server configuration can cause various issues, including a 503 error. | Misconfigured servers may not manage resources effectively or might have incorrect settings that lead to server unavailability. |
| Faulty CDN (Content Delivery Network) services | Although CDNs are meant to improve site performance, they can sometimes cause issues, including a 503 error, if not properly configured. | Problems with CDN services can lead to a disconnect between the CDN and the server, resulting in a 503 error. |
| WordPress Heartbeat API overuse | The WordPress Heartbeat API enables your web browser to establish communication with the server when you are logged into your WordPress dashboard. | Excessive use of the Heartbeat API, particularly in limited-resource environments, can lead to server resource exhaustion. |
Understanding these causes provides a foundation for effectively troubleshooting the WordPress 503 error.
To effectively resolve the WordPress 503 error, a methodical approach is needed.
From deactivating plugins and themes to adjusting server settings, each step is critical in pinpointing and fixing the issue.
Here’s what you need to do:
Plugins can often be the culprit behind this error, especially if they are outdated, incompatible with your version of WordPress, or conflicting with other plugins or themes.
Here are two methods to safely deactivate your plugins:
Go to the installed plugins page of your WordPress website:

Select all the plugins at once by clicking the leftmost checkbox at the top row.
Then, follow these series of steps:

Wait for a minute as the system deactivates all the plugins on your website.
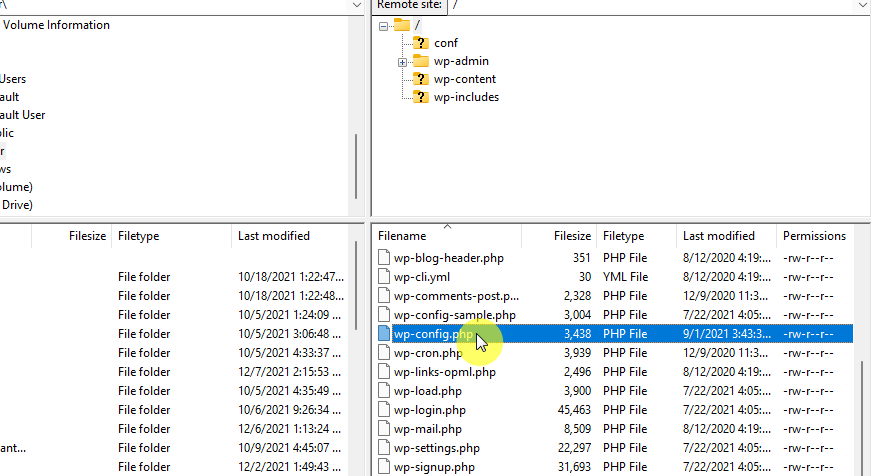
For this method, you need access to your website’s files — either through an FTP client like FileZilla or the file manager from your hosting service.
Get to the /wp-content/ directory and you will find the plugins folder:
plugins_old or plugins_deactivate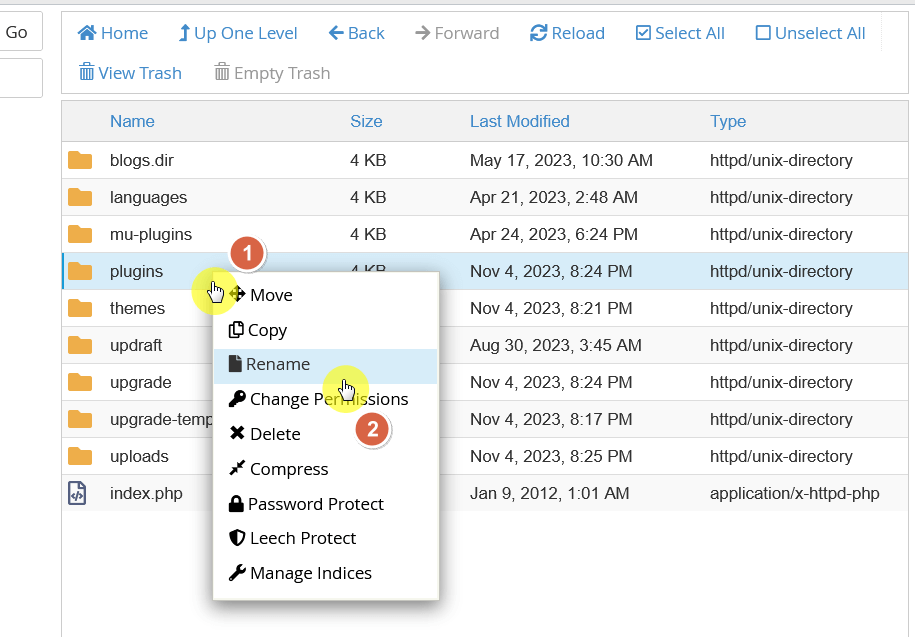
Renaming the folder will force WordPress to deactivate all plugins because it can no longer locate them.
After renaming the folder, visit your website. If the site loads without the 503 error, it’s likely that one of the plugins was causing the issue.
What you need to do now is to identify the problematic plugin:
Once you identify the problematic plugin, you can choose to keep it deactivated, seek an alternative, or contact the plugin developer for support.
If deactivating plugins did not resolve the WordPress 503 error, the next step is to switch to a default WordPress theme.
Themes can sometimes cause issues due to compatibility problems, coding errors, or conflicts with plugins.
Switching to a default theme (like Twenty Twenty-Four) can help determine if your current theme is the source of the error.
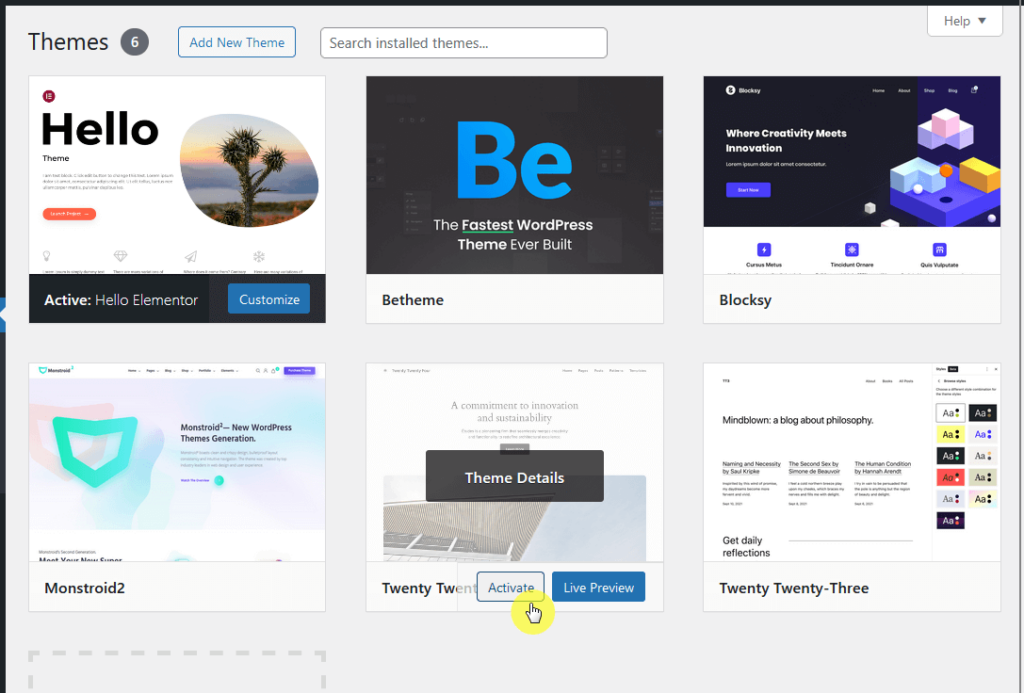
If you can access your WordPress admin area, go to ‘Appearance’ > ‘Themes‘.
Then, activate a default WordPress theme such as Twenty Twenty-Three or Twenty Twenty-Four:
If you cannot access your WordPress dashboard, use an FTP client or File Manager.
Navigate to /wp-content/themes/ and temporarily rename the folder of your current theme.
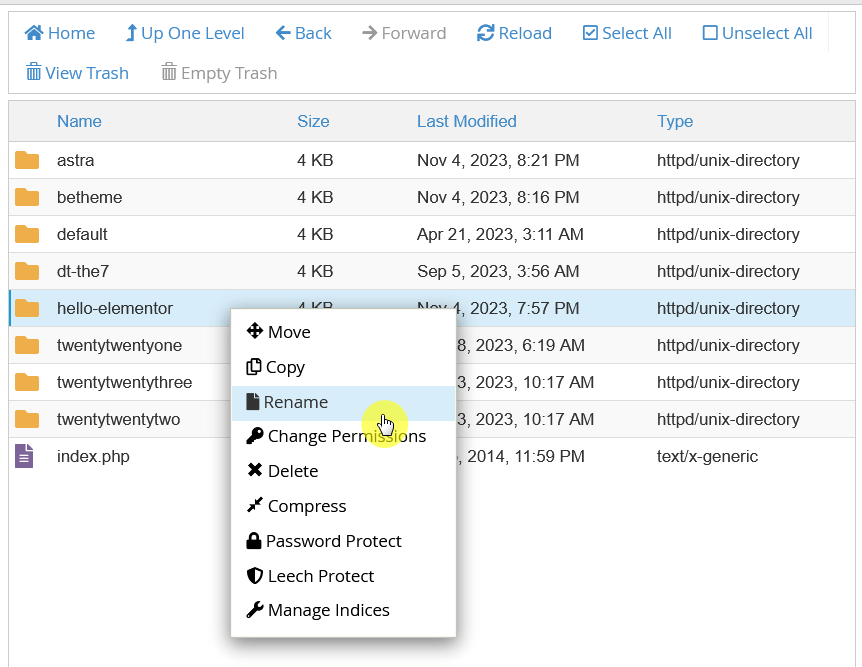
WordPress will automatically revert to a default theme if available.
After switching to a default theme, visit your website to see if the 503 error persists.
If the site works without the error after switching themes, it suggests that your previous theme was causing the problem.
You can confirm it by reactivating the theme and checking if the error reappears.
Should the original theme be the cause:
Consider looking for updates from the theme developer, seeking an alternative theme, or contacting the developer for support if it’s a premium theme.
As you delve into theme management for your WordPress site, consider the broader aspect of web design maintenance.
Darrel Wilson brings an efficient solution to streamline your design process with his Elementor Template Kits.

Darrel Wilson has an incredible offer that you simply can’t ignore:
Take this chance to maintain your website’s functionality and aesthetics, staying updated with design trends while saving time and effort.
If the WordPress 503 error persists after deactivating plugins and switching themes, the next troubleshooting step is to increase the PHP memory limit.
This can happen when your website needs more memory than currently allocated. Increasing the PHP memory limit is a common solution.
Use an FTP client or file manager to access your website’s root directory.
Find the wp-config.php file, which contains important WordPress settings.
Open the wp-config.php file in a text editor. You will need to add a line of code to increase the memory limit.
Add the following line of code just before the line that says /* That's all, stop editing! Happy publishing. */:
define('WP_MEMORY_LIMIT', '256M');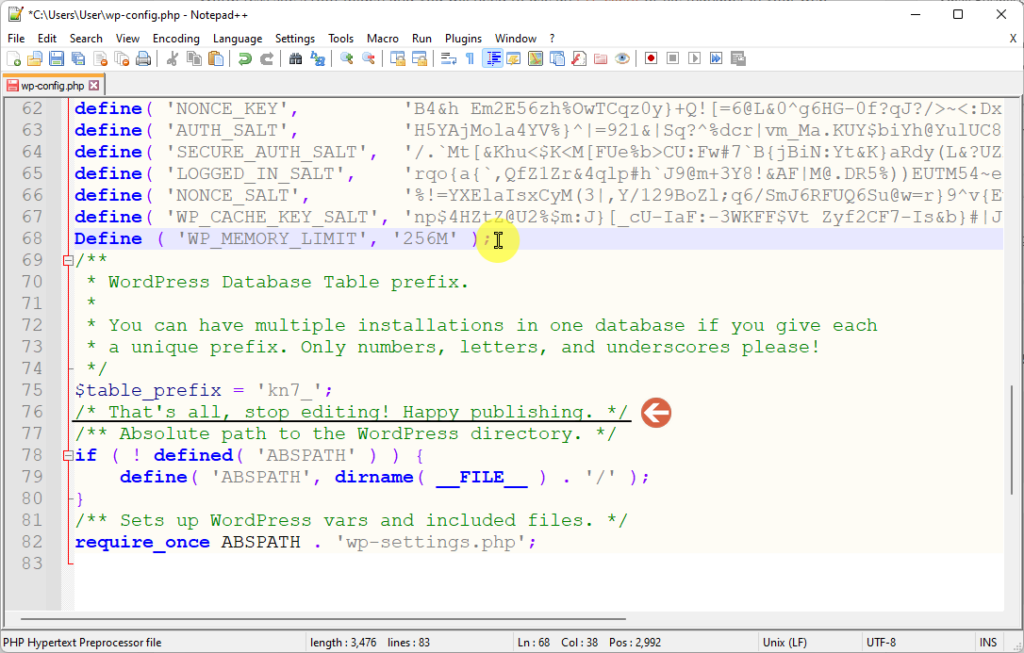
That line increases the WordPress memory limit to 256 megabytes. You can adjust the value (‘256M’) as needed, but 256M is generally a good starting point.
After adding the code, save the file and upload it back to your server if you edited it locally.
⚠️ Note: If you’re uncomfortable making these changes, or if they don’t resolve the issue, contact your hosting provider. They can often increase the memory limit for you or provide guidance on the best approach.
After increasing the PHP memory limit, check your website again to see if the 503 error has been resolved.
If the error persists, it might be due to other issues, such as server configuration problems, which will require further investigation.
When the WordPress 503 error is not resolved by plugin, theme, or PHP memory limit adjustments, it’s time to investigate potential web server issues.
Server-related problems can range from temporary overloads to more complex configuration issues.
Here’s how to approach this:
☎️ Contact your hosting provider
After contacting your hosting provider and reviewing server issues, they can either resolve it or guide your next steps.
If the server is fine and no problems are found, proceed with troubleshooting, like disabling CDN or deactivating WordPress Heartbeat API.
If you’re using a Content Delivery Network (CDN) and still experiencing the 503 error after previous troubleshooting steps, it might be helpful to temporarily disable the CDN.
A CDN can sometimes cause issues due to misconfigurations or connectivity problems between the CDN and your server.
⚙️ How to disable the CDN
If you’re using a host with a CDN feature, there might also be a way to stop the service.
For example, this host allows you to delete or purge the CDN created for the site:
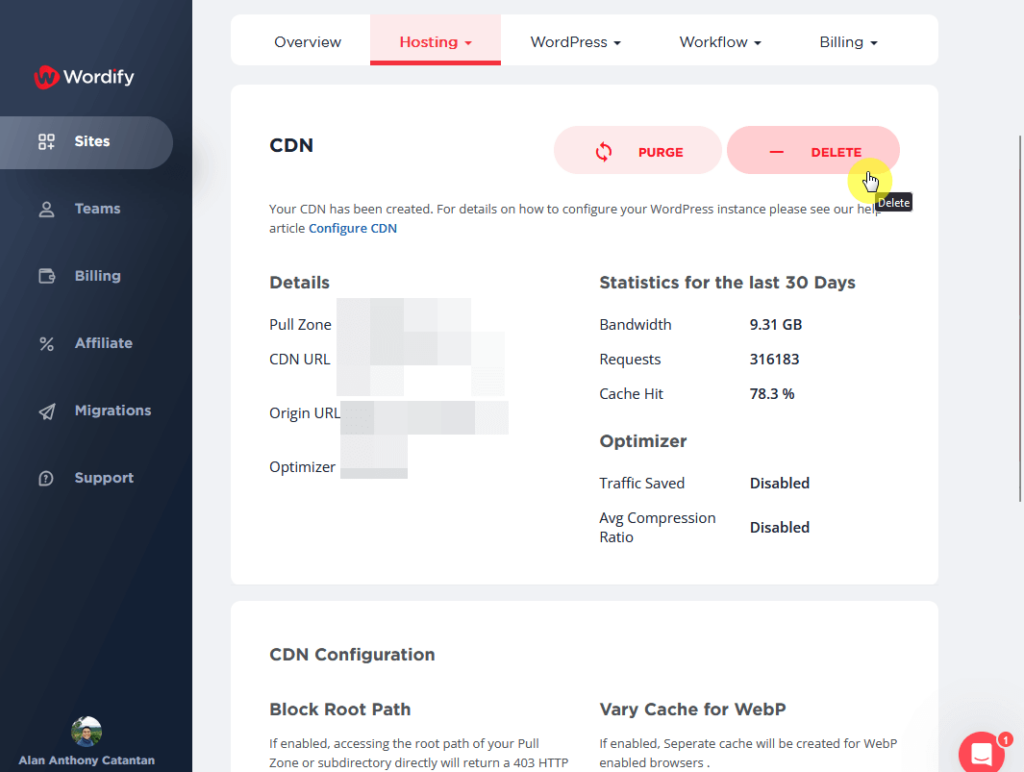
Here are the next steps if CDN is the culprit:
The WordPress Heartbeat API is a feature that provides real-time communication between your web browser and the server.
While it’s useful for auto-saving, session management, and notifications, it can also consume server resources, potentially leading to a 503 error message.
Deactivating or controlling the Heartbeat API can help in resolving this issue:
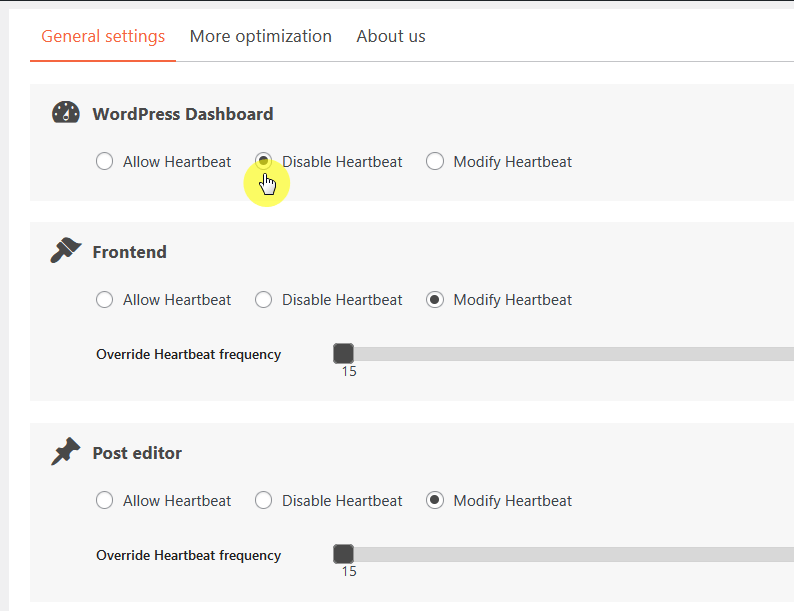
The easiest way to control the Heartbeat API is by using a plugin like “Heartbeat Control” or “WP Rocket” as they offer a user-friendly interface to manage the Heartbeat API.
For example, using the Heartbeat Control plugin, you can easily disable heartbeat like this:
Access your theme’s functions.php file using an FTP client or File Manager.

Add the following code to disable the Heartbeat API:
add_action( 'init', 'stop_heartbeat', 1 );
function stop_heartbeat() {
    wp_deregister_script('heartbeat');
}
⛔ Warning: This method will completely disable the Heartbeat API, which might affect functionalities like post-revision tracking and real-time data on the dashboard.
After deactivating or limiting the Heartbeat API, visit your website to see if the 503 error has been resolved.
If deactivating the Heartbeat API resolves the error, consider using a more balanced approach by limiting its frequency instead of complete deactivation.
If the error continues, it may indicate a complex issue, needing further investigation or a hosting plan upgrade to meet your site’s resource requirements.
Enabling wp_debug mode in WordPress is a valuable step for diagnosing the 503 error, as it allows you to see any underlying PHP errors that might be contributing to the issue.
This mode is a built-in debugging tool that displays errors and warnings which are otherwise hidden.
Use an FTP client or the file manager in your hosting control panel to access your website’s root directory.
Find the wp-config.php file, which is one of the core WordPress files:
Open the wp-config.php file in a text editor. Look for the line that says:
define( 'WP_DEBUG', false );If this line doesn’t exist, you will need to add it.
Change false to true to enable debugging mode. The line should now read:
define( 'WP_DEBUG', true );For a cleaner approach and to avoid displaying errors to visitors, you can also enable debug logging.
This will write errors to a debug.log file instead of showing them on your website. Add the following lines to the wp-config.php file:
define( 'WP_DEBUG_LOG', true );
define( 'WP_DEBUG_DISPLAY', false );
@ini_set( 'display_errors', 0 );
The debug.log file will be located in the /wp-content/ directory. Review this file for any error messages or clues that could indicate what’s causing the 503 error.
Look for recurring errors or any specific plugin, theme, or function names mentioned in the errors. This can help identify the source of the 503 error.
Once you’ve finished debugging, don’t forget to disable the debugging mode by changing true back to false in the wp-config.php file to prevent the display of errors to site visitors.
⛔ Warning: Enabling WP_DEBUG mode on a live site may reveal critical information about your website to visitors. It’s recommended to perform this on a staging site or during low-traffic periods.
If you’ve exhausted the previous troubleshooting steps and the WordPress 503 error persists, it might be time to consider upgrading your hosting plan.
This error can sometimes be a result of limited server resources, particularly on shared hosting plans where your site’s resource usage is restricted.
Upgrading your hosting plan can provide increased resources, better performance, and more stability.
As you consider upgrading your hosting plan, it’s crucial to choose a service that guarantees the reliability and performance your WordPress site deserves.
Elevate your website’s capabilities with Hostinger’s outstanding hosting solutions, designed for optimal performance and reliability.

Discover the Hostinger advantage for your WordPress site:
Choosing Hostinger means more than hosting:
It means partnering with a dedicated ally for top speed, unwavering stability, and exceptional performance.


