If you’re planning to run multiple WordPress websites, you might be wondering if there’s a way to manage them from a single dashboard efficiently. WordPress multisite will let you do just that.
In this guide, you will learn what WordPress multisite is, how it works, and how to create one. We’ll also cover the tips and tricks for running it, its pros and cons, and a list of the best WordPress multisite plugins.
What Is a WordPress Multisite Network? WordPress multisite lets you create multiple sites as part of the same network. It is a highly centralized experience compared to running a separate WordPress installation for every site you manage.
All websites on a multisite network run on a single WordPress installation. They also share plugins, themes, server configurations, and hosting resources.
You can manage a WordPress multisite network on your own or add authorized users who will do it. As long as your hosting supports it, you can create as many sites as you want in the network.
For example, if you create a blogging platform using WordPress multisite, users will be able to create their own blogs on the network and publish their posts. That said, only you as the network admin will be able to add, remove, or change the blogging platform’s main features.
How a WordPress Multisite Works The person who creates a WordPress multisite network is the super administrator or network admin . They can make changes to all the sites within the network. This includes adding new plugins and themes and editing server settings.
If you want, you have the option to allow other people to manage WordPress sites within the multisite network. You can assign them the role of website administrators , enabling them to make limited changes to the websites they’re assigned to.
Site admins can publish, edit, or manage blog posts. However, they can’t manage plugins and themes installed on the network by the super administrator.
We’ll explore how WordPress multisite differs with regard to data, media, themes, plugins, and security in the following sections.
Data
Upon activating a multisite network, WordPress will create seven new database tables which will store the entire network’s data:
wp_blogs wp_blog_versions wp_registration_log wp_signups wp_site wp_sitemeta wp_sitecategories (optional) WordPress will create 11 new database tables to store its data when creating a new website within the network. This keeps the data of each site separate. As a result, other site administrators can’t access this information.
A numbered prefix will represent each website in the database tables. For example, for the WordPress site number 05, the new database tables will look like the following:
wp_5_posts wp_5_postmeta wp_5_comments wp_5_commentmeta wp_5_users wp_5_usermeta wp_5_links wp_5_term_relationships wp_5_term_taxonomy wp_5_terms wp_5_options Media
After a multisite network is formed, WordPress will create a new directory called “sites ” in wp-content/uploads . Whenever a new website is created within the network, WordPress will create a new directory within sites for its media files.
However, main site media uploads will stay in the original directory wp-content/uploads .
Themes and Plugins
When it comes to themes and plugins, they are stored the same way as they would be on a normal site – in wp-content/themes and wp-content/plugins, respectively.
Only the super administrator can install new themes and plugins. The super admin can activate both themes and plugins for the entire multisite network.
However, there’s a vital difference between plugins and themes when universally activated. Site admins can’t deactivate plugins that were network-activated. However, they can activate or deactivate a network-activated theme.
If a plugin isn’t activated universally in the network, each site admin has the option to activate or deactivate it by themselves.
Super administrators can also activate a theme for the whole network or an individual site only. This is excellent for hosting client sites that use different themes. If a theme isn’t network-activated or assigned to a specific site, the site admins won’t be able to see it.
Security
Upon finishing the WordPress multisite installation, the super admin can access the Network Settings . Various security-related settings can be configured here, such as disabling new registrations, disabling new users, and banning certain email domains.
How to Create a WordPress Multisite Although creating a WordPress multisite network involves some technical steps, the process is relatively straightforward. All you have to do is access some files on your host and copy and paste the correct code into them.
Before you install WordPress multisite, make sure you have the following prerequisites:
Hosting. To get your WordPress multisite online, you must purchase a plan from a hosting provider. Ensure your hosting plan supports multisite and has sufficient resources to host all the WordPress sites you plan to include in the network.Domain name. You will need to purchase at least one domain name for the main website. If you want each website in the network to have a different domain, you’ll have to buy them separately.WordPress installation. Once you have set up hosting and a domain name, install WordPress. The fastest method involves using the 1-click installation method that most hosting providers offer via the hosting control panel.1. Prepare for the Transition This step applies to users who want to turn an existing WordPress site into the main site of a multisite network. If you’re using a fresh WordPress installation, feel free to skip this step.
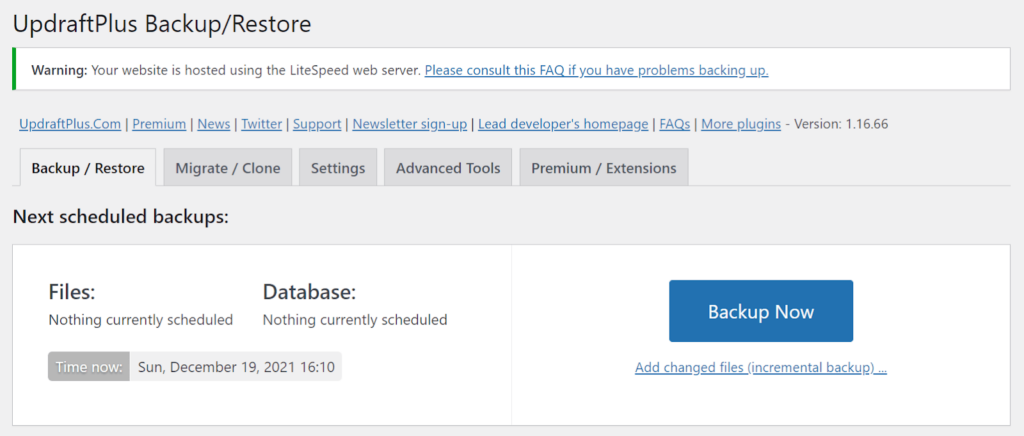
First, you should back up the files and database of your existing WordPress website. The fastest and simplest way to backup your entire site UpdraftPlus
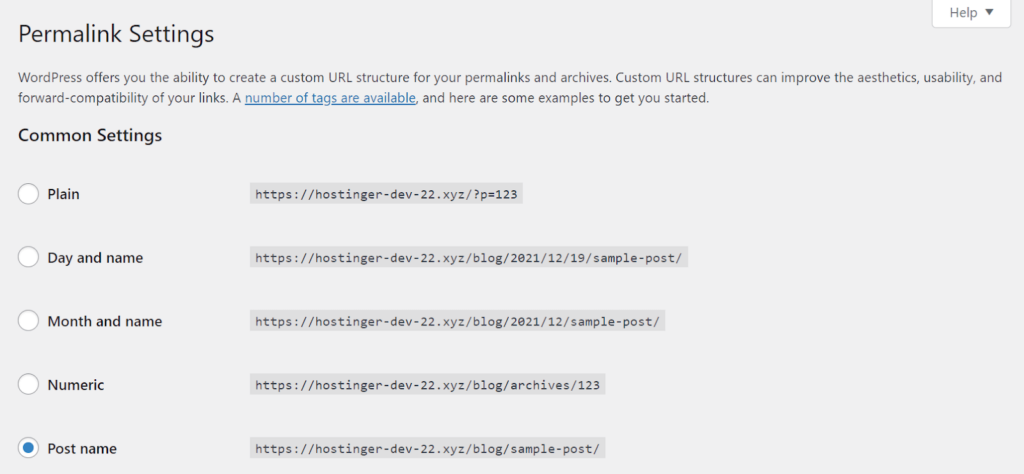
Install and activate UpdraftPlus. Go to Settings -> UpdraftPlus Backups. Select Backup Now. Next, review the permalink settings of the existing WordPress website and make sure that Pretty Permalinks are correctly set up. This means that the links to your website’s posts and pages shouldn’t be random characters. To change permalink settings, go to Settings -> Permalinks .
Finally, deactivate all the plugins on your existing site. To do this, go to Plugins and use Bulk actions to Deactivate all the plugins at once.
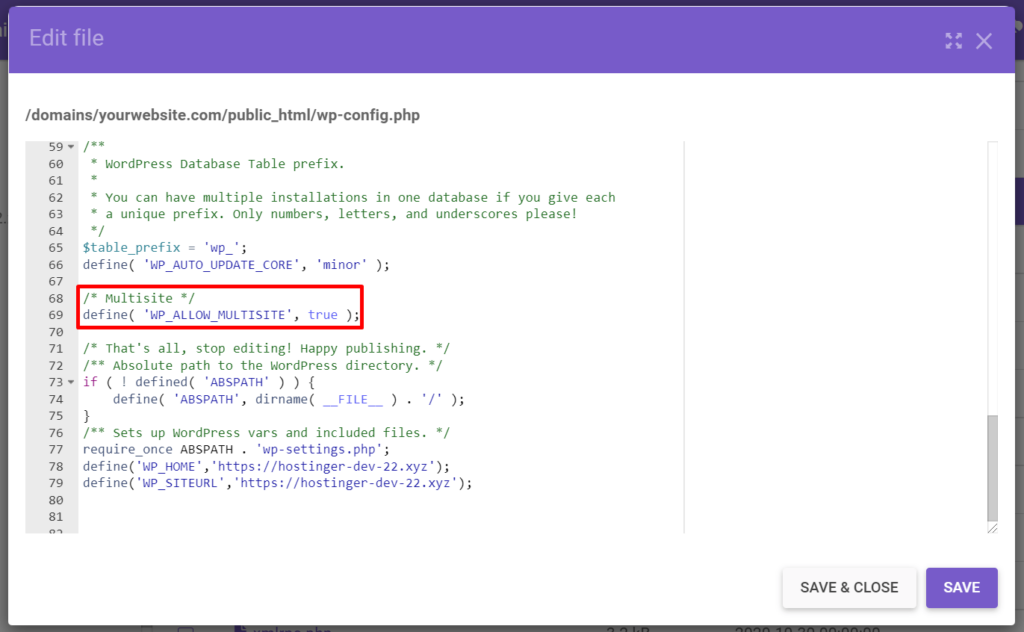
2. Allow Multisite in the wp-config.php File Go to your hosting control panel, open the File Manager , and locate the wp-config.php file. Back up the original wp-config.php file on your computer first in case an error occurs.
Open the wp-config.php file and paste the following code snippet before the line saying /* That’s all, stop editing! Happy publishing. */:
/* Multisite */
define( 'WP_ALLOW_MULTISITE', true );
Save the changes made to the wp-config.php file.
3. Set Up the Multisite Network The previous step has enabled Network Setup . To access it, go to Tools -> Network Setup .
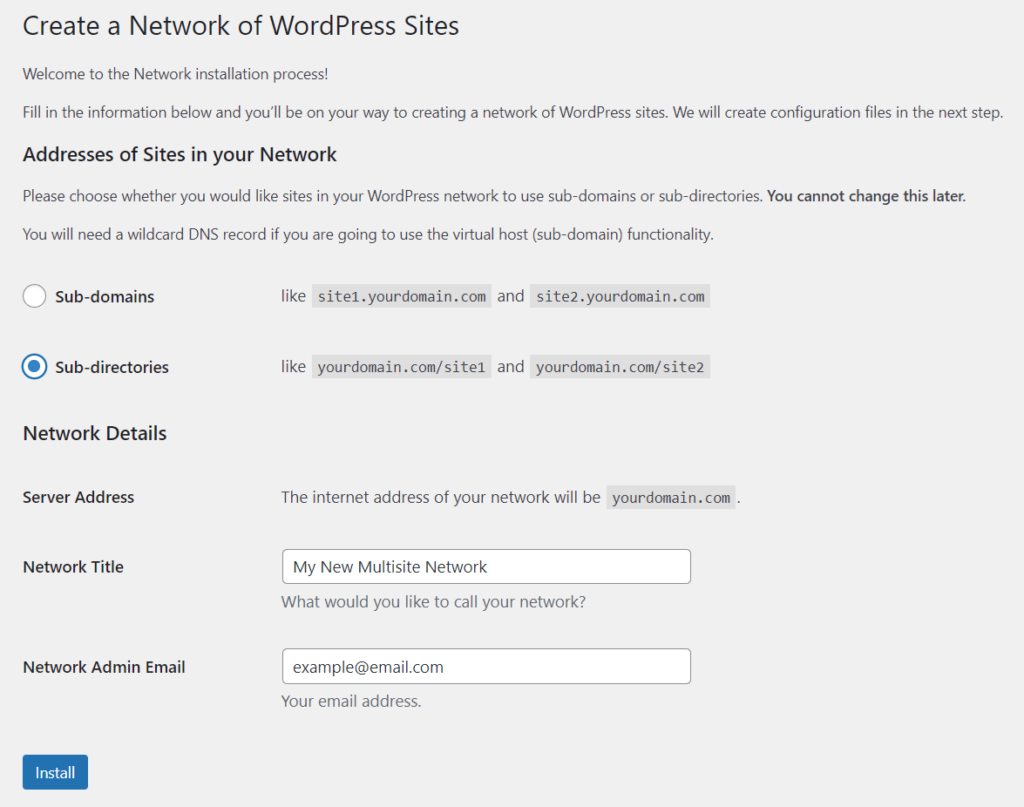
Choose whether you want to use subdomains or subdirectories for the WordPress sites in your network:
Subdomains. The websites will use addresses that look like “site1.yourdomain.com” and “site2.yourdomain.com”. You will need to change your domain mapping DNS settings for this option.Subdirectories. The websites will use addresses that look like “yourdomain.com/site1” and “yourdomain.com/site2”.Be sure to choose the right option because you won’t be able to change this later. In this tutorial, we will select Subdirectories .
Next, enter the Network Title and Network Admin Email. Click Install .
During the next step of the WordPress multisite installation process, you will be asked to add two additional code snippets to the wp-config.php and .htaccess files. Don’t forget to back up both files before making any changes.
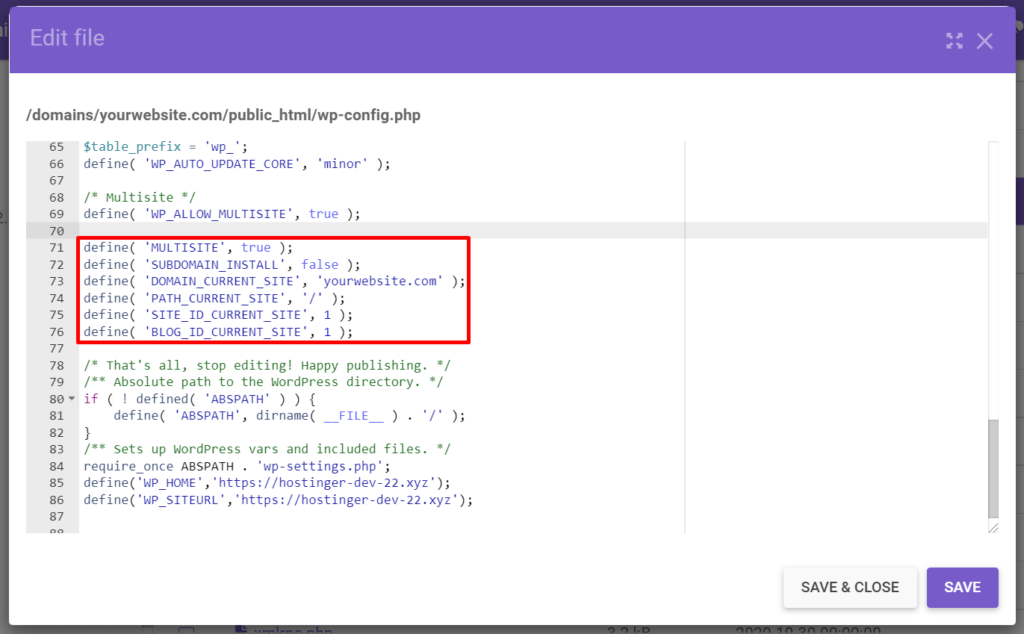
Open the File Manager and locate the wp-config.php file. Paste the following code snippet before the line reading /* That’s all, stop editing! Happy publishing. */:
define( 'MULTISITE', true );
define( 'SUBDOMAIN_INSTALL', false );
define( 'DOMAIN_CURRENT_SITE', ‘yourwebsite.com' );
define( 'PATH_CURRENT_SITE', '/' );
define( 'SITE_ID_CURRENT_SITE', 1 );
define( 'BLOG_ID_CURRENT_SITE', 1 );
Save the changes.
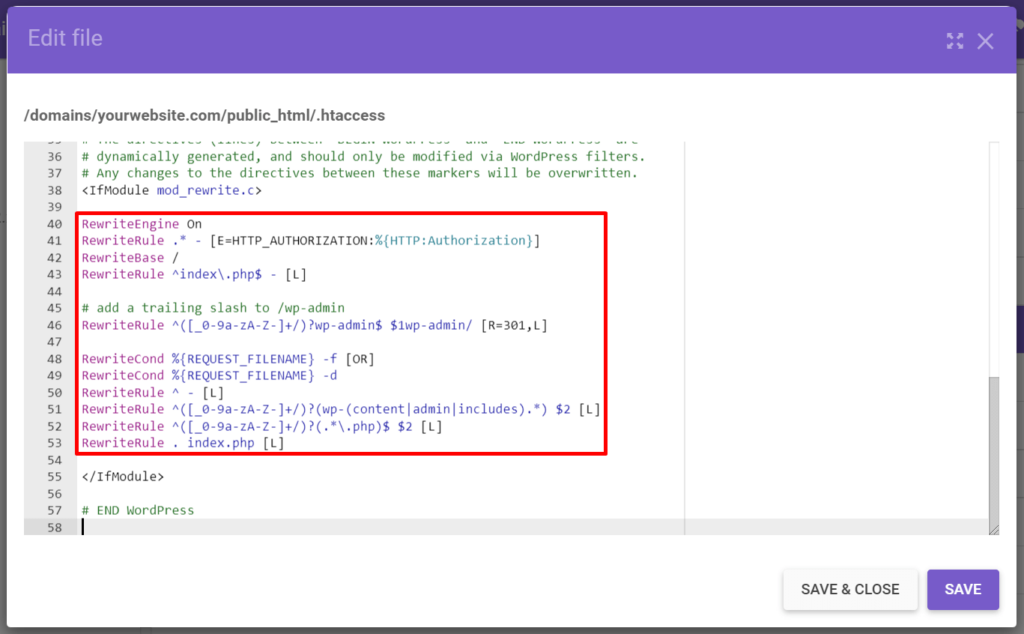
Next, locate the .htaccess file. Replace the existing rules with the following code:
RewriteEngine On
RewriteRule .* - [E=HTTP_AUTHORIZATION:%{HTTP:Authorization}]
RewriteBase /
RewriteRule ^index\.php$ - [L]

# add a trailing slash to /wp-admin
RewriteRule ^([_0-9a-zA-Z-]+/)?wp-admin$ $1wp-admin/ [R=301,L]

RewriteCond %{REQUEST_FILENAME} -f [OR]
RewriteCond %{REQUEST_FILENAME} -d
RewriteRule ^ - [L]
RewriteRule ^([_0-9a-zA-Z-]+/)?(wp-(content|admin|includes).*) $2 [L]
RewriteRule ^([_0-9a-zA-Z-]+/)?(.*\.php)$ $2 [L]
RewriteRule . index.php [L]
Save the changes.
To access the WordPress multisite dashboard, you’ll have to log in again.
Tips and Tricks to Manage a WordPress Multisite This section will go over the management of WordPress multisite, including configuring network settings, adding new sites, setting up themes and plugins, adding or removing users, and assigning roles.
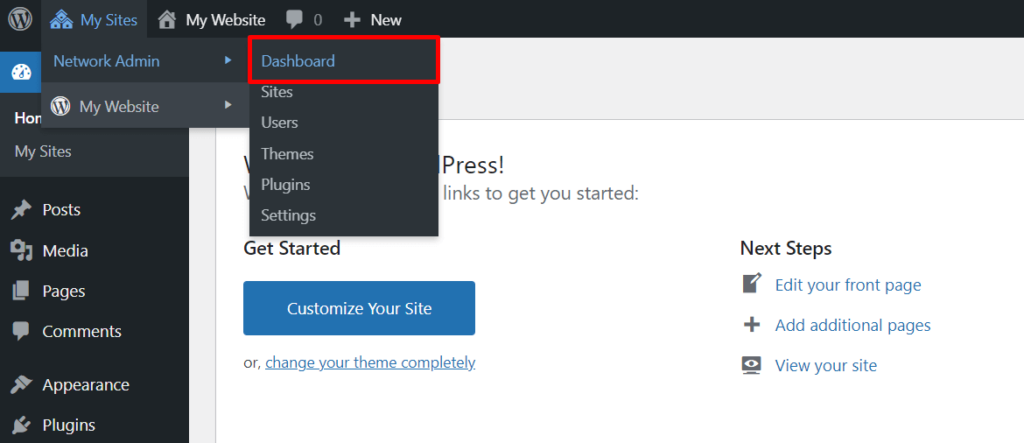
Get to Know WordPress Multisite Configurations and Settings Upon completing the WordPress multisite installation, a new menu titled My Sites will appear on the main site’s dashboard. To access the network admin screen, go to My Sites -> Network Admin -> Dashboard .
To access the network settings screen as the super admin, go to Settings -> Network Settings .
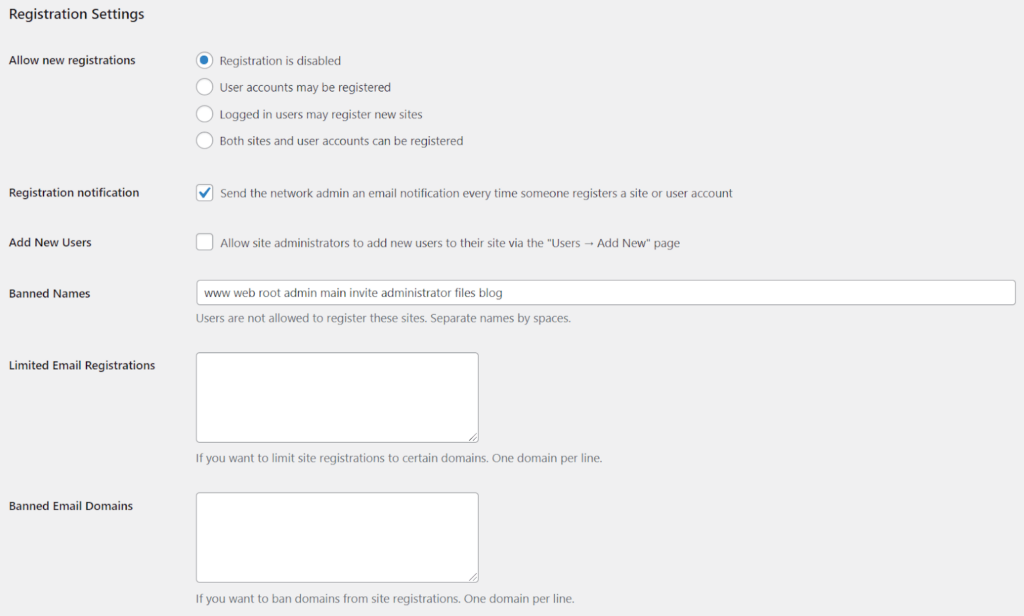
Registration Settings
These settings modify rules related to user registrations.
Allow new registrations . You can allow people to register as users on your network and create their own sites. Registration notification . Receive email notifications whenever users create accounts and websites. Add New Users . Allow site admins to add new users to their site.Banned Names . Enter words that are not allowed as website names, separated by spaces.Limited Email Registrations. Enter domains that you’d like to limit from registering websites.Banned Email Domains. Enter domain names that you want to prohibit from registering websites.New Website Settings
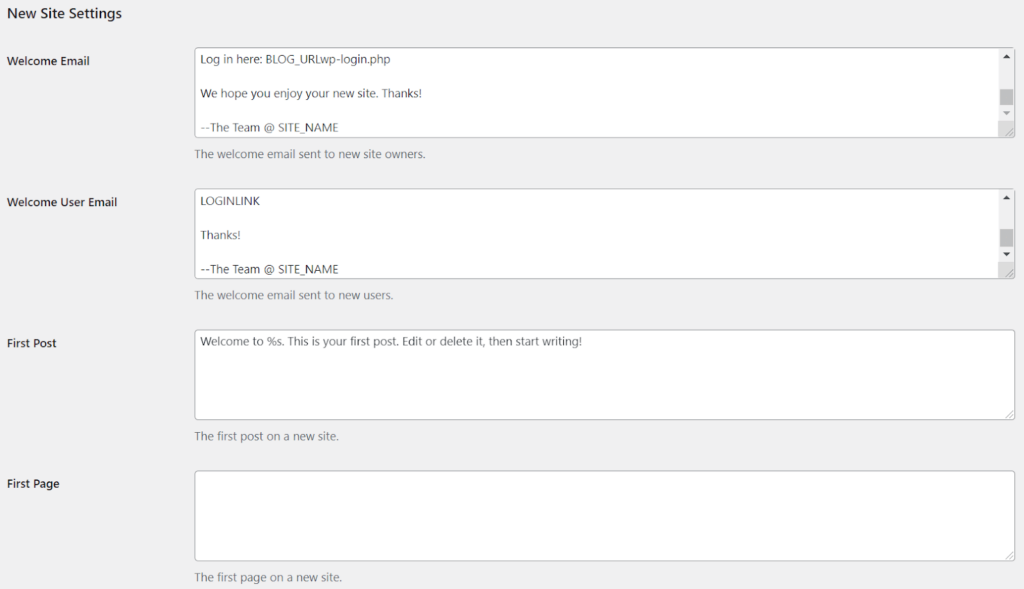
This set of settings lets you customize the welcome email message for new users and the “default” or “example” first posts on new sites.
Upload Settings
These settings modify rules related to file uploads on the multisite network.
Site upload space. To limit the total size of all files uploaded to one website, select and enter a value in MB .Upload file types. Enter the file extensions that are allowed to be uploaded on the network. Separate each file extension by spaces.Max upload file size. Enter the maximum size of each file upload in KB .Language Settings
Here, you can choose the default language for all the sites in your network.
Menu Settings
If you select Enable administration menus , website admins will have the option to activate and deactivate plugins on their own site.
Keep in mind that they still won’t be able to add new plugins – only you, as the super admin, can do this.
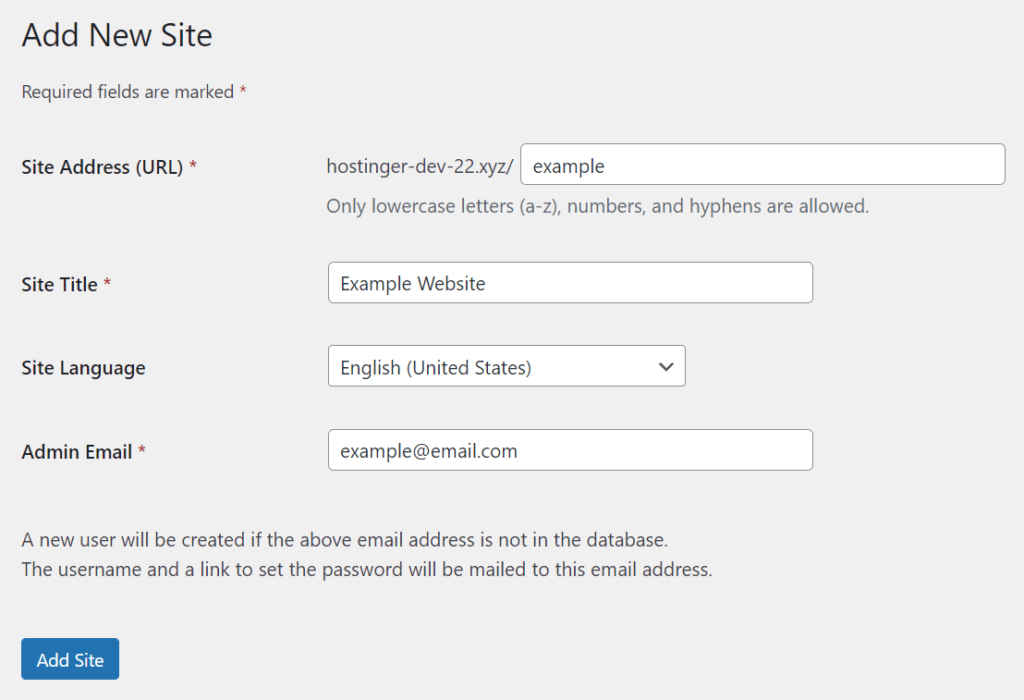
Add a New Website To add new sites as the super admin:
From the network dashboard, go to the Sites screen -> Add New . Fill in the required fields. Click Add Site . Set Up Themes and Plugins In this section, you will learn how to set up plugins and themes on WordPress multisite.
Setting up a Theme
The theme installation process is similar to how you would do it on a standard WordPress site. However, only the super admin can install new themes on the network. Here’s how to do it:
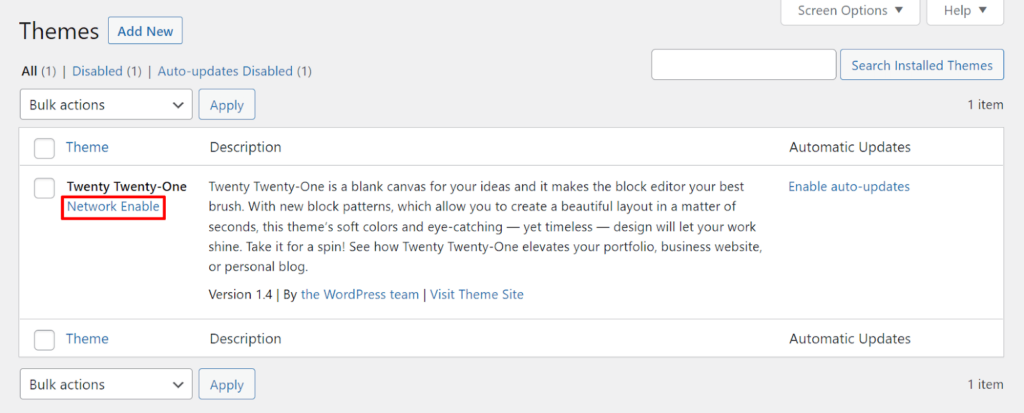
From the multisite dashboard, go to Themes -> Add New . Choose a theme and Install it. Return to the Themes main page. Underneath the theme name, you will see the option to Network Enable it. This option will activate the theme on all the sites in your network. Alternatively, here’s how to enable a theme for a specific site only:
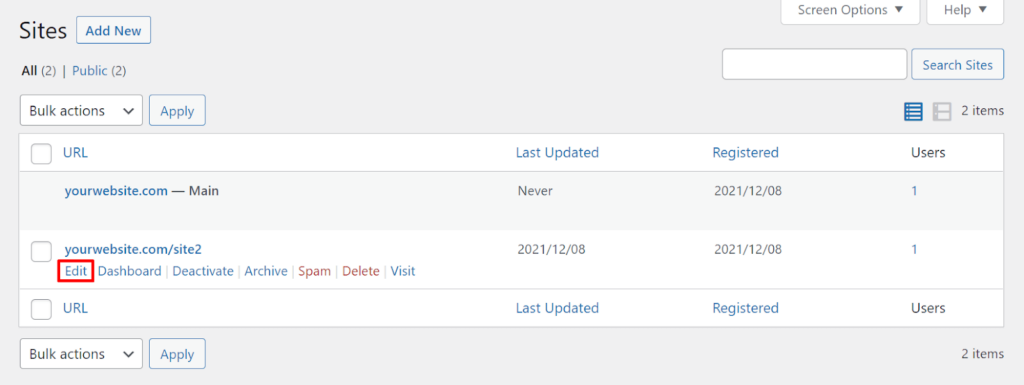
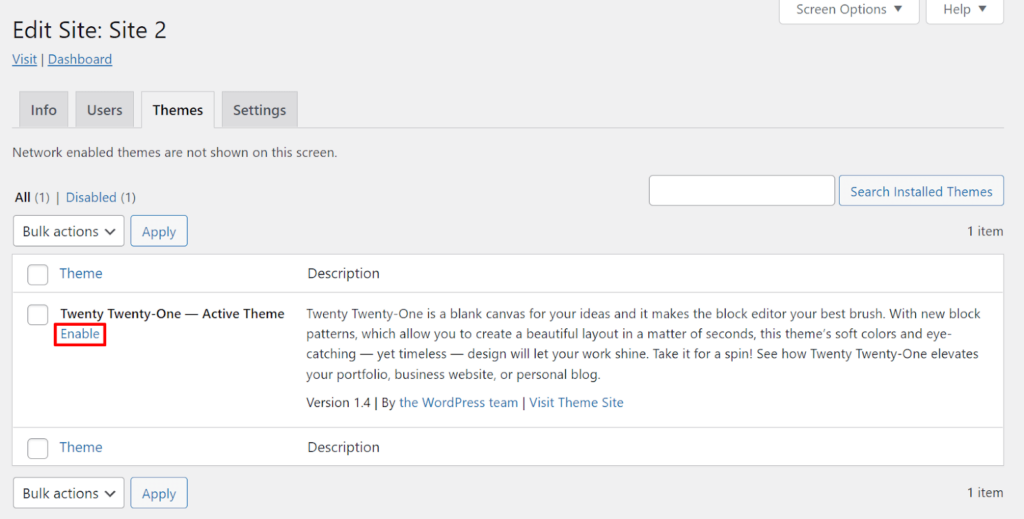
From the network dashboard, navigate to the Sites link. Find the website to which you want to apply the theme and click Edit underneath its name. Select the Themes tab. Find the theme you want to apply and click Enable . Enabling a theme on a particular website will let the site admin choose to activate it. Any theme that isn’t enabled won’t show up as an option to the site admin.
Setting up a Plugin
Installing a plugin on a multisite network is similar to doing it on a standard WordPress site, as well. Follow these steps to do it:
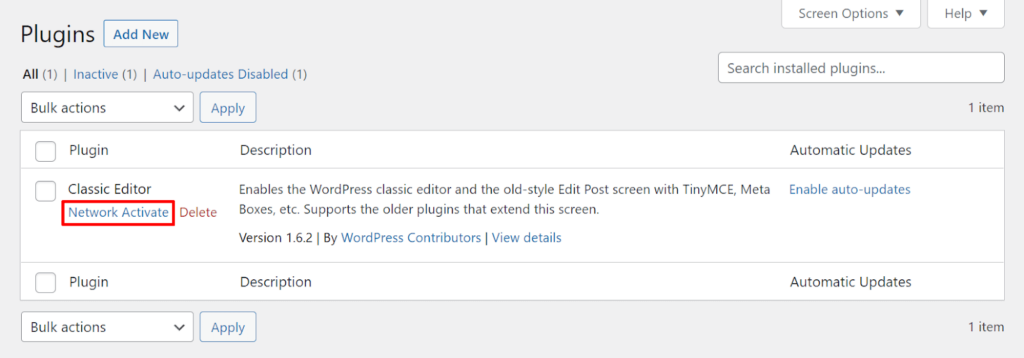
Go to Plugins -> Add New from the network dashboard. Choose a plugin and Install it. Return to the Plugins main page. Underneath the plugin name, you will see the option to Network Activate it. This option will activate the plugin on all the sites in your network. If you choose not to network enable a plugin, the site admins will be free to decide whether they want to activate the plugin on their site or not.
Add or Remove Users and Assign Roles As the Super Admin or Network Administrator
To manually add a new user:
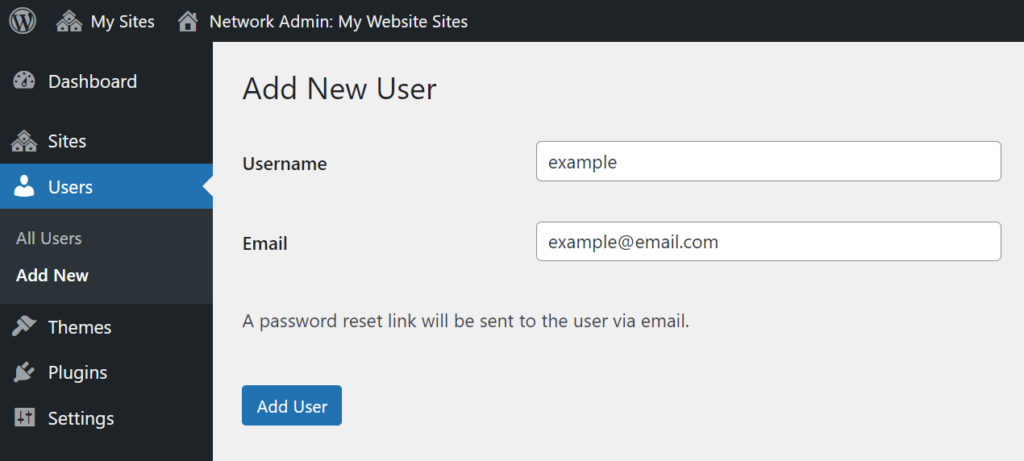
From the network dashboard, go to Users -> Add New . Enter the Username and Email of the new user. Select Add User . To allow users to register on their own:
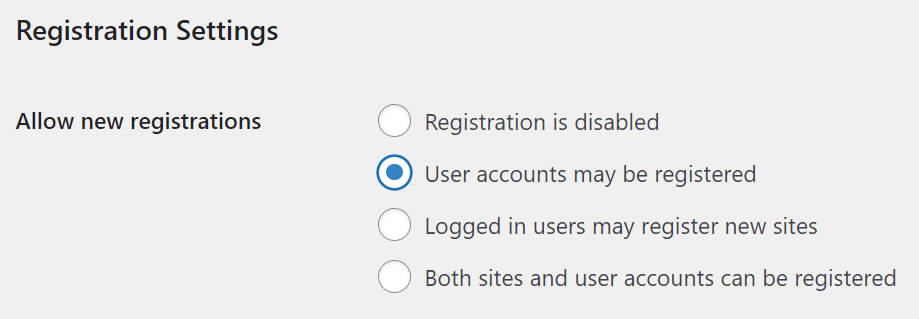
Go to Settings -> Network Settings . Under Registration Settings , find the Allow new registrations configuration. Depending on your preference, choose User accounts may be registered, or Both sites and user accounts can be registered . Click Save Changes . To allow site administrators to add new users to their websites:
Go to Settings -> Network Settings . Under Registration Settings , find the Add New Users . Select Allow site administrators to add new users via the “Users → Add New” page . Click Save Changes . To assign a new role to a user:
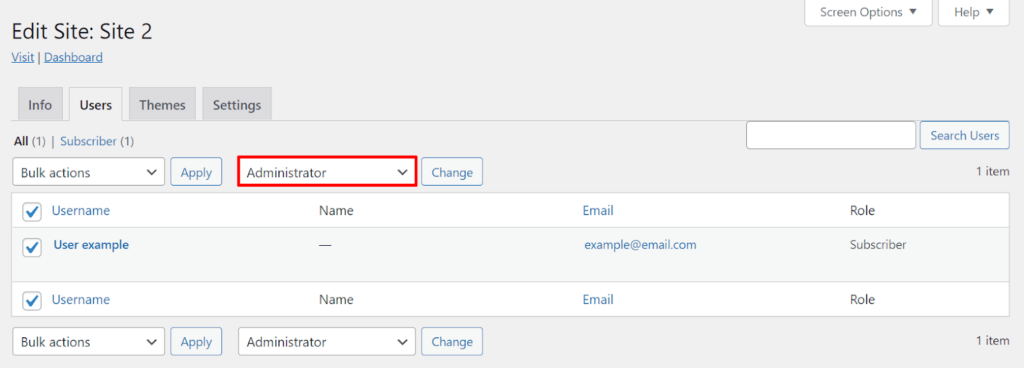
Go to Sites to open the site settings screen. Find the website you want to assign a user to and click Edit . Switch to the Users tab. Find the user you want and check the box before their username. Select a new role for the selected user from the second drop-down menu. In this example, we’ll assign the Administrator role to User example . Confirm the new role by clicking Change . As a Site Admin
To manually add a new or existing user:
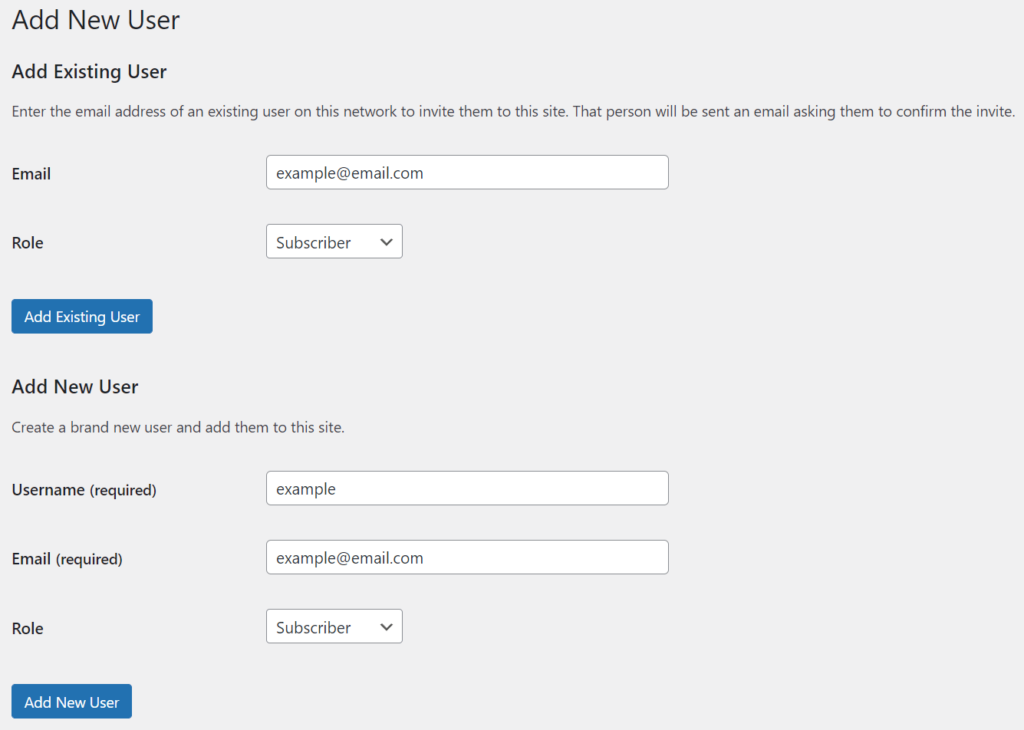
First, make sure that the super admin has enabled the option for site admins to add new users. Log in to the site admin screens and go to Users -> Add New . You’ll have the option to Add Existing User or Add New User . If the user you want to add is already a member of the network, fill in the fields below the former section. Otherwise, go for the latter. Choose the Role for the user from the drop-down menu. Finalize by clicking Add Existing User or Add New User . Remove a User
To remove a user, follow these steps:
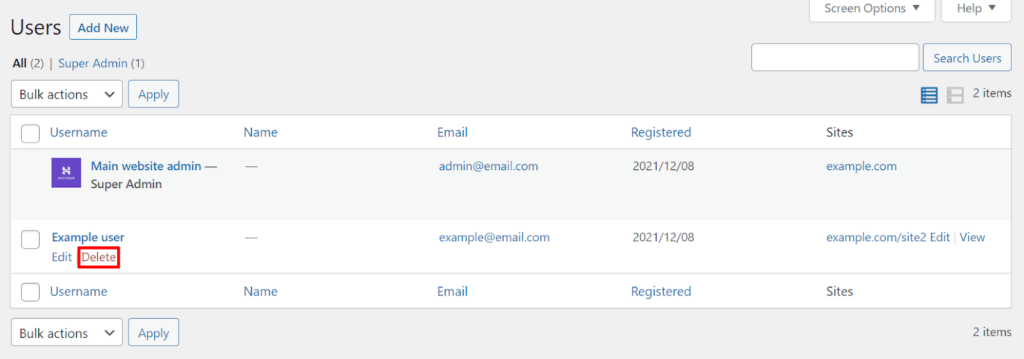
Go to Users -> All Users . Hover the cursor over the user you want to remove and click Delete . Choose whether you want to Delete All Content created by the user or Attribute All Content to another user. Click Confirm Deletion . Pros and Cons of WordPress Multisite and Who It Is Best For Read this section to find out whether WordPress multisite is going to be a good fit for your project.
When to Use a WordPress Multisite Here are some pros of using WordPress multisite:
Centralized multisite dashboard. Having a centralized system makes site creation and management easier and more time-efficient. For example, plugins and themes only have to be installed once and can be network-activated.Controlled freedom for users and site administrators. Site admins have some freedom to run their websites. The super admin can decide how much control they want to exercise over the sites in the network.Quick maintenance. The super admin can instantly perform maintenance tasks like data backups and software updates for multiple sites. Consistent brand identity. Having multiple sites in the same network will make it easier to establish and maintain consistent branding.Here are some examples of how users use WordPress multisite:
Blogging platforms Personal sites University, school, or business sites with multiple divisions eCommerce websites selling various products Any big website that benefits from being broken up into smaller sections When Not to Use a WordPress Multisite Here are some cons of using WordPress multisite:
Theme and plugin incompatibility. Some plugins and themes may not support WordPress multisite. Read the plugin or theme’s description carefully before installing it.Hosting incompatibility. Basic hosting plans are incompatible with WordPress multisite. Consider upgrading your hosting to meet its needs and ensure the best performance.Problem sharing. If a website in a multisite network encounters an issue, it’s likely to affect other sites in the network as well. For example, if one site is experiencing high traffic, it will negatively impact the performance of the other sites as well.Security risks. Unfortunately, a centralized system can mean bigger security risks. If one site is compromised, the other sites will be in danger of being breached too. Therefore, WordPress multisite is not recommended for:
Users with limited hosting resources Websites that prioritize performance and security Managing multiple sites that use different hosting servers – a management tool like ManageWP Best Plugins for WordPress Multisite This section will explore some of the best plugins to enhance WordPress multisite.
Elementor Stats:
Downloads: 5,000,000+Rating: 4.7/5Notable Features: Multiple design features, 100+ pre-designed templates and blocks, 40+ free widgetsBest Suited For: Users who want to design their website without codingPrice: $0-999/year Elementor
All you have to do is install and activate the plugin and create a new page using the editor. However, before you do, make sure your theme supports Elementor.
Elementor Pro, starting at $49/year , includes advanced features, such as 300+ pro templates, motion effects, and premium customer support. That said, you will need a separate license key for each site on the network.
User Switching Stats:
Downloads: 200,000+Rating: 4.9/5Notable Features: Full password protection, strictly for super admins, cookie authentication system utilizationBest Suited For: Test environmentsPrice: FreeUser Switching
Activating the User Switching plugin will modify the Users page in the WordPress admin dashboard. A new link Switch To will appear alongside each username. Clicking it will let the super admin instantly switch to the chosen user account.
This free plugin is excellent for users working in a test environment or those who prefer having control over their user accounts.
Multisite Enhancements Stats:
Downloads: 100+Rating: 4.4/5Notable Features: Blog and user ID in network view, active plugins and themes information in network view, “Add New” link under the Plugins menu in the network dashboardBest Suited For: Any WordPress multisite super admin looking for additional efficient management featuresPrice: FreeMultisite Enhancements
Once you have installed and activated this free plugin, go to your network admin screens. Then, to change the default settings, navigate to Settings -> Multisite Enhancements .
Yoast SEO Stats:
Downloads: 5,000,000+Rating: 4.8/5Notable Features: Automated technical SEO improvements, Google search results preview, SEO analysis toolBest Suited For: Any website that wants to rank higher on search engine results pagesPrice: $0-89/year Yoast SEO
Once installed and activated, Yoast SEO will automatically improve the technical SEO of the website. When writing a new post, you will see the Yoast SEO analysis tool. This tool analyzes the SEO performance of your writing and offers suggestions to improve it in real-time.
Remember that you can use one Yoast SEO license for multiple sites on the same WordPress installation that uses subdirectories. If your WordPress network uses subdomains instead, you’ll have to get a separate license for each website
While the free version of Yoast SEO has the essential features, the premium version, which costs $89/year , adds advanced functionality such as internal linking suggestions, social sharing previews, and synonym and related keyphrase suggestions.
Smush Stats:
Downloads: 1,000,000+Rating: 4.8/5Notable Features: Image lazy loading, lossless image compression, bulk optimizationBest Suited For: Websites with a lot of imagesPrice: $0-5/month Good image optimization is important for any website – otherwise, its performance may suffer. Smush
Once activated, Smush will detect all the images on your website and automatically optimize them without sacrificing quality. A new Smush menu on the admin dashboard will let you change its settings.
This freemium plugin fully supports WordPress multisite. Users can optimize all images on the network or set up optimization settings for individual sites.
If you upgrade to Smush Pro for $5/month , you’ll unlock features such as 10 GB Smush CDN, 2x better compression, WebP conversion, and 24/7 support.
Wordfence Security Stats:
Downloads: 4,000,000+Rating: 4.7/5Notable Features: Web application firewall, security scanner, login securityBest Suited For: Any website that values securityPrice: $0-99/year Wordfence Security
Its core features include the firewall, which blocks malicious traffic, the security scanner, which checks the website files and database for abnormalities, and two-factor authentication, which protects websites against brute force attacks.
Wordfence Security fully supports WordPress multisite. Once network-activated, the plugin can scan the whole network for malware with a single click.
If you upgrade to the premium version of Wordfence Security for $99/year , you’ll get advanced features, including real-time IP blocklist, premium support, country blocking, and more frequent security scans.
Conclusion WordPress multisite is a powerful feature that lets users create and manage multiple websites using a single WordPress installation.
In this tutorial, you have learned how WordPress multisite works, how to create one, and several tips and tricks for running it. We have also explained its pros and cons and listed the best plugins you should use to get the most out of WordPress multisite.
We hope this tutorial helps you start your own WordPress multisite. Best of luck!


Bappu Acharjee
I have never seen detailed & useful posts about WordPress like Darrel wilson.
Best of luck……
Ankur
Remarkable article, straight up to the point.
Keep it up!
JulianJealp
tor markets links darknet drug market
Robertdig
darkweb marketplace tor market url
Zacharygralp
darkmarket tor darknet
Michaellum
tor dark web dark web market list
Corryfieds
bitcoin dark web darkweb marketplace
Jamesdem
drug markets onion tor markets
Jamesatons
darknet sites dark web markets
Michaelvok
dark market darkmarket