If you’ve been running your website for a while, you probably have hundreds of images in your WordPress media library. While images can improve your website and make your content more shareable, the bad news is that WordPress creates several versions of your images in different sizes. This can quickly clutter up your media library which makes it hard to find an image and reuse it later on.
The good news, though, is that you can easily bring order to this chaos and organize your WordPress Media Library. In this post, I’ll explain why organizing your WordPress library is necessary and how you can do it with the help of WordPress Media Library Folders plugin.
Three Reasons Why You Need to Organize Your WordPress Library
There are several reasons why you need to organize your media library within WordPress.
1. You’ll have an easier time finding images
As mentioned earlier, when your library is organized, you’ll be able to quickly find images you need. Instead of waiting for the search feature to complete your request, an organized library makes it easy to locate image no matter how long ago you uploaded it to your site.
2. You can get rid of images you don’t need
As you’re organizing your WordPress media library, you may come across images that are no longer relevant. For example, maybe you’ve deleted posts that no longer align with your niche or perhaps you’ve stopped selling a certain product. Organizing your library allows you to easily get rid of images you don’t need. This helps free up disk space and reduces the burden on your server. In the end, you get a faster loading website.
3. You’ll have an easier time optimizing your images for SEO
Lastly, an organized library makes it easy to go through all your images and optimize them for SEO. You can add necessary alt tags and make sure all of the images are named properly without worrying about whether you’ve missed some.
How to Organize Your Media Library with WordPress Media Library Folders
You can organize your WordPress Media Library with a handy plugin called WordPress Media Library Folders. As the name suggests, this plugin allows you to organize all the images on your site into logical folders. Here’s how it works.
Organizing Your Media Library With WordPress Media Library Folders Plugin
To get started with WordPress Media Library Folders, you need to install and activate the plugin. Go to your WordPress dashboard and then navigate to Plugins > Add new. Search for the WordPress Media Library Folders plugin, install and activate it.
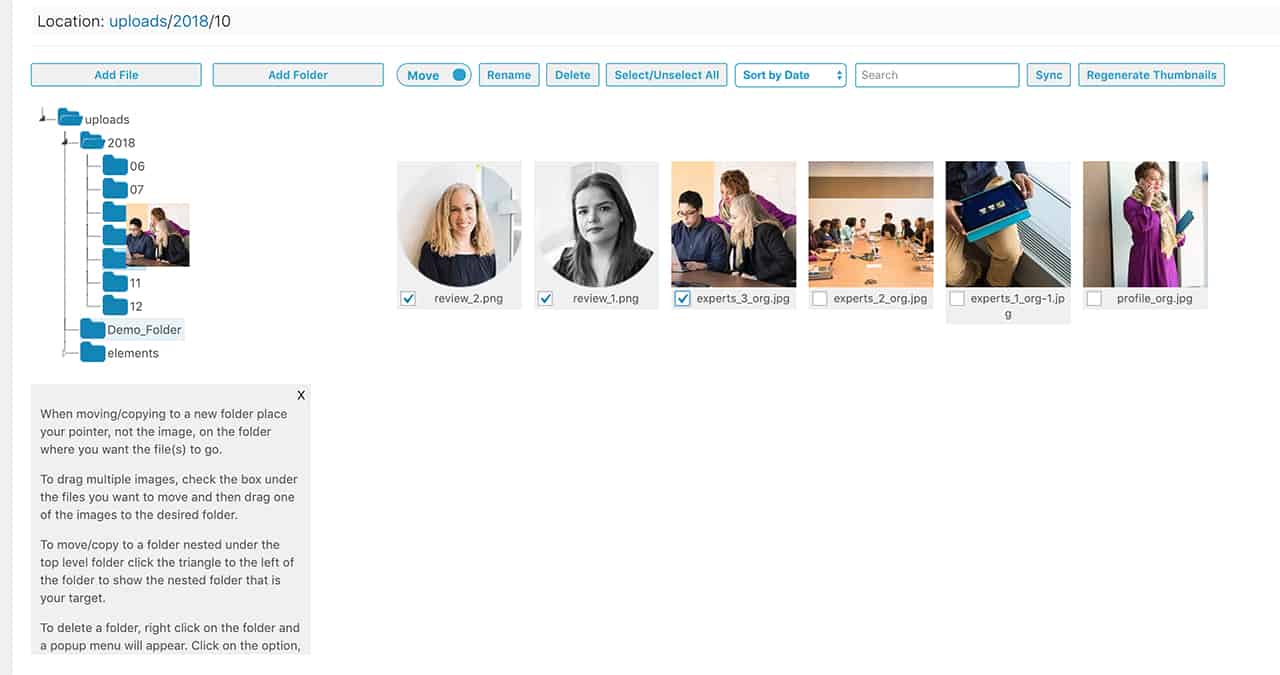
Once the plugin has been installed, you’ll notice there is a new menu item in your sidebar called Media Library Folders. Clicking on it loads a new screen that allows you to start organizing your media library.
As you can see from the screenshot below, you’ll see the default folders that WordPress uses. Here, you can click the Add a new folder button, name your folder, and click the Create New Folder.

By default, the new folder will be created within the uploads folder. To move images to it, follow these steps:
- Click on a specific month’s folder to open it and see all the images
- Check the box next to the images you want to move to the newly created folder
- Drag the image to the new folder
You can also move multiple images at once and copy images to different folders. The only thing you have to keep in mind is that the folder names cannot contain spaces.
Using this interface, you can also rename your images. To do so, select the image you want to rename, click the Rename button in the top menu, enter a new name then click the Rename button next to the name field. Similarly to the folder rules, image names cannot contain spaces but you can uses dashes to separate the words.
You can easily delete newly created folders by right-clicking the folder and selecting Delete folder from the popup menu.
Optimizing Images for SEO With WordPress Media Library Folder
By now, you probably know how important it is to optimize your images for SEO. WordPress Media Library plugin makes this task a little easier. Once you enable this feature, your images will automatically be named according to the rule you set in the plugin’s settings.
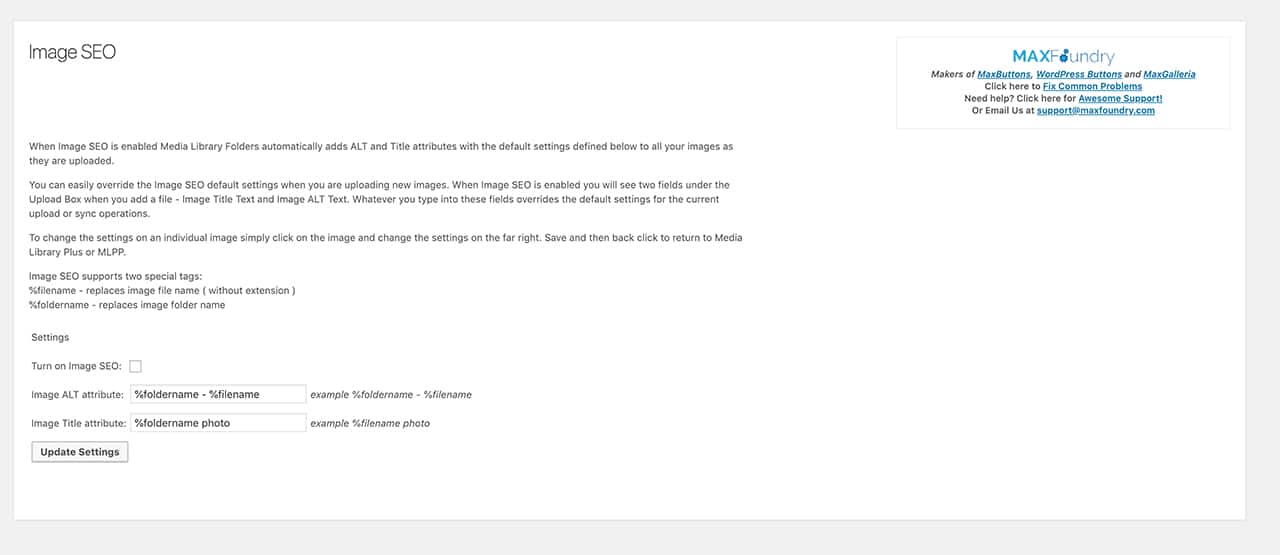
This means you never have to worry about forgetting to add alt tags and making sure images names are optimized for the search engines.
WordPress Media Library Folders Pros and Cons
Now that we’ve covered the main features of WordPress Media Library Folders plugin, let’s go over its pros and cons.
WordPress Media Library Folders Pros
When it comes to pros, WordPress Media Library Folders has several advantages:
- Makes it easy to organize all the images in your media library into folders that make sense to you
- Comes with a simple drag and drop interface
- Allows you to optimize your images for SEO automatically on upload so you don’t have to worry about it
WordPress Media Library Folders Cons
WordPress Media Library Folders has a couple of cons which include:
- It uses a separate interface than the default media library which means you need to remember to go to the plugin’s admin area when you want to reuse images
- It doesn’t allow you to use spaces in images or folder names
Despite that, WordPress Media Library works great and makes organizing images a breeze.
WordPress Media Library Folders Pricing
WordPress Media Library Folders can be downloaded for free from the official plugin repository. The basic features described in this post are available for free and will probably be enough for most website owners.
However, it’s worth mentioning that there is a pro version of the WordPress Media Library Folders plugin. The Pro version ads more features which include:
- The ability to use WordPress Media Library Folders within post and page editor for adding images to posts and pages
- Integration with NextGen Gallery plugin
- Support for WordPress Multisite and WooCommerce Product Gallery
- The ability to categorize your media folders with categories
- And more.
The pricing for the Pro version of the plugin is as follows:
- $29 for a single site license along with a year of updates and support
- $79 for the ability to install the plugin on up to three sites and a year of updates and support
- $119 for unlimited websites and a year of updates and support.
Final Thoughts
Organizing your WordPress media library is a great way to quickly find images and help your site load faster. If you’re looking for an easy to organize your library and get rid of images you no longer need, give the WordPress Media Library Folders plugin a try. You can create folders that allow you to put similar images together or you can create a separate folder for each post or page on your site.
Another benefit of WordPress Media Library Folders is the ability to enable automatic SEO settings which is a nice time-saver when it comes to optimizing your images for SEO.
All things considered, even the free version of the WordPress Media Library Folders plugin does an excellent of making the default WordPress Media Library easier to manage.